Couchbase with Windows and .NET - Part 1
Editor’s note: The following post was written by Visual Studio and Development Technologies MVP Matt Groves as part of our Technical Tuesday series with support from his technical editor, Visual Studio and Development Technologies MVP Travis Smith .
In this three-part series, we’re going to look at the basics of interacting with Couchbase for .NET developers on Windows. We’ll start with the basics, and build towards a "vertical" slice of a complete ASP.NET MVC app on the .NET 4.x framework. For a deeper dive, please check out my blog posts on Couchbase and the Couchbase Developer Portal.
In this first part, we’ll install Couchbase Server and go over the basics of how it works.
In the second part, we’ll look at using ASP.NET with Couchbase Server.
In the final part, we’ll implement all the CRUD functionality in an ASP.NET application.
Installing Couchbase Server
Let’s start with the easiest part:
Download and install Couchbase Server.
Windows 10, Mac OS X and Linux packages are all available. Go to the Downloads page on the Couchbase website. We’ll use the Enterprise Edition for this blog post. Let’s proceed with a Windows 10 installation.
Run the downloaded installation file, and go through a 4-step wizard.
At this point, Couchbase should be running as a Windows Service (verify by opening services.msc).

We’ll automatically be taken to the Couchbase Console via web browser to customize the Couchbase setup. We can always return to this console via https://localhost:8091.
Click "Setup" to start the configuration wizard. Let’s stick with the default settings (mostly) for now.
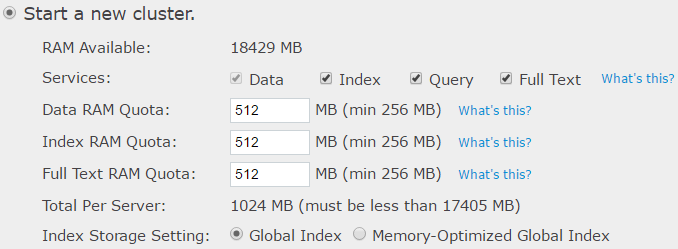
- In step 1, we need to specify how much RAM to give to Couchbase. It might be a good idea to dial down some of the default RAM Quotas (we can always change them later). Since we only need the one node for development, let’s enabled all services on this node (Index, Query, and Full Text). I would recommend checking out some of the free Couchbase training available to dive deeper into tweaking these settings.
- In step 2, we can choose to install some sample data. For this blog post, we don’t need to do this. However, the "travel-sample" is useful for trying out some of the N1QL functionality (more on that later).
- In step 3, let’s create a "default" bucket, to follow along with this blog post.
- In step 4, we can elect to receive notifications from Couchbase and register the product.
- Finally, in step 5, we need to enter a username and password to create an administrator account.
Now we’re ready to start using Couchbase. On the "overview" page, we can see how much RAM is available to Couchbase, and how much is actually in use. If we wanted to scale out Couchbase by adding servers, then we would see them listed in the Servers section. If we click on the "Data Buckets" tab, we’ll see that there’s at least the default bucket we created.
Feel free to play around with the Couchbase Console and check out the Couchbase Console documentation.
Some NoSQL lingo
But before we dive into some code, let’s go over some of the lingo with Couchbase. It’s not a difficult tool to use, but it is different from RDBMS systems like SQL Server.
Node
A node is an invidual machine that is running Couchbase Server.
Cluster
Nodes are joined together into a cluster that act in concert to provide scaling and improved availability. Scaling: more nodes means more RAM and disk space. Availability: if one node goes down, the cluster will continue to function. As developers, we don’t generally have to worry about node management and clustering in code: it’s all handled by Couchbase and the Couchbase .NET SDK.
Bucket
A bucket is a place to store documents. Each document has a key. Within a bucket, each key must be unique. Typically, a single bucket corresponds to a single application. The documents within a bucket do not have to be similar at all. We could store a document that contains information about a user, and a document with information about a building, both in the same bucket.
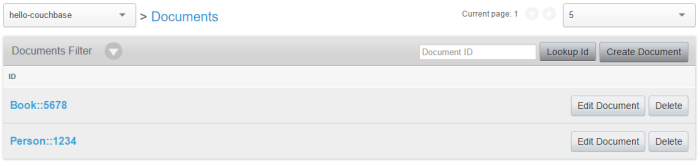
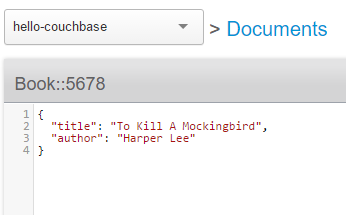
Document
In a basic sense, a Couchbase bucket is a giant Dictionary<string,string>. Each entry in a bucket consists of a key and a document. Documents consist of JSON. Because Couchbase uses JSON documents, it’s called a "document database".
N1QL
With Couchbase Server, we can write queries in a language called N1QL (N1QL stands for "Non-first Normal Form Query Language, pronounced "nickel"). N1QL is a superset of SQL. This means that, basically, if you know SQL, then you know N1QL. An example:
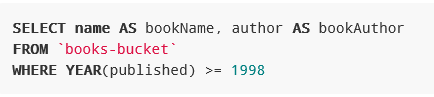
That will return something like:

As we’ll see later, the Linq2Couchbase library leverages N1QL into a LINQ provider that is similar to Entity Framework, NHibernate.Linq, etc.
Indexes Indexes in Couchbase are as important as in relational databases. Probably more so, because buckets contain a variety of documents.
To enable N1QL queries on a bucket, we need to at least create a primary index. This is an index on the bucket itself. Here’s how to create one with 
We can create indexes based on the fields in the documents. For instance, if we have a lot of documents that have "name" or "author" fields, and we end up querying based on this fields often, we can create indexes for them. These are "secondary indexes." As the size of a bucket grows, so does the importance of indexing.
See you later!
Stay tuned for the next two blog posts in this series. Please leave a comment, ping me on Twitter, or email me (matthew.groves AT couchbase DOT com). I’d love to hear from you.

About the author
Matt is a guy who loves to code. It doesn't matter if it's C#, jQuery, or PHP: he'll submit pull requests for anything. He has been coding ever since he wrote a QuickBASIC point-of-sale app for his parent's pizza shop back in the 90s. He currently works as a Developer Advocate for Couchbase. His free time is spent with his family, watching the Reds, and getting involved in the developer community. He is the author of AOP in .NET (published by Manning).