Creating Nuget Packages
Editor’s note: The following post was written by Windows Development MVP Houssem Dellai as part of our Technical Tuesday series.
Introduction
Nuget package is a tool that adds functionality into Visual Studio application projects.
The goal of this tutorial is to show how to create, test and publish nuget packages that can add files, folders, precompiled libraries (.dll) and even other existing nuget packages to Visual Studio projects. Sample code can be found on Github at https://github.com/HoussemDellai/social-media-templates/blob/master/Plugin.Youtube.nuspec.
You can also watch a video of Houssem demonstrating how to create nugget packages here on Microsoft Channel 9.
See it in action
When you do the following steps:
- Create a new project in Visual Studio (ex. Console Application)
- Right-click the project and select Manage Nuget Packages…
- Select Browse and search for Plugin.Youtube, click Install
Nuget Package Manager will add files and libraries to the project. The following steps describes the process to create such a plugin.
1) Create a nuspec file
Create a new project in Visual Studio, choose the one the nuget package will be installed in (ex. Console Application).
Download the nuget.exe from https://dist.nuget.org/win-x86-commandline/latest/nuget.exe
Copy the nuget.exe file to the root folder of the Solution.
Open Command Prompt, navigate to the location of your solution and type: nuget spec
This command will create a Package.nuspec file like this:
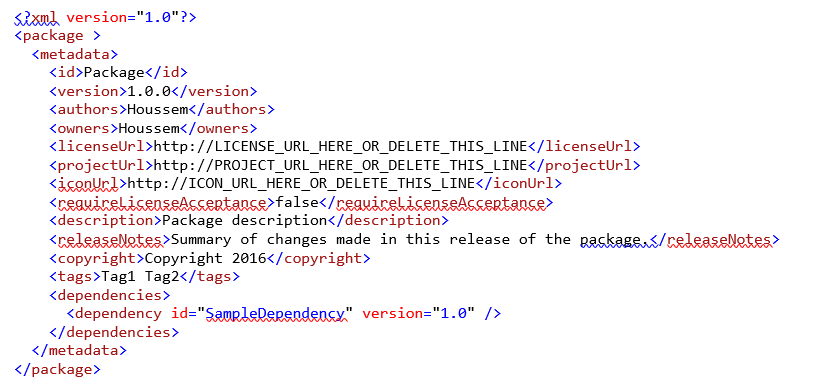
The following properties should be modified: id, authors, owners, licenseUrl, iconUrl, tags and dependencies
2) Add precompiled library (.dlls)
To add a precompiled library (.dll), you will need to add a new element before the closing package element:

The path specified in the src attribute, should start from location of the nuspec file. The target attribute should start with lib keyword
3) Add files
Adding a file (cs, html, txt, json, xml…) is similar to adding a dll, you will need to add a new element before the closing package element, except that the target should start with content:

Important notes:
- It is possible to add the Class1.cs file inside a folder with:

- It is recommended to add a readme.txt file that will be displayed automatically after installing the package, in order to help users to get started.
- Adding XAML files with code behind could be done using PowerShell (.ps1) scripts in order to make the xaml and xaml.cs dependent files.
- Projects based on project.json (ex. UWP) do not support adding files
4) Add an existing nuget package
The nuget package can reference other nuget packages (ex. Newtonsoft.Json). In this case, the packages should be added using the dependency element. The id is the official package’s id as written in nuget.org. A specific version could be specified using the version attribute.
Multiple packages could be added, each in one dependency element.
This method will add the referenced package to any type of project. If you want to add a specific package to only UWP project, for example, then you could use
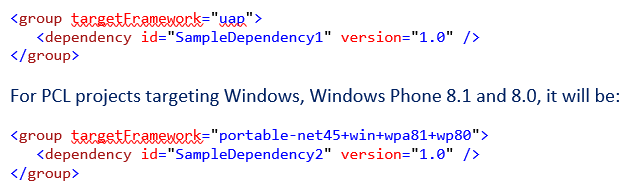
For PCL projects targeting Windows, Windows Phone 8.1 and 8.0, it will be:

5) Generate the nuget package
Open the command prompt, navigate to the nuspec file path, make sure you still have nuget.exe there and type the command: nuget pack Package.nuspec
That will generate the nuget package Package.1.0.0.nupkg.
6) Test the nuget package
The generated package is ready to be published, but it is highly recommended to test it before publishing.
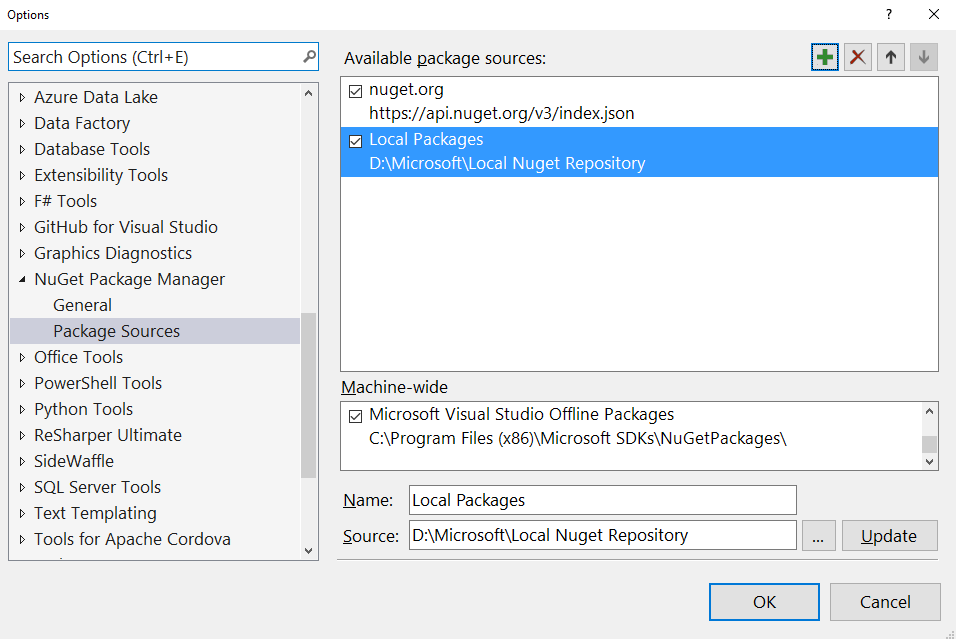
Visual Studio, be default, supports only packages published on nuget.org. As the generated package is not yet published, a new local source should be added to Visual Studio:
- In Visual Studio menu, select Tools -> Options
- Choose Nuget Package Manager -> Package Sources
- Click the green add button
- Choose a name and a source path where to put the generated packages
- Then hit OK
Then, when trying to add a new nuget package through Manage Nuget Packages, a new source is added:
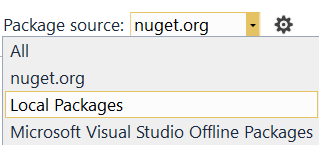
After copying the generated package to that source, they will be accessible and ready for testing. If everything works as expected (adds the files, dlls, other nuget packages), then the generated package is ready to be published.
7) Publish the package to nuget.org
Nuget.org is a shared source for public nuget packages. To publish the generated package:
- Create an account, if you don’t have one
- Go to https://www.nuget.org/packages/upload
- Click Choose File and navigate to the generated nuget package
- Hit Upload
- Verify the information that will be published, then click Publish
That’s it! The nuget package will now be available online for thousands of users!

About the author
Houssem is a software engineer, speaker and trainer. He writes articles and develops open source software in C#, WP8 and Win8. He also gives training sessions and speaks about Microsoft technologies.