Securing Windows 10 with BitLocker Drive Encryption
Editor’s note: The following post was written Office Servers and Services MVP Zubair Alexander as part of our Technical Tuesday series.
Windows 10 includes several security features. Perhaps one of the most important features is BitLocker Drive Encryption, which provides data protection in case of a loss or stolen device. It also provides security for decommissioned computers. BitLocker has been around for several years and can be used with Windows Vista, Windows 7 and Windows 8/8.1 operating systems. However, the focus of this article is on securing Windows 10 with BitLocker.
BitLocker Drive Encryption is built into the Windows 10 operating system and uses Advanced Encryption Standard (AES) with configurable key lengths of either 128-bit (default) or 256-bit (configurable using Group Policy). The idea behind the BitLocker Drive Encryption is that once you secure your drive, only you, or someone who has your password and recovery key, will be able to get to your data. Although this kind of protection provides enhanced security on mobile devices, such as laptops, there is no reason why you shouldn’t take advantage of BitLocker encryption on your desktop computers.
NOTE: BitLocker is not available on Windows 10 Home edition. It’s available on Windows 10 Pro, Enterprise and Education editions.
Unlike Encrypted File System (EFS) in previous Windows operating systems, BitLocker Drive Encryption encrypts your entire drive. This is much better than encrypting certain files or folders not only because of its ease but also because it offers a much higher level of security. By encrypting the entire drive, you can rest assured that all the files on your encrypted partition are protected.
In this article, I will share some insights into Windows 10 BitLocker Drive Encryption. I will walk you through step-by-step configuration of BitLocker on Windows 10 and also share some best practices.
BitLocker Requirements
It is important to understand the following BitLocker requirements before you implement BitLocker on your computer. These requirements are fairly minimal and an average user is likely to easily implement them on his/her computer.
Hardware
TPM v1.2 Chip - If you have a computer that you purchased in the last few years, chances are that it includes a Trusted Platform Module (TPM) chip. This is common on most laptops these days. To properly secure your Windows computer with BitLocker, Microsoft recommends you use TPM version 1.2 or later. If you are not sure whether your computer has a TPM chip, type tpm.msc in the Windows search box to load TPM Console. It will show you the TPM if it exists, otherwise you will see a message Compatible TPM cannot be found. Support for USB – Your computer must support booting from a USB flash drive. If you don’t have a TPM chip, you can still use BitLocker Drive Encryption with a USB flash drive. For example, if you have a Windows 10 desktop computer that doesn’t have a TPM chip, you can use the USB flash drive to save the BitLocker recovery key. You will insert the flash drive when the computer is started or resumed from hibernation and it will unlock the computer for you.
NOTE: BitLocker doesn’t support Dynamic Disks. Dynamic disks are very rare and if you don’t know what a dynamic disk is, chances are that you have not converted your Basic Disk to a Dynamic Disk.
Software
No Additional Software Required – BitLocker is integrated into the Windows operating system and therefore doesn’t require any additional software.
Partitions
Because pre-startup authentication and system integrity verification must take place on a partition other than the encrypted operating system drive, BitLocker requires that your computer has at least two partitions:
- An operating system partition (usually drive C) that is formatted with NTFS.
- A system partition that is at least 350MB. This is where Windows stores files needed to load Windows at boot. The system partition must not be encrypted and should also be formatted with NTFS for computers that use BIOS firmware and with FAT32 for computers that use UEFI-based firmware. This drive is often hidden in Windows Explorer. You can configure one or more partitions for your data (drive D, E, etc.) and enable BitLocker on them.
Administrative Access
You must have local Administrative rights to manage BitLocker on the operating system and fixed data drives. Standard users can only manage BitLocker on removable data drives.
Encryption Overhead
Unlike compression, which can cause a lot of disk fragmentation, BitLocker encryption doesn’t have the same impact on your computer. While there is some overhead due to encryption, it’s hardly a show stopper. With the advancement in computer hardware over the years, the central processing unit (CPU), hard drive, memory, and other components work so efficiently that the encryption overhead is minimal (less than 10%) and most people are unlikely to notice it. At my company, we use BitLocker on our desktop workstations and laptops and we haven’t experienced any noticeable performance hit. The way I look at it, even if there is a small price to pay in terms of performance overhead, securing your data with encryption is well worth it.
Step-by-Step Configuration
Here are the step-by-step instructions on how to turn on and configure BitLocker on your Windows 10 computer. If you are running Windows 10 Home edition, you won’t have the option to use BitLocker.
- Login to your Windows 10 computer.
- Right-click the Start button and select File Explorer. This was called Windows Explorer in previous Windows operating systems.
- Right-click the hard drive that you want to encrypt, e.g. drive C where the operating system is installed, and select Turn on BitLocker.
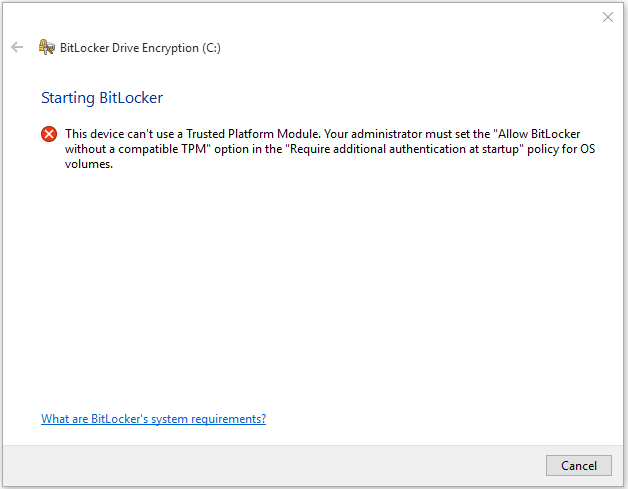
- If your computer doesn’t have a TPM chip you will see the following message. This device can’t use a Trusted Platform Module. Your administrator must set the “Allow BitLocker without a compatible TPM” option in the “Require additional authentication at startup” policy for OS volumes.
- You can modify the local group policy to allow BitLocker to encrypt the operating system drive on this computer even if it doesn’t have a TPM.
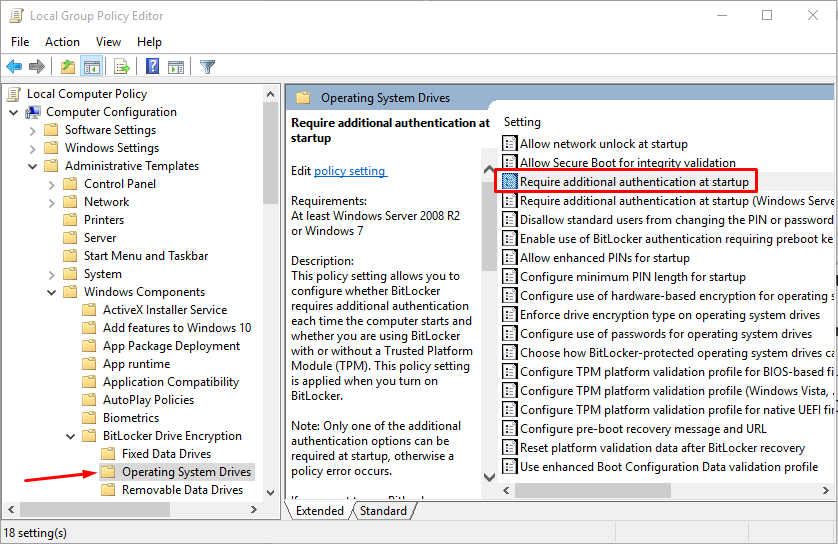
- In the Windows 10 Search box type gpedit.msc and press Enter to start the Local Group Policy Editor.
- Go to Computer Configuration -> Administrative Templates -> Windows Components -> BitLocker Drive Encryption -> Operating System Drives and in the right-hand pane double-click Require additional authentication at startup.
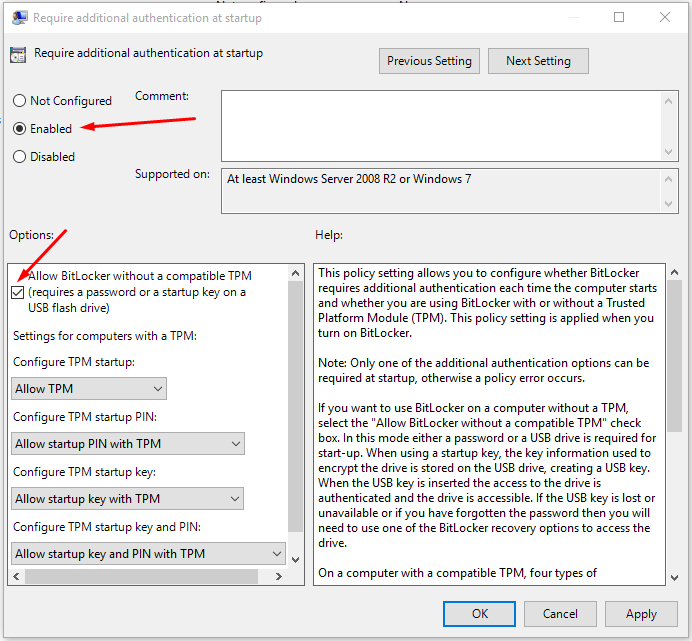
- Check the Enabled radio button and make sure that the box Allow BitLocker without a compatible TPM (requires a password or a startup key on a USB flash drive) box is checked. Then click OK.
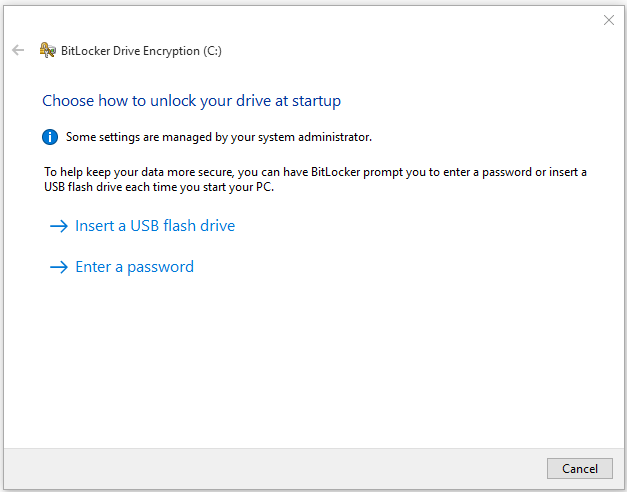
- Go back to the File Explorer, right-click drive C and select Turn on BitLocker.
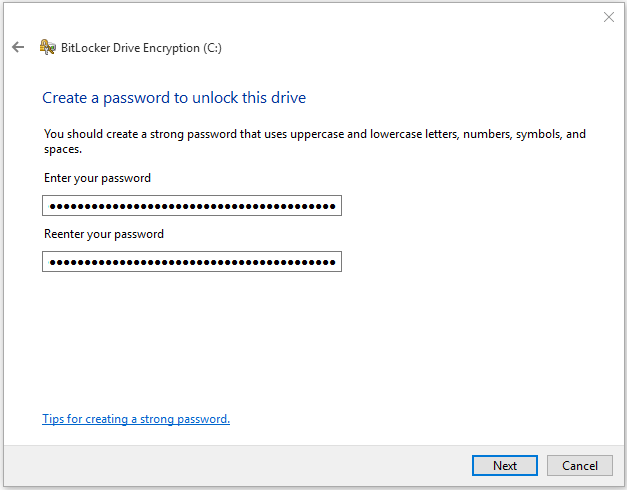
- This time it will allow you to turn BitLocker on. You are given a choice to either Insert a USB flash drive or Enter a password. NOTE: If you use a password to unlock your BitLocker-protected operating system drive, you won’t be able to remotely access the computer using remote desktop protocol (RDP) if it is rebooted for some reason, e.g. restarted after power outage.
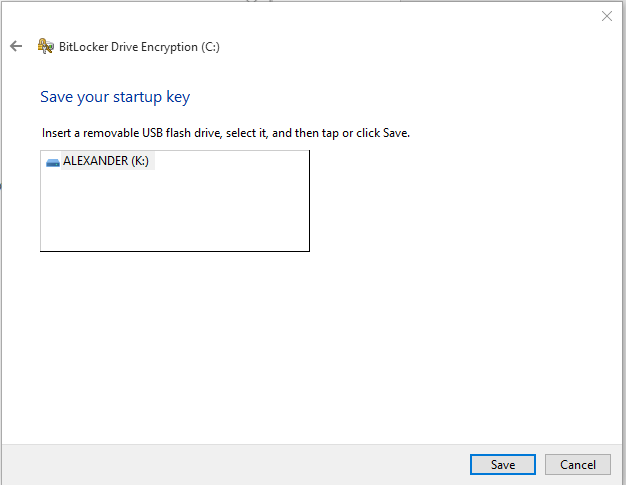
- If you choose the option to insert a removable USB flash drive, it will save the startup key on the USB flash drive. This will be used to unlock the operating system drive after each reboot. NOTE: Unlike the recovery key, the startup key is not a text file. It has the file extension .BEK.
- If you select the option to enter a password, you will enter the password and confirm it. Make sure you use a long, secure pass phrase. This password will be required each time the computer is rebooted.
- Next, you will be given several options for storing the recovery key. You can back up the recovery key to one of the following locations. a) Save to your Microsoft Account. b) Save to a USB flash drive. c) Save to a file. d) Print the recovery key.
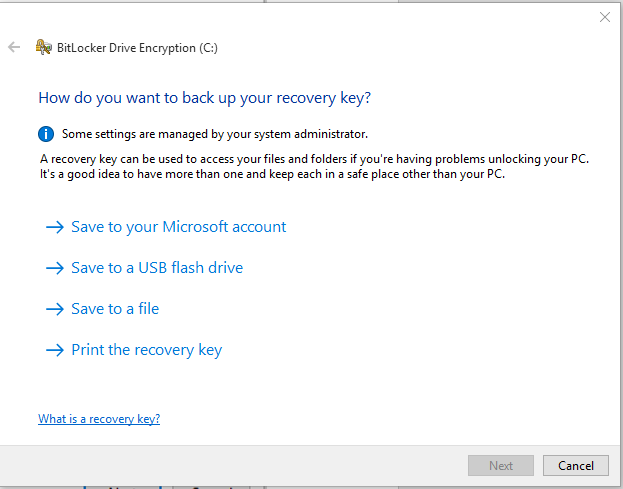
- The easiest thing to do is to use the option Save to a file. The recovery key is a text file that can be opened in Notepad. You can copy the recovery key later to a USB flash drive if there is a need, open the text file and print it, and copy it at multiple locations for back up purposes if you want. You can even type the key manually into Notepad, save it on a USB flash drive and use it to unlock the computer. There is nothing magical about the recovery key file.
- After you have saved the recovery key to a file, click Next.
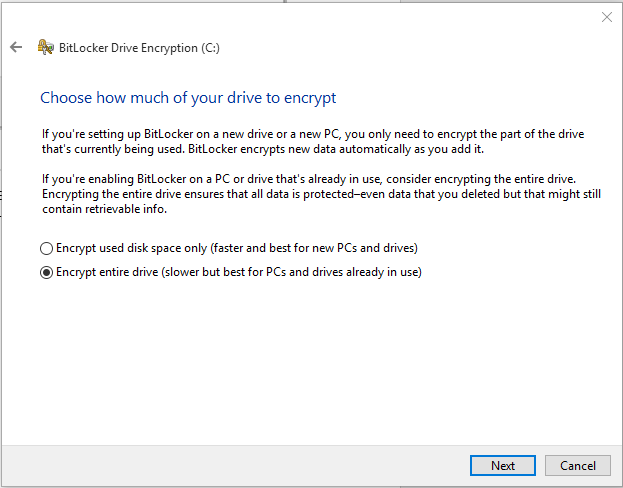
- If you are setting up BitLocker on a new drive, you only need to encrypt the part of drive that is being used. When you add additional data, BitLocker will automatically encrypt that data. You should select the first radio button Encrypt used disk space only (faster and best for new PCs and drives) . However, if you have already been using your computer for a while, select the second option Encrypt entire drive (Slower but best for PCs and drives already in use) .
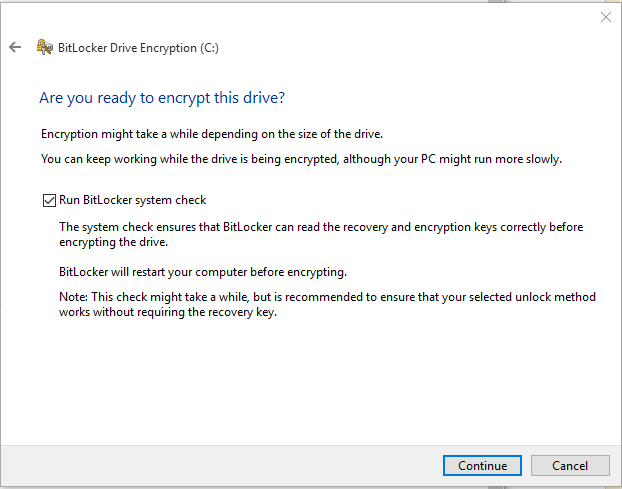
- Depending on the size of the hard drive and the amount of data, the encryption process can take a long time so be patient. It’s best to start this process at the end of the day when you are no longer going to use your computer until the next day. Make sure the box Run BitLocker system check is checked and once you are ready, click Continue.
- You will be prompted to restart the computer. If you are ready to reboot now, click Restart now or click Restart later if you are not quite ready yet.
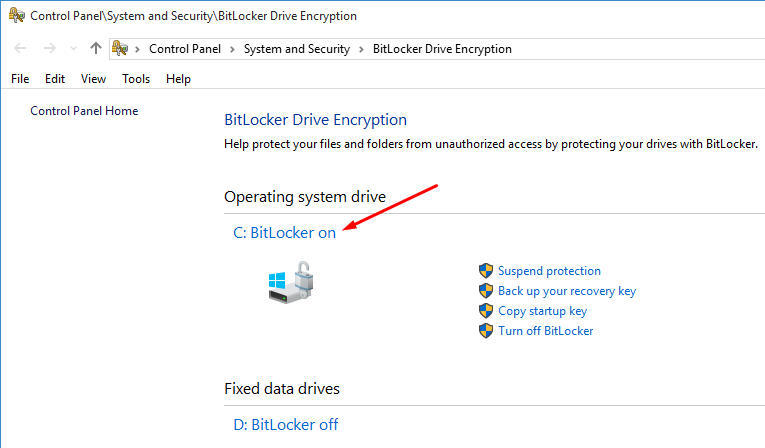
- After the computer reboots, it will start encrypting the drive. You won’t see any progress bar but if you go to Manage BitLocker in Control Panel (Control Panel\System and Security\BitLocker Drive Encryption) you will see that BitLocker is encrypting the drive.
- When the encryption is complete, you can see the status which shows that BitLocker is on for drive C. Some of the management tasks for BitLocker include the ability to suspend protection, back up your recovery key, copy the startup key and turn off BitLocker. You will find more information on suspend protection later in this article.
- After enabling BitLocker for your operating system drive, you can turn on BitLocker for other drives, such as drive D. As far as BitLocker is concerned, the order that you encrypt the drives is not important. You can encrypt the data drive first and the then the operating system drive, or vice versa.
When Would I Need the Recovery Key?
There are several reasons that you may need your recovery key. Some, but not all, of the reasons include, updating of computer BIOS, losing the flash drive that contains your startup key when you have enabled the startup key authentication, changing the original TPM (e.g. installing a new motherboard), moving your BitLocker drive to a new computer, or changing boot configuration settings. If you want to upgrade the computer BIOS chip, you can temporarily disable (turn off) BitLocker, upgrade the BIOS and then enable BitLocker (turn on).
BitLocker Best Practices
When you implement BitLocker, it’s imperative that you follow the best practices and take computer security very seriously. For example, using BitLocker to encrypt the drive but a weak password to authentication to your computer will be a bad idea. Follow these best practices and guidelines to secure your computer that’s configured for BitLocker.
- If you encrypt your data drive but not the operating system, you need to ensure that your computer is physically secure. In addition, you need to make sure that you are using a strong password and preferably multi-factor authentication.
- If during BitLocker configuration you save the recovery key on the local computer, make sure you copy the recovery key on a different computer. Otherwise, you may lock yourself out of your computer.
- Have more than one recovery key for your computer and keep each key in a secure place other than the computer where it was generated.
- Print out the recovery key on paper and store it in a safe location, like a safe deposit box at your bank. If there is a need, you can simply type the recovery key in Notepad and save it as a text file. That’s your recovery key that can now be used on the computer where it was generated.
- If you ever regenerate the recovery key, make sure you update all your backups.
- Name your recovery key file so it is easy to recognize the computer to which it belongs because recovery keys are computer-specific.
- Do not confuse a startup key from recovery key. They serve different purpose. Recovery key is a text file.
- For computers that are configured to use a startup key on a USB flash drive when they are started, make sure that you have backed up the startup key to a safe location.
- If you have a laptop with docking station, configure the BIOS to make sure that the hard drive is listed first in the boot order whether the laptop is docked or undocked.
- Before you upgrade Windows 7/8 to Windows 10, simply suspend BitLocker (refer to image in step 19), which won’t decrypt your drive. Upgrade to Windows 10 and then click Resume Protection.
- Use BitLocker to Go to encrypt removable drives, such as USB flash drives, external hard disks, SD cards, etc. because they are more likely to be lost or stolen than the fixed drives.
BitLocker in Business Environment
In a domain environment, Active Directory Domain Services (AD DS) can be used to centrally manage the BitLocker keys. In addition, you can also use Group Policies to not only backup BitLocker and TPM recovery information but also manage recovery passwords. If you are interested in planning and deploying BitLocker in a business environment, check out some of the Microsoft TechNet articles listed below.
- Prepare your organization for BitLocker: Planning and policies
- BitLocker Group Policy settings
- BitLocker Recovery Password Viewer
- BitLocker Recovery Guide
Conclusion
BitLocker Drive Encryption is built into Windows 10 Pro, Enterprise and Education versions. It offers an easy and secure way to protect your confidential data by encrypting your drives. BitLocker has very little performance overhead and you can encrypt not only your fixed drives but also the removable drives, such as USB external hard drives, USB flash drives, SD cards, etc. If you are interested in securing your data on your desktop computer or mobile devices, BitLocker is an excellent option. And best of all, you don’t even need to purchase any extra software or install an add-on.

About the author
Zubair is a Microsoft SharePoint MVP, a Microsoft Certified Trainer, and CEO of SeattlePro Enterprises, an IT training and consulting company in Seattle, WA. He holds more than 25 industry certifications including MCT, MCSE, MCSA, MCDST, MCITP, MCTS, MCP+I, CNA, A+, Network+, Security+, CTT+ and CIW. His experience covers a wide range of spectrum: trainer, consultant, systems administrator, security architect, network engineer, Web designer, author, technical editor, college instructor and public speaker.