Insider’s Guide to Managing Service Level Agreements with Dynamics CRM 2015
Editor’s note: The following post was written by Dynamics CRM MVP Steven Foster
Insider’s Guide to Managing Service Level Agreements with Dynamics CRM 2015
How do you as a business manage Service Level Agreements (SLAs)? How can you utilise Dynamics CRM to manage multiple SLAs against a Case and monitor the performance against them? This post will discuss the ins and outs of setting up and working with SLAs from a business perspective.
Dynamics CRM 2015 provides the ability to manage Sales activity, Marketing activity and Service Activity. This post will focus on Service activity with a customer and specifically related to creating and managing SLAs.
An SLA or Service Level Agreement determines the level of service you will provide your customers. A level of service can be dependent on a number of factors including but not limited to:
- Whether the Customer is entitled to service via an entitlement. An entitlement could be a something you sell or is included in a product offering i.e. you get 9-5 service with a response time of 8 hours
- Based on an attribute of the customer i.e. high value customers get x service level and low value customers get y service level
- Based on an attribute on the Case i.e. if the Priority or Severity is high then provide x level of service
- Different channels of communications could drive a different level of service i.e. a post on Twitter could require a response in under 30 mins, whereby a response via email requires a response in 4 hours
- Based on any other attribute related to the Case or associated records i.e. Customer details, product details etc.
As an organisation, you want to measure your levels of service to ensure that you are performing well against them and ideally meeting them. If you are not meeting them you want to be able to monitor why you are not i.e. is a particular team or user, or customer type or product type that is the issue.
Dynamics CRM 2015 enables you to both create multiple SLAs aligned to any attribute, channel or entitlement and monitor through views and charts on how you are performing against them.
I will now walk through the components that make up SLAs, how you create them, how they are executed and how you report on them.
Types of SLAs
Dynamics CRM 2015, provides for 2 SLA types as below:
- Standard – standard SLAs were introduced as part of the CRM 2013 – Q2 2014 Spring release (Leo). They required a number of manual steps to get working, for example including in the warning actions updating the SLA status field appropriately, so that the timer field can behave as expected.
- Enhanced – enhanced SLAs were introduced with the CRM 2015 release and removed some of the manual processes of the standard and introduced a number of new enhanced features.
Note: It is recommended to only use one type in an implementation and not mix and match, for consistency and ongoing management. If you have not used SLAs to date it would be recommended to use the enhanced SLAs over the Standard SLAs. If you have used Standard and wish to move to enhanced, you have to recreate the SLAs. Please note you should consider how your data and views are set up currently to report on the data captured.
The feature matrix below details the differences between the two:
Feature |
Standard SLA |
Enhanced SLA |
First Response By and Resolve By dates and statuses maintained on Case Entity |
Yes |
No |
Use of new SLA KPI related records |
No |
Yes |
Use of Quick view cards to display timers |
No |
Yes |
Timer display added to Case Form |
Yes |
No |
Ability to pause and resume SLA |
No |
Yes |
Start date, warning, failure and succeeded date stored |
No (partial only Failure date stored) |
Yes |
Last on hold time and hold minutes supported |
No |
Yes |
Business Hours support |
Yes |
Yes |
Entitlement Support |
Yes |
Yes |
Ability to create custom SLA KPI measures |
No |
Yes |
Ability to add success actions |
No |
Yes |
Ability to add warning actions |
Yes |
Yes |
Ability to add failure actions |
Yes |
Yes |
Support for default SLA |
Yes |
Yes |
Update the SLA status via the SLA Item rules |
Yes |
No |
SLA statuses updated automatically |
No |
Yes |
Components that make up an SLA
The following components make up an SLA:
- Customer Service Calendar – defines the business hours to be used in the SLA calculation. A business can have multiple calendars to support different SLAs i.e. 24x7, 9-5 business days, Customer specific calendars
- Entitlements – defines the agreed number of Cases or Time that has been contracted with the customer for support. Entitlements can only be associated to one SLA. An SLA can be associated to many Entitlements.
- Service Configuration – define which statuses place an SLA on hold (shortcut to System Settings). Note that the pause and resume statuses apply to all SLAs and thus are not SLA specific.
- Holiday Schedule – defines the dates that are considered holidays in a particular region. If you work in multiple regions then you may have multiple holiday schedules. Holiday schedules can be applied to the Customer Service Calendar to be observed.
- Service Agreements – define the rules that apply to the agreement, when a SLA is triggered, when and what should occur if the SLA is successful, non-compliant or nearing non compliancy.
Creating an Enhanced SLA
To create an enhanced SLA you need to have first created your customer calendar schedules if applicable so that they can be selected as part of the SLA definition.
You should consider the following before creating SLAs:
- If a customer does not have an entitlement what default SLAs should be applied? Only one default SLA can exist in the system, so all general SLA business rules will need to be included in the default SLA.
- Should the SLA dates be calculated off the created or modified date?
- Do we allow SLAs to be paused and if so what statuses are permitted?
- How will my SLAs be structured? I.e. by product, by customer segment, by customer value, by type of case, by entitlement type, by priority / severity. It is crucial to have consistency of rules so that you and your customers understand how they applied.
- What should happen if an SLA is nearing the warning time or failure time, what processes should be initiated on failure for example and does it depend on the type of SLA?
Once you have determined your business rules you are ready to configure them in Dynamics CRM.
To create an SLA record, follow the steps below:
- Navigate to System Settings -> Service Management
- Select Service Level Agreements
- Create New
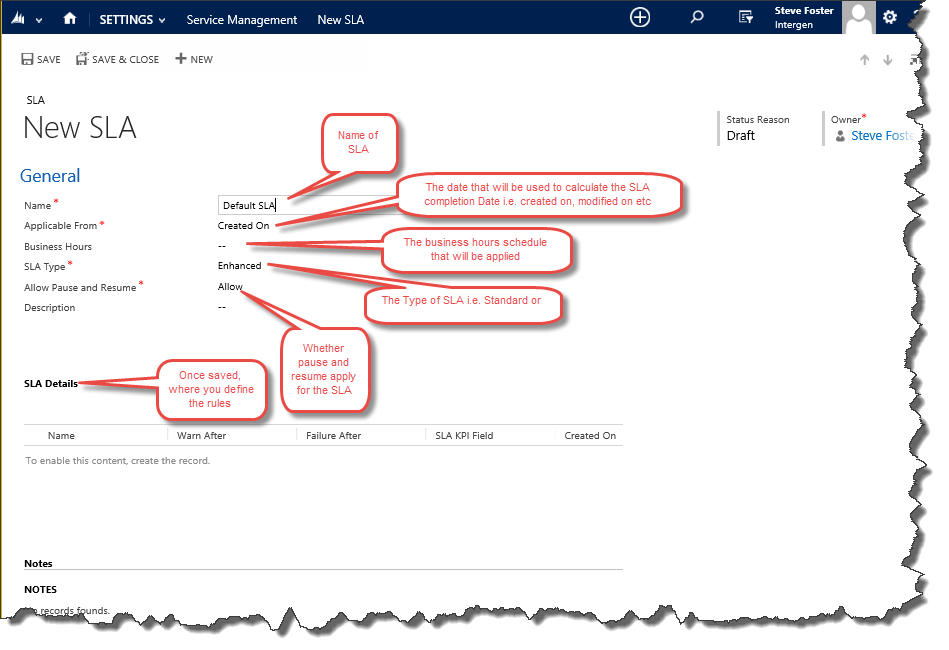
- Complete the form, entering your specific information:
5. Save the new SLA to enable the SLA Details area
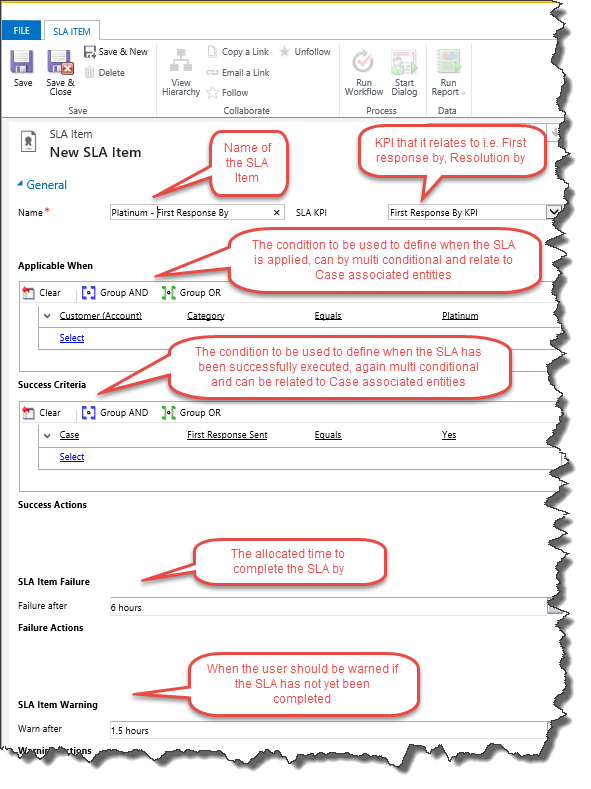
6. Select the “+” to add a new SLA detail record, complete with your data as described below:
 7. Note you can over type the Failure and Warn after with your own defined values as long as you keep the same syntax i.e. x hours or y days
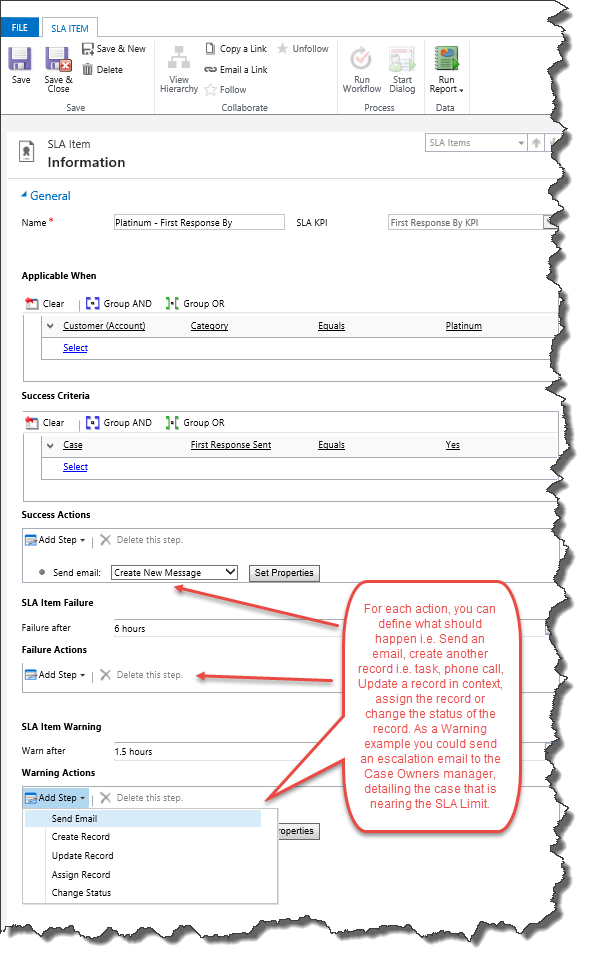
8. To enable the Success, Warning and Failure actions, you need to first save the record.
 9. Repeat step 6 for each business rule. An SLA can include multiple business rules. If this will be the default SLA you will need to include all the default SLAs rules in this one SLA as only one SLA can be defined as default i.e. not associated to an Entitlement.
10. In my example I have defined multiple First response by and Resolve by KPIs by Customer category.
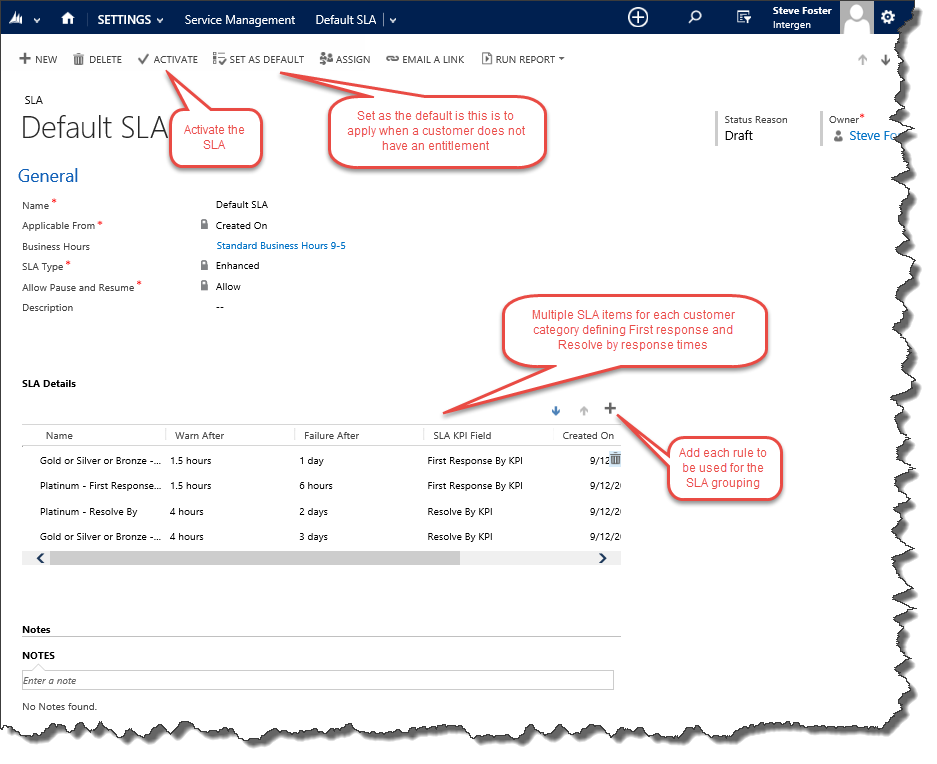
11. Once you have created the rules, activate the SLA, by clicking Activate
12. If it is to be the default SLA i.e. the SLA to be used when no entitlement is selected, click “Set as Default”
Note: Only one SLA can be defined as the Default.
SLAs in Action
Now that the SLA has been activated, any new Cases that meet the criteria will have the SLA applied.
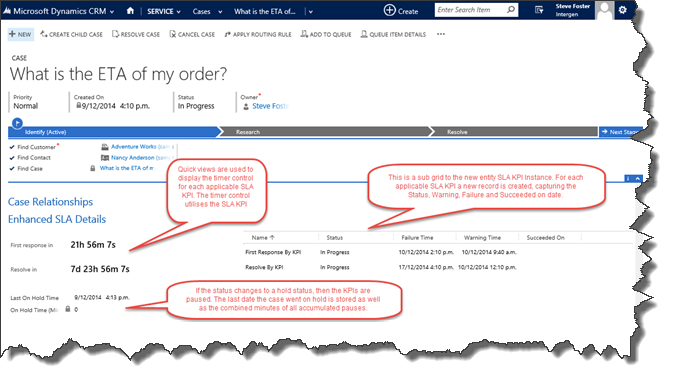
The screenshot below is of a Case related to a premium customer. You can see two SLA KPIs created for First and Respond by SLAs, the applicable countdown timers and the details if the case has been on hold. The timers will automatically change colour from black to orange to red and to Green based on the warning, failure and success criteria.
Note: The Last hold date and minutes are not displayed by default on the Case form. You will need to add these to the case form to view them.
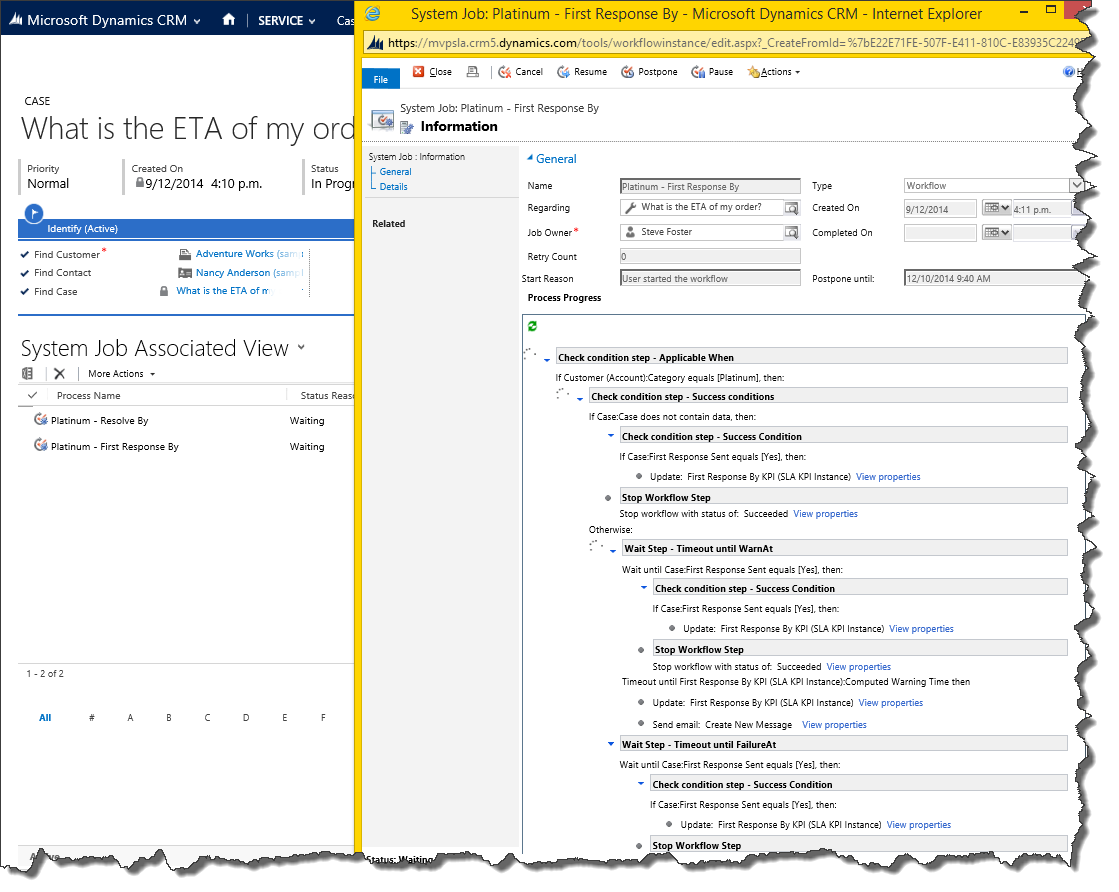
Each SLA that is triggered against a case is reflected as a workflow on the case. The clauses that you defined based on trigger for success, warning and failure are converted in Wait and If conditions. So if we take a look at the workflows associated to this case we will see two workflows and if we open one up you will see the conditions as defined in setting up the SLA depicted in workflow logic. It’s a great place to look if for some reason your expected SLA KPI is not working as expected.
Advanced Topic – Adding a new KPI measure
So we have discussed creating an enhanced KPI for the standard First Response by and Respond by KPIs, but what if you want to measure another KPI like for example Decision Date or Second Response by?
With Enhanced SLAs for Dynamics CRM 2015 you can now create your own KPIs. So what do you need to know?
- The SLA KPIs are defined as lookups to the SLA KPI Instance, so by default there are two lookups one for Respond by and another for First Response by.
- The timer is displayed by using a quick view for each SLA KPI. When a quick view is added to the case form you define the lookup field for which the quick view will display
- Any new look-up to the SLA KPI instance are dynamically displayed on the SLA item form when defining the SLA details. So to add a custom SLA item you need to first create and publish the new relationship
So to create a new SLA KPI for Decision Date you will need to:
- Open up the customisations area – Settings -> Customisations -> Customise the solution
- Open the SLA KPI Instance entity and create a new 1:N to Case for the new SLA KPI, providing the name of the new KPI i.e. in this example Decision Date By KPI
- Open up SLA KPI Instance Forms and copy one of the existing Quick Views by using Save As
- Open the new quick view form and change the labels to reflect the new SLA KPI
- Save and Publish
- Open up the Case form and add the new quick view form to the Enhanced SLA tab
- Select the new lookup field to SLA KPI Instance that you created in step 2
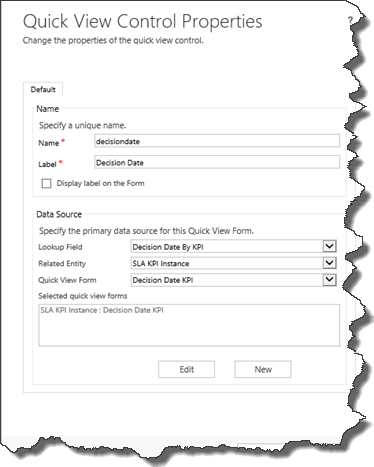 8. Save and Publish
9. You can now create a new SLA item against an existing SLA definition or new using the new SLA KPI Decision Date:
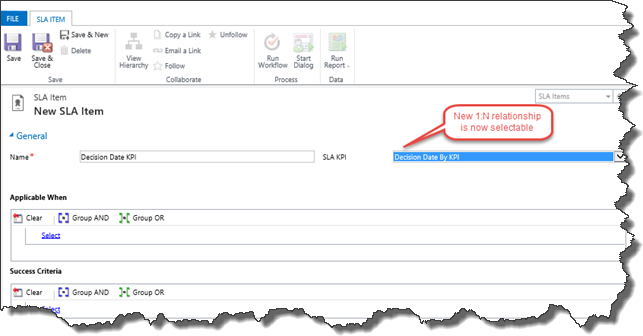
10. Once you have created the SLA item and activated it, you will be able to view the new KPI Decision date on the Case Form as per the out of the box KPIs. You can as many new KPIs as required, triggered on any condition.

Reporting on SLAs
You can report on SLAs by using the standard views, charts and excel. One key point to remember when you are reporting on Enhanced SLAs, is that the key fields to be reported on are stored in a separate relationship SLA KPI Instance.
To create a chart on first response by status, you will need to add the First Response SLA instance fields to the Case form. You can then include the fields on a chart. For example the chart below depicts the status of first response by all active cases:
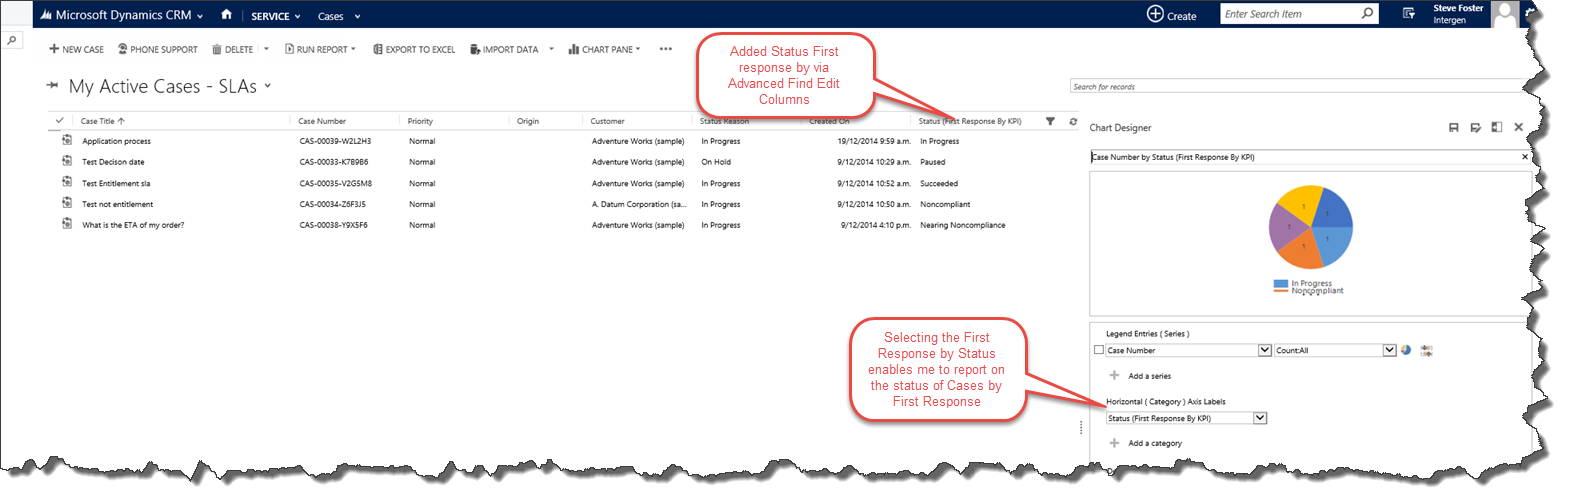
You can report on any of the SLA date fields and review which cases are nearing non-compliance. You can create specific dashboards on SLAs so that you can monitor SLAs and performance against them.
IMPORTANT NOTE FOR ON PREMISE AND HOSTED ENVIRONMENTS
If you have CRM installed in an On Premise or Hosted environment (not CRM Online), then you need to be aware of a current issue with date calculations for non US based users. If you do not apply this fix you will notice that the date calculations for the SLAs may appear incorrect because of the date format being used. Unfortunately until a fix is applied to CRM you will need to ensure that the CRM servers running the web application are set to the US region as per this blog https://blogs.msdn.com/b/emeadcrmsupport/archive/2014/06/25/dynamics-crm-2013-and-date-time-not-rendered-as-expected-for-notes-related-to-case-records.aspx.
Once you have applied this change then the dates will be calculated as expected. A detailed community support blog can be found here detailing some of the issues that other users have experienced with a reference to this fix https://community.dynamics.com/crm/f/117/t/129027.aspx?pi49829=2#responses.
About the author

Steven is the Product and Marketing Manager for the leading Microsoft partner Intergen in New Zealand. Steven is an MVP, Microsoft Partner Seller, has an active blog and is on the committee of the Dynamics CRM user group in Auckland.
Steven has been a speaker at many events across the world on the topic of CRM during his 15 years focusing on delivering and selling CRM solutions. Steven has multi industry expertise and has delivered both small and global CRM implementations. Read his blog, connect with him on LinkedIn or follow him on Twitter.
About MVP Monday
.jpg)
The MVP Monday Series is created by Melissa Travers. In this series we work to provide readers with a guest post from an MVP every Monday. Melissa is a Community Program Manager, formerly known as MVP Lead, for Messaging and Collaboration (Exchange, Lync, Office 365 and SharePoint) and Microsoft Dynamics in the US. She began her career at Microsoft as an Exchange Support Engineer and has been working with the technical community in some capacity for almost a decade. In her spare time she enjoys going to the gym, shopping for handbags, watching period and fantasy dramas, and spending time with her children and miniature Dachshund. Melissa lives in North Carolina and works out of the Microsoft Charlotte office.