Visualizing Your SharePoint Farm with PowerShell
The following post was written PowerShell MVP Nik Charlebois
Introduction
How often have you wished that you could easily press a button and get an exact picture of all the servers in your SharePoint farm? I know this came up a few time in my career as a SharePoint administrator. Today is the day where I make all your dreams come true! Together, we will learn how to develop a very simple PowerShell script that will allow you to easily scan your entire SharePoint environment and extract relevant information about the various components running on them and the resources they have available. The icing on the cake is that we will create our script in such a way that it will present all the extracted information in a visually appealing and useful way.
Setting the Stage
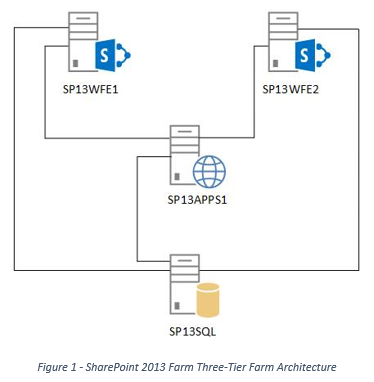
For the purpose of this article, I have spin off a new three-tier SharePoint 2013 test farm that consists of two Web-Front-Ends, one Application server, as well as one dedicated SQL Server (see Figure 1 below). All 4 servers are running on Windows Server 2012 R2, the SQL Server is running on Microsoft SQL Server 2014, and SharePoint 2013 Service Pack 1 is installed.
Obtaining a List of all Servers in the SharePoint Farm
The first step for us is to acquire a complete list of all servers in the SharePoint farm. This can easily be achieved with a single command, by calling the Get-SPServer PowerShell cmdlet. This cmdlet returns an array containing several objects representing each physical server in the farm (see Figure 2 below). These objects expose several properties and methods that we can use to obtain additional information.
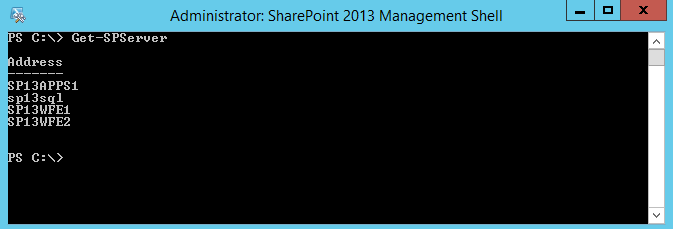
Figure 2 - Listing all servers in a SharePoint 2013 farm using PowerShell
Obtaining Information about the Servers
The next step is to remotely connect to each server in the farm and extract relevant information about them. To achieve this, we will be using the Get-WmiObject PowerShell cmdlet. For the sake of this article, we are assuming that you are running the resulting PowerShell script as an administrator that has access to all servers in the farm. To connect the Get-WmiObject cmdlet to a remote server, we need to include the –ComputerName parameter with our request. If you ever decide to run this script as a user who doesn’t have administrative rights on the destination server, you can always provide new credentials for impersonation to the cmdlet using the –Credentialparameter along with the –Impersonation parameter to define the level of permissions to grant to the user. For more information on how to use the Get-WmiObject PowerShell cmdlet to do remote impersonation, please refer to the following TechNet article (https://technet.microsoft.com/en-us/library/hh849824.aspx).
Firewall & Security
In order for you to be able to use the Get-WmiObjectcmdlet, you will need to make sure that you enable the Windows Management Instrumentation on each server's to allow incoming requests to the WMI. If this is not allowed on your SharePoint servers, remote requests will all fail and return an error mentioning that RPC Server is not available. With PowerShell, you can easily enable a firewall rule on each server to allow connections to the WMI by running the following line of script on each server in the farm:
Netsh advfirewall firewall set rule group="Windows Management Instrumentation (WMI)" new enable=yes
Information about the CPU
The first data points we will try to obtain is information about the server’s CPUs. We want to be able to determine how many cores and logical processors are assigned to them. By using the Get-WmiObject PowerShell cmdlet, we need to specify the object’s class we which to retrieve. Depending on what version of the OS is installed on the servers, you may get a different set of available classes. To get a full list of all classes that are available to you, you need to add the –List parameter to your request. For our purpose, the information about what we are looking for is contained within the win32_processor class. This object exposes two very important properties: NumberOfCores and NumberOfLogicalProcessors. With this information in hand we can now make the following PowerShell call:
Get-WmiObject -ComputerName <ComputerName> –Class win32_processor | Select NumberOfCores, NumberOfLogicalProcessors
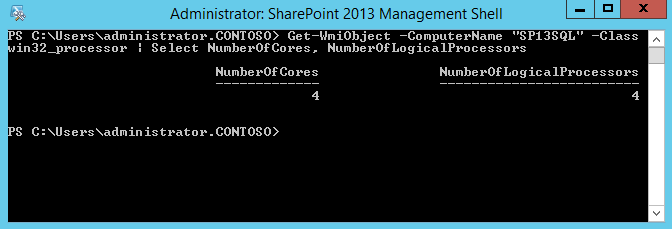
Figure 3 - Getting information about CPU remotely for a SharePoint server using PowerShell
Information about Memory
In a similar fashion to what we just did for the CPU related information, we can use the same PowerShell cmdlet to remotely retrieve information about a server’s memory. This time around however, we will be making a call into the win32_computersystem class. This class exposes a property names TotalPhysicalMemory which will give us the total memory size in bytes. As a general rule of thumb, I tend to talk about RAM in GB so in order for us to obtain this value we need to divide the value in bytes by 1024 three times (1024 cube). Then ideally, we wish to round the value up to two decimals. The following PowerShell command will allow us to obtain the RAM value of a remote server in GB:
$object = Get-WmiObject -ComputerName <ComputerName> –Class win32_computersystem
$memoryInGB = $('{0:N2}' –f ($object.TotalPhysicalMemory/1024/1024/1024))
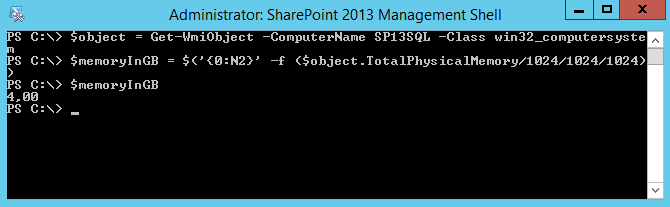
Figure 4 - Retrieving RAM capacity from a remote server using PowerShell
Information about Disk Space
Again here, getting information about remaining disk space can be achieved by using the good old Get-WmiObject PowerShell cmdlet. The win32_logicaldisk class is where all the good stuff is. This class contains information about all the logical drives that are associated with your servers. Through the exposed Size and FreeSpace properties, we can easily determine information such as the percentage of disk space used. One thing to watch out for though is that simply querying this object without properly filtering out drives will return a complete list of all Medias attached to the server including CD-Rom and other storage mediums. Luckily for us, there is a property called DriveType that allows us to differentiate between various media types. In our case, we are only interested in getting information about the logical disks on the server. These are represented with a DriveType of 3 in the object. Therefore, when calling our PowerShell command, we can filter out all other media types:
$drives = Get-WmiObject -ComputerName <ComputerName> –Class win32_logicaldisk | Where {$_.DriveType –eq 3}
Then for each drive object obtained, we can obtain specific information about disk usage. Again, for simplicity’s sake we are rounding up to two decimal numbers. Figure 5 shows the following Powershell script being executed remotely to obtain information about the various drives of the SharePoint SQL server.
$drives = Get-WmiObject -ComputerName SP13SQL –Class win32_logicaldisk | Where {$_.DriveType –eq 3}
foreach($drive in $drives)
{
$deviceId = $drive.DeviceId
$totalSize = $('{0:N2}' –f ($drive.Size/1024/1024/1024))
$freeSpace = $('{0:N2}' –f ($drive.FreeSpace/1024/1024/1024))
$percentageFull = $freeSpace / $totalSize * 100
Write-Host "Stats for:"$deviceId
Write-Host "Total:"$totalSize
Write-Host "Free:"$freeSpace
Write-Host "% Full:"$percentageFull
}
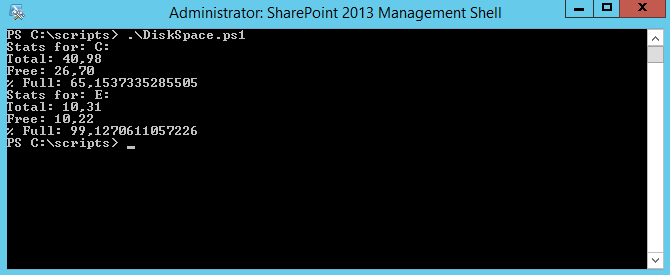
Figure 5 - Retrieving information about remote drives using PowerShell
Retrieving Information about the SharePoint Services
We are now getting into the real interesting stuff, information about the various SharePoint bits on the server. There are probably thousands of data points we could be collecting for our SharePoint servers, but to keep this exercise short and concise, we will only focus on determining what services are running on each of the SharePoint servers in the farm.
In the first section of this article, we learned how to retrieve a list of all servers in our SharePoint farm. What is actually being returned by the Get-SPServer PowerShell cmdlet we used is a collection of .NET objects representing a SharePoint server object. Each of these object exposes various properties that we can use to obtain additional information about a particular server. The property we are particularly interested in is called ServiceInstances and returns a collection of all SharePoint Services that are installed on the server. An important thing to watch out for is that the fact that a service is installed, doesn’t mean that it is enabled. If we wish to get a list of services that are running on a SharePoint server, we need to filter the results to exclude service instances that are disabled. Another very important thing to watch out for is the fact that through PowerShell, you’ll obtain a complete list of services, including those that are normally hidden to the users through the Central Administration interface. In our case, we will also want to filter service instances that are hidden out of the results. The following lines of PowerShell will allow us to retrieve a list of all service instances that are active and that are not hidden for a specific SharePoint server (Figure 6 shows the execution of these lines of code).
$servers = Get-SPServer
$servicesRunning = $servers[0].ServiceInstances | Where{$_.Status –eq “Online” –and $_.Hidden –eq $False}
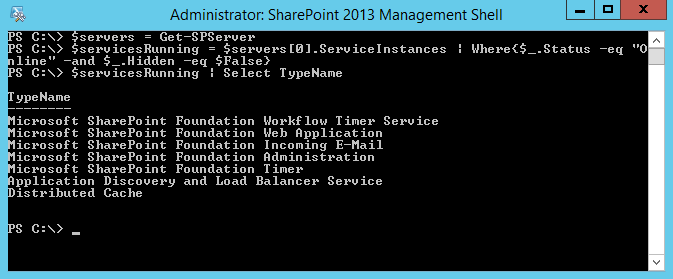
Figure 6 - Listing all SharePoint services running on a specific SharePoint server using PowerShell
Putting it all Together:
Now that we’ve learned how to obtain all these useful tidbits of information, it is time to put all of this into a single script and have it produce a full picture of every server in your SharePoint farm. The following lines of PowerShell summarize our learning into a fully automated script that can be run on any SharePoint environment.
$servers = Get-SPServer
# Loop through all servers in the Farm
foreach($server in $servers)
{
$serverName = $server.DisplayName
Write-Host $serverName -ForegroundColor "Black" -BackgroundColor "Yellow"
# Get SharePoint services running
$servicesRunning = $server.ServiceInstances | Where{$_.Status –eq "Online" –and $_.Hidden –eq $False}
Write-Host "SharePoint Services Running:" -ForegroundColor "Blue" -BackgroundColor "White"
$servicesRunning | Select TypeName
Write-Host "`n"
# Get CPU Information
$cpuInfo = Get-WmiObject -ComputerName $serverName –Class win32_processor
Write-Host "CPU Information:" -ForeGroundColor "Blue" -BackgroundColor "White"
Write-Host "Number of Cores:" $cpuInfo.NumberOfCores
Write-Host "Number of Logical Processors:" $cpuInfo.NumberOfLogicalProcessors"`n"
# Get Memory Information
$memoryInfo = $object = Get-WmiObject -ComputerName $serverName –Class win32_computersystem
$memoryInGB = $('{0:N2}' –f ($object.TotalPhysicalMemory/1024/1024/1024))
Write-Host "Memory Information:" -ForeGroundColor "Blue" -BackgroundColor "White"
Write-Host "RAM:" $memoryInGB "GB`n"
# Get Storage Information
$drives = Get-WmiObject -ComputerName $serverName –Class win32_logicaldisk | Where {$_.DriveType –eq 3}
Write-Host "Storage Information:" -ForeGroundColor "Blue" -BackgroundColor "White"
foreach($drive in $drives)
{
$deviceId = $drive.DeviceId
$totalSize = $('{0:N2}' –f ($drive.Size/1024/1024/1024))
$freeSpace = $('{0:N2}' –f ($drive.FreeSpace/1024/1024/1024))
$percentageFull = $('{0:N2}' –f ($freeSpace / $totalSize * 100))
Write-Host $deviceId -ForeGroundColor "Green"
Write-Host "Total Size:" $totalSize "GB"
Write-Host "Free Space:" $freeSpace "GB"
Write-Host "Percentage Full:" $percentageFull "%"
}
Write-Host "`n"
}
Wrap-up:
I hope I have demonstrated how easy it is, with PowerShell, to quickly produce relevant and useful reports to help you better do your daily job. Of course PowerShell for SharePoint provides you with a few specific set of a few hundred cmdlets, but in reality, you can combine your SharePoint scripts with any other set of PowerShell cmdlets and fully leverage the power of the shell!
About the author
Nik is the Manager of the Collaboration & Corporate Systems at Library and Archives Canada. Awarded the title of Microsoft Most Valuable Professional in 2014, he tries to help the SharePoint community by sharing his knowledge through various classes, blog articles, and online training material. Author of the book "Beginning PowerShell for SharePoint 2013", Nik strives to bridge the gaps between the developers and IT Pros communities by teaching them how to get the most out of PowerShell. He is also the owner of IgniteSoft, a company whose focus is to help enterprise migrate their document management and web presence over to Office 365. Being an early adopter of anything worth a try, Nik always tries to think out-of-the-box and pushes himself to deliver rich and interactive sessions and demos during his talks. You can find Nik answering in the MSDN forums or follow him on Twitter.
About MVP Mondays
.jpg)
The MVP Monday Series is created by Melissa Travers. In this series we work to provide readers with a guest post from an MVP every Monday. Melissa is a Community Program Manager, formerly known as MVP Lead, for Messaging and Collaboration (Exchange, Lync, Office 365 and SharePoint) and Microsoft Dynamics in the US. She began her career at Microsoft as an Exchange Support Engineer and has been working with the technical community in some capacity for almost a decade. In her spare time she enjoys going to the gym, shopping for handbags, watching period and fantasy dramas, and spending time with her children and miniature Dachshund. Melissa lives in North Carolina and works out of the Microsoft Charlotte office.
*SharePoint Server MVP Vlad Catrinescu also contributed to this article as a technical reviewer. Thank you Nik and Vlad!