Git for TFS 2013


Editor's note: The following post was written by Visual Studio ALM MVP Esteban Garcia
One of the great new features of TFS 2013 is the addition of Git as a source code repository. Git is a Distributed Version Control System (DVCS) that has gained a lot of popularity in the past few years. Git allows you and your team to work completely disconnected by keeping a copy of your source code locally, including all your change history. By doing this, you are able to commit your changes locally, do file comparisons, create branches, merge your code, and much more. Once you are ready to share your changes with the rest of the team, you are able to push your changes to the centralized Git repository contained in your TFS Server.
Git is not replacing Team Foundation Version Control (TFVC) but it does give you another option for you and your team to use. So starting with TFS 2013 and Team Foundation Service, when you create a new Team Project, you are able to decide what source control repository you will use.
Implementation
TFS's Git implementation is based on msysGit so this is not just a small subset of Git functionality. If you are already used to working with Git, you should be able to get up and running quickly. Even though the Git commands that you will use are the same as other Git implementations, the backend is very different. As you may know, Team Foundation Server uses SQL Server to store all of its data, and TFS Git is no exception. This means that your backup and restore procedures won’t change whether you are using TFVC or Git. This implementation also means that all the integration points that you have when using TFVC are also available when using Git. This includes Work Item associations, build integration (Continuous Integration, Gated Builds, Associated Changesets in the Build Summary), alerts, and more.
Getting Started
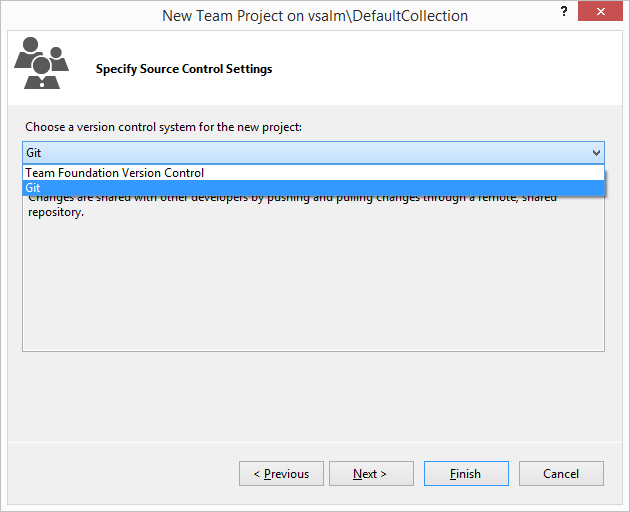
Before you get started, you have to create a Team Project that uses Git for Source Control. To do so, you follow the same steps as you would normally follow to create a Team Project from Team Explorer, but you will now see a new step called "Specify Source Control Settings" which will allow you to pick between Team Foundation Version Control and Git. As described in this step: "Git is a Distributed Version Control System (DVCS) that uses a local repository to track and version files. Changes are shared with other developers by pushing and pulling changes through a remote, shared repository."
Once you get through the Team Project creation wizard, you will now have a fully-working Team Project with all the great features that you are already used to (and some new ones with 2013), but instead of using TFVC you will now use Git.
Working with Git from Visual Studio 2013
When you open Visual Studio and connect to your Team Project, Team Explorer will look and behave differently since it is aware that you are using Git.
This is what Team Explorer looks like when you connect to a Team Project that uses Git:
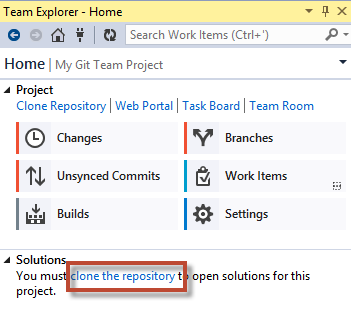
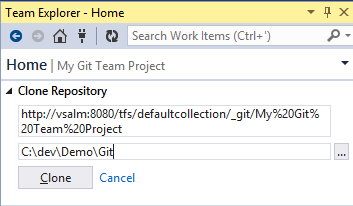
Before you can start working with any code stored in TFS, you have to clone the repository (see highlighted link above). This creates the mapping between your local Git repository and your Git repository that is hosted by TFS. Clicking on the link allows you to specify the location of the server repository and initializes your local repository:
As part of your local repository initialization, you will see a hidden .git folder, and two files used by Git: .gitattributes and .gitignore.
You can now get started with either a brand new project (in my case I don't yet have anything in TFS) or making changes to existing projects.
When you are done with your changes, you are able to access similar features than what you would get when working with TFVC, except that the workflow changes. Git expects you to commit locally at least once and then you would push those changes to the server. Since your commits don't affect the rest of your team until you push them to the server, you should feel encouraged to commit often since Git makes branching, merging, and rollbacks a very trivial process.
When you are ready to commit, you are taken to the "Changes" tab in Team Explorer. Here, you can enter a comment, select your included changes, and associate your commit to a Work Item:
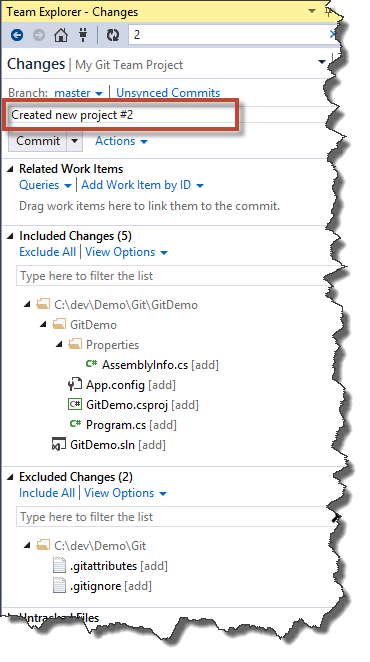
You can create associations two different ways. You can either select the "Add Work Item by ID", the way you are probably used to doing it. Or, as part of your comment, you can enter the Work Item ID prepended by a hash-sign. For example, in my comment above, I'm associating my commit to Work Item ID 2 by entering my comment like this: "Created new project #2". One of the reasons for this feature is that in some cases, your team members may need to access your source control from outside of Visual Studio, for example, by using the Git's command-line support, and this allows you to still create associations with your TFS Work Items.
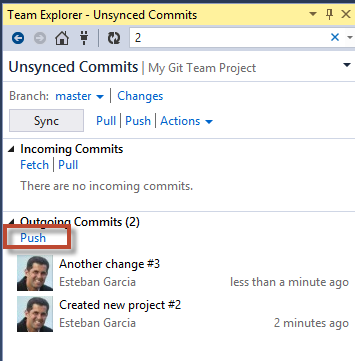
You can now push your changes to your server by accessing the Unsynced Commits tab in Team Explorer. You can access it from the link in the Changes tab or from your Team Explorer home. When you get there, you will see a list of all your local commits. Before pushing your changes to the server, you should submit a Pull request, which will allow you to resolve any conflicts with changes made by the rest of your team. Once those conflicts are resolved, you can proceed with a Push operation, which will move all your local commits to the centralized repository.
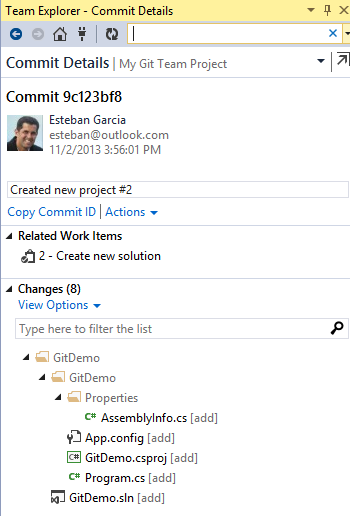
Once you push your changes to the server, you are able to view History by selecting the "View History" option from the "Actions" dropdown in the Unsynced Commits tab. Double-clicking on one of the Changesets in the history window brings up the Commit Details, which shows you my commit comment, Related Work Items (remember that I used the hashtag to associate), and the files that were affected.
Branching
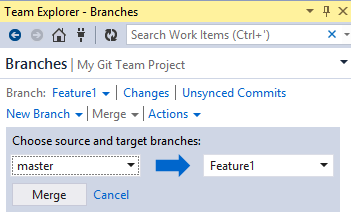
One of the most important features of Git is its ability to painlessly create branches and merge between your branches. Since these operations are performed locally, you don't need any special permissions to perform them in your local repository. Team Explorer gives you an whole section dedicated just to branching:
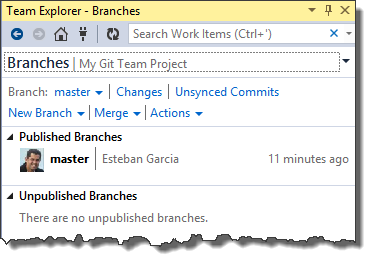
From here you can create new branches, merge between them, view Unsynced changes in each branch, and publish your branches to your local repository.
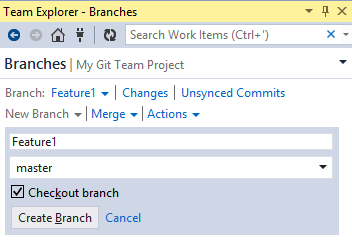
Creating a Branch:
Merging between branches:
Build Integration
Just like when you are using Team Foundation Version Control, you are able to get full integration with the TFS automated build system. When setting up a Build Definition, you are able to specify your repository name, the Branch that should be used to pull code from, and you are even able to pull code from a Git repository outside of TFS.
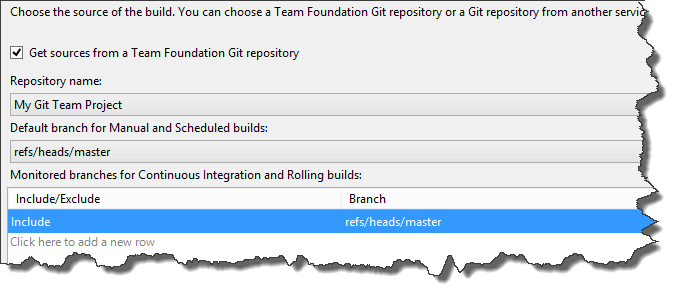
The Build Process Arguments are also a little different since you are now dealing with a different structure than you would when connecting to a TFVC repository, but once you configure the build, all build operations work the same as they would in prior versions of TFS.
This is an awesome new addition to TFS, which will give you and your team another option for source control. If you have team members working outside of Visual Studio, they are able to connect to Git from their favorite Git plugin and collaborate with the rest of the team. The greatest part is that all the integrations that we all love about TFS is still there, so you get all the great features of Git while being able to collaborate with the rest of the team using Work Item Tracking, Build Integration, Microsoft Test Manager, and more. Now go out and give it a try!
About the author

Esteban Garcia is a Visual Studio ALM MVP and ALM Ranger. He is the ALM Practice Lead at AgileThought (Microsoft ALM Gold Partner), Pluralsight author, Telerik Insider, and president of ONETUG (Orlando .NET User Group). He has over 15 years of professional experience in software development, working in all phases of enterprise application development and design using Microsoft technologies. Esteban has a BS degree in Computer Engineering from the University of Central Florida. You can follow his blog at https://www.almguide.com and follow him on Twitter at @EstebanFGarcia.