Making Web Development Wonderful Again with Web Essentials


Editor's note: The following post was written by Visual C# MVP Schabse Laks
Visual Studio is a fantastic development environment for .Net-based Windows and web projects. However, this view of Visual Studio overlooks one of its most useful features: the text editor. Visual Studio includes a powerful text editor that can easily be used to edit standalone files without a project.
Unlike competing development editors such as Sublime, Visual Studio maintains a full-featured parse tree as you edit each file. This allows VS to provide unparalleled auto-completion and document-based actions, and can make the development experience much faster and more pleasant. These features are especially powerful in HTML and CSS documents.
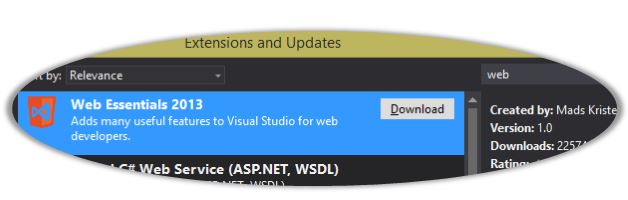
All of this power is also available to extensions, making it simple to extend the editors with powerful new features to suit your needs. (I wrote a separate blog post about building your own extensions) A poster-child example is the open-source Web Essentials extension by Mads Kristensen. This extension adds a variety of useful features that are essential to modern web development. You can install Web Essentials from the Extension Gallery in Visual Studio:
Using the text editor alone
To use the VS text editor, you can simply drag any text file into the editor. To work more efficiently with an entire project, you should create a Web Site project to hold all of your files for easier navigation. Click File, Open, Web Site, then select the folder containing your existing files (or create a new folder to start from scratch). Web site projects will automatically list all files in the directory you select; there are no project files or inclusion lists to worry about. If you create a new file outside of Visual Studio, simply click the Refresh button in Solution Explorer and it will show up as expected.
With Web Essentials, Visual Studio now has everything you need for a complete modern web development workflow. Visual Studio has built-in git support to manage source control, and Web Essentials can compile LESS files, run JSHint on your Javascript code, and minify and combine all of your static resources. You can also use the separate Image Optimizer extension to optimize PNG images. You can easily install and update popular 3rd-party libraries like jQuery or Bootstrap from NuGet.
To test your HTML locally, you can simply press F5, and Visual Studio will run IIS Express to host your site on a random port on localhost. No admin privileges needed. Visual Studio is thus especially useful for purely static sites hosted on GitHub pages. If you need to upgrade to an actual server, Windows Azure is just a few clicks away. You can also easily publish your site to an existing host over FTP or Microsoft Web Deploy.
HTML Files
Visual Studio 2013’s HTML editor was rewritten from scratch on top of the modern WPF-based editor stack. This new editor eliminates all of the formatting and validation issues with the old editor, and opens the door for extensions like Web Essentials to add all sorts of additional features.
The editor is now much smarter about HTML attribute IntelliSense. All of the aria-* attributes are now grouped into a single entry to avoid cluttering IntelliSense:

The editor also knows about attributes used by common web development frameworks, such as jQuery Mobile, Knockout.js, and AngularJS:

As you might expect, the editor will warn you about invalid HTML as you type.
Web Essentials adds more features to the HTML editor. You can press F12 (Go to Definition) on any local path (e.g., an image, a link to a separate HTML file, or a reference to a JS or CSS file) and jump directly to that file. You can see referenced images in tooltips. You can even press F12 on a CSS class and it will try to find a matching selector in CSS or LESS files in your project.
Web Essentials also adds support for Emmet/ZenCoding
CSS Files
Web Essentials really shines in its CSS features. Visual Studio’s standard CSS editor already features IntelliSense for CSS pseudo-classes/elements, property names, and values. It will and will give warnings for invalid selectors or properties. It even recognizes CSS hacks and will not show warnings for invalid CSS from common hacks.
Web Essentials adds lots of nice extras to the CSS editor. It adds get full IntelliSense for selectors as well, including all HTML elements and all CSS IDs & classes in the file. It even adds auto-completion for attribute names & values, filtered to only show attributes that apply to the element for element selector. It also adds a small preview every time you write a color (by name, HEX, RGB, or HSL).
You can see browser support information in the tooltip for each CSS property, along with sample usage. If you use a property that has vendor-specific versions for some browsers, Web Essentials will warn you if any of the vendor-specific (or standard) versions are missing, and will automatically update all of the vendor-specific versions as you change the value of the standard property (this feature does not work for vendor-specific values of standard properties).
You can use smart tags to easily convert between color formats, or to add CSS hacks to selector blocks to make them visible only in older versions of IE. You can see the specificity in a tooltip for each selector, to help resolve importance issues.
Web Essentials can warn you when you have duplicate CSS properties or selectors, or other issues like overqualified ID selectors or extra units on zeros.
As you type URLs (for images or fonts), Web Essentials will provide IntelliSense for folders and files in your project to help you select an existing file. Once you’ve entered the URL, you can see a preview of the image in a tooltip, and you can convert it to an embedded data URI in a smart tag. You can also
Web Essentials can also automatically generate minified (and optionally also gzipped) copies of each CSS file as you save. You can also drag an image or web font from the Solution Explorer (or even Explorer) to insert a background property or @font-face directive.
You can press Ctrl+Shift+Up/Down to increment/decrement numbers in CSS properties, or to lighten/darken hexadecimal colors.
LESS Files
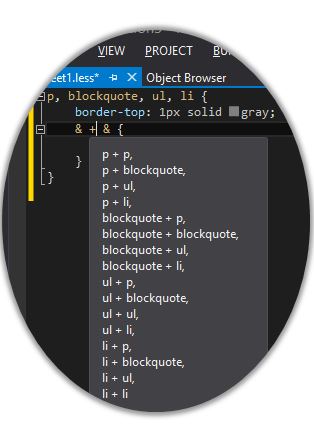
Visual Studio has a first-class LESS editor, including all of the features from the CSS editor. Web Essentials adds a preview pane on the left side to show the generated CSS, automatic compilation on save, and tooltips to show the generated selector from complex nested LESS selectors:
Web Essentials also adds useful refactoring command to extract repetitive code into a common variable or mixin.
There are a couple of LESS language features that the editor does not support yet (in particular, nested media queries). The LESS syntax tree is part of Visual Studio itself and cannot be fixed by an extension; this will be fixed in an upcoming Visual Studio update.
Javascript Files
Visual Studio’s Javascript editor was completely rewritten in VS2012. The new editor will actually run all of your Javascript code using a specially modified version of IE11’s fast new Chakra Javascript engine. This means that Visual Studio can know exactly what all of your code is doing, no matter how complicated it is. Even if you write code using Array.forEach to add functions to an object programmatically, those functions (and their return values) will show up correctly in IntelliSense. It can even figure out what values are passed to asynchronous callbacks. This makes Javascript development in Visual Studio much more pleasant than other editors. Unfortunately, Visual Studio’s IntelliSense engine is not Node.js aware, ruining what could have been the best Node.js development experience ever. I’m working on a project to fix this, but it’s not finished yet.
The dark side of the new Javascript is that it’s written entirely in native code and is completely closed; unlike other language services, VS extensions cannot see the syntax tree or fully participate in the editing experience
Even so, Web Essentials does add some features. After installing Web Essentials, you’ll get IntelliSense for strings passed to DOM selector functions like getElementById, getElementsByTagName, and getElementsByClassName (full CSS selector IntelliSense for querySelector or jQuery is not yet possible). Similarly, you’ll get IntelliSense for module names or file paths passed to the Node.js require() function. There is currently no IntelliSense for module names passed to AMD/RequireJS’ require() function. Pull requests are welcome; tweet me for details. On a smaller but still useful note, you’ll get IntelliSense for "use strict"; and "use asm"; for writing modern code.
You can also press F12 on a Visual Studio /// <reference> directive or Node.js require() call to jump to the included source file.
Web Essentials can also automatically run JSHint whenever you save a JS file, including full support for .jshintrc and .jshintignore configuration files. Like CSS, it can also automatically minify and gzip your code on save (and compile CoffeeScript).
Bundling
To optimize performance, websites should combine all CSS and Javascript files into a single bundle of each type. This eliminates the overhead of making a separate HTTP request for each individual file, and can drastically improve page load times on unreliable connections. For more information, see Google’s Page Speed documentation. (Note that upcoming standards like SPDY and HTTP2 use protocol-level parallelization to offer better performance for unbundled resources; see here)
ASP.Net 4.5 added a server-side bundling system in Microsoft ASP.NET Web Optimization; see here for more detail. When writing a web application that involves server-side code, this (or similar frameworks like Cassette) is the ideal way to add bundling, it lets the server take care of everything for you automatically.
For static sites (e.g., GitHub pages), server-side bundling is not an option. Instead, Web Essentials has its own bundling framework that lives inside Visual Studio and saves bundled files to disk. To get started, select all of your JS or CSS files in Solution Explorer, right-click, then click Web Essentials, Create Javascript (or CSS) bundle file.
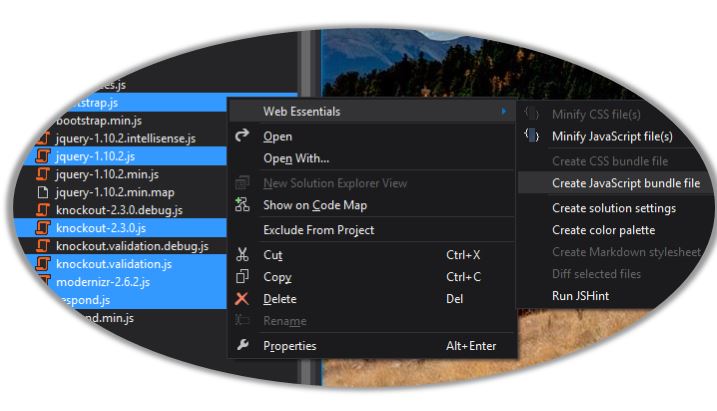
This will ask you for a filename, then generate an XML file listing all of the files in the bundle:
<?xml version="1.0" encoding="utf-8"?>
<bundle minify="true" runOnBuild="true" output="frameworks.js">
<!--The order of the <file> elements determines the order of them when bundled.-->
<file>/Scripts/bootstrap.js</file>
<file>/Scripts/jquery-1.10.2.js</file>
<file>/Scripts/knockout-2.3.0.js</file>
<file>/Scripts/knockout.validation.js</file>
<file>/Scripts/modernizr-2.6.2.js</file>
<file>/Scripts/respond.js</file>
</bundle>
Every time you save the bundle file or source files, or build the project, Web Essentials will concatenate and minify (if enabled in the XML) all of the source files and save the output file.
As the auto-generated comment suggests, you can re-order the <file> tags to change the order in which the files will be concatenated, allowing you to ensure that libraries come before their dependencies. You can also drag other source files into the XML.
Note that you should not include .min.js files in a bundle; Web Essentials will minify the whole bundle for you (and you certainly don’t want to include both minified and non-minified versions of a script, or it will run twice). In fact, if you’re using bundles, you should probably delete your minified source files entirely.
Browser Link
Browser Link is the star web feature in Visual Studio 2013. For the first time, the editor now has a real-time, two-way link with the browsers running your web apps. Browser Link automatically injects a piece of Javascript into your pages to connect to a Signalr server hosted by Visual Studio, using Web Sockets in supporting browsers and falling back to slower techniques in older browsers. That’s right; this works in any modern browser – all the way back to IE8 – without needing any browser plugins or special settings.
The most obvious use of this feature is live reload; you can now press Ctrl+Alt+Enter in Visual Studio to instantly refresh every browser viewing your site. However, the true power of Browser Link is its extensibility. You can easily create a Browser Link addin simply by writing Javascript code (typically with jQuery) to run in the browser, plus some C# code to run in Visual Studio, and Browser Link lets them easily communicate with each-other. Visual Studio will give you source mappings to allow you to find the underlying HTML behind any DOM element in the browser, even from within Razor partials or loops. The power of this feature is limited only by the possibilities you can imagine; as people grow more accustomed to this type of real-time communication, we should see lots of awesome extensions.
Web Essentials includes a number of Browser Link extensions. You can use Design Mode to click any element and edit its text directly in the browser, and have your edits reflected in source code. This is a great way to make minor textual corrections on a website, especially when working together with a copyeditor / proofreader. You can use Inspect Element to click any element in the browser and jump to its source code in the editor, allowing you to easily find out where that HTML came from and make deeper changes.
You can use F12 auto-sync to change CSS properties in your browser’s dev tools, and have them reflected in real time in your CSS (or even LESS!) files in Visual Studio, and in any other browsers connected to Browser Link. This is an extremely powerful feature for making iterative stylistic fixes; it greatly reduces the gap between making your site look exactly the way you want it to via minor tweaks in the dev tools, and rewriting those changes back in the editor after making it perfect.
You can use the Unused CSS detector to audit your CSS selectors and see which ones don’t match anything in the page. For CSS selectors that only apply in some conditions (e.g., validation), you can click Start Recording CSS, interact with your page so that all of the selectors should apply, then go back to Visual Studio. You will see all of the selectors that didn’t match anything in the warning list.
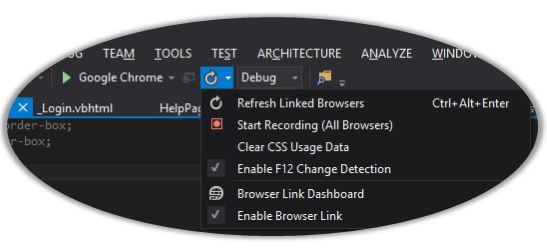
You can see the status of this feature in the Browser Link dropdown button, next to the Run button in the toolbar. If the button is disabled, make sure that your project targets .Net 4.0 or later, and that your Web.config has <compilation debug="true">. (To enable it in release mode, add <add key="vs:enableBrowserLink" value="true" /> to <appSettings> instead). Browser Link is implemented entirely as normal ASP.Net modules, so it can work with any local ASP.Net server.
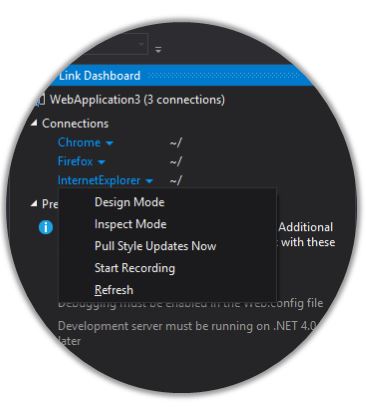
From this menu, you can invoke Browser Link extensions, and show the Browser Link dashboard. The dashboard shows all currently connected browsers, and allows you to run extension commands against individual browsers. The dashboard also shows troubleshooting tips to help solve common problems.
Browser Link can also work with static HTML files; you can use it to debug static sites even if .Net is not involved at all. However, you must still use a .Net 4.0+ based server (such as IIS or IIS Express) so that the ASP.Net module can run. You also need to register the module in Web.config so that it runs for static pages; see the documentation.
Solution Settings
Many of Web Essentials’ settings (especially CSS / LESS compilation settings) are highly specific to the projects you’re working on. For some projects (e.g., static sites), you may want Web Essentials to compile everything; for others (e.g., larger sites with deployment-time CDN setups), you may want that to be handled elsewhere, and use less.js in the browser for development.
To support this, you can right-click your solution and click Web Essentials, Create Solution Settings. Web Essentials will create a WE2013-settings.xml file in the solution directory, initialized with the current system-wide Web Essentials settings. Once this file exists, Web Essentials will read all of its settings from the file, and the Web Essentials settings pages in Tools, Options will write to the file in your solution instead of the system-wide Web Essentials settings file. You can check the file into source control to make sure that all developers on a team share the same settings.
Unfortunately, this feature only applies to Web Essentials settings; there is still no good way to save (e.g.) C# formatting settings on a per-project basis. However, you can set tabs/spaces settings on a per-project or even per-file/directory basis using EditorConfig and its Visual Studio extension.
About the author

Schabse has been writing code in various languages since he was 12, starting with VB6 and moving on to more decent languages like C# and Javascript, including modern web client development and Node.js. He enjoys explaining complicated ideas on StackOverflow, believing that understanding the concepts they're working with is the best way for budding programmers to succeed in the real world. Lately, he's been focusing on functional programming and more-powerful type systems. He blogs at https://blog.slaks.net and can be found on Twitter at @Schabse.