Windows 8 /8.1 ApplicationDataContainers and VB


Editor’s note: The following post was written by Visual Basic MVP Ockert Johannes du Preez
Windows 8 /8.1 ApplicationDataContainers and VB
Storing little pieces of information is pivotal to any program. The trick however is: knowing what tools are at your disposal in such cases. Many a programmer is still trying to wrap their heads around Windows 8’s way of doing things. Windows 8.1 is not an exception. The Windows Store is an even bigger culprit when it comes to topics such as storing info. Why? Because Windows Store apps do not make use of Desktop app’s APIs and tools. It has its own set of tools and APIs with which we need to program.
Enough small talk, let’s get started.
To store small bits of information in your Windows 8 / 8.1 Store app, you will need to use the ApplicationDataContainer class. There are in effect, two separate ways you could use this class. You could use it to store your data locally ( on the local application data store ), or the roaming application data store ( this means that it is easy to sync information across multiple devices ). Today I will concentrate only on the local application data store.
The ApplicationDataContainer class has two methods and four properties. The methods are: CreateContainer and DeleteContainer. The properties are: Containers, Locality, Name and Values.
Let us put all of these to use.
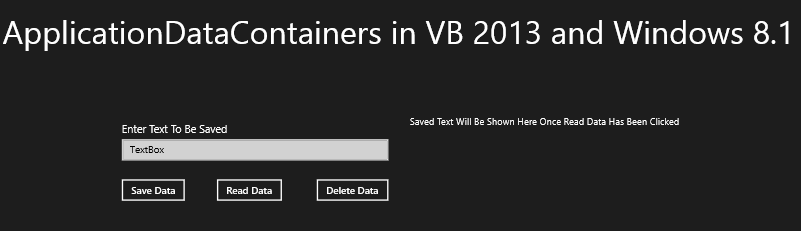
Fire up Visual Studio 2013 Preview on Windows 8.1 Preview, or Visual Studio 2013 RC on Windows 8.1 RTM, and start a Visual Basic Windows Store project. You can give it a descriptive name. Design your MainPage.xaml to resemble the following picture:
Figure 1 – Our design
The resulting XAML Code looks as follows :
Code Segment 1 – XAML code for MainPage.xaml
<Grid Background="{StaticResource ApplicationPageBackgroundThemeBrush}">
<TextBlock HorizontalAlignment="Left" TextWrapping="Wrap" Text="ApplicationDataContainers in VB 2013 and Windows 8.1" VerticalAlignment="Top" FontSize="48" Margin="62,48,0,0" Width="1222"/>
<Button x:Name="btDelData" Content="Delete Data" HorizontalAlignment="Left" VerticalAlignment="Top" Margin="528,290,0,0"/>
<Button x:Name="btDelData" Content="Read Data" HorizontalAlignment="Left" VerticalAlignment="Top" Margin="379,290,0,0"/>
<Button x:Name="btDelData" Content="Save Data" HorizontalAlignment="Left" VerticalAlignment="Top" Margin="237,290,0,0"/>
<TextBlock HorizontalAlignment="Left" TextWrapping="Wrap" Text="Enter Text To Be Saved" VerticalAlignment="Top" Margin="240,209,0,0" FontSize="16"/>
<TextBlock x:Name="tbAppText" HorizontalAlignment="Left" TextWrapping="Wrap" Text="TextBox" VerticalAlignment="Top" Margin="240,233,0,0" Width="398"/>
<TextBlock x:Name="tShowText" HorizontalAlignment="Left" TextWrapping="Wrap" Text="Saved Text Will Be Shown Here Once Read Data Has Been Clicked" VerticalAlignment="Top" Margin="670,199,0,0" Height="126" Width="576" FontSize="14"/>
</Grid>
Obviously, you could copy and paste this code directly into your XAML code editor, but if you have chosen to have different names for your objects, yours would then look different.
Open up MainPage.Xaml.vb by double clicking on any of the created controls and add the following namespace declaration at the top of your code :
Code segment 2 – Imports statement
Imports Windows.Storage 'Import Storage Namespace To Access Storage Libraries
We need the Windows.Storage namespace so that we will be able to store and retrieve information. Add the following modular variable :
Code segment 3 – Modular variable that will assist in using the ApplicationDataContainer class
Private adcContainer As ApplicationDataContainer = _
ApplicationData.Current.LocalSettings 'Create LocalSettings Object To House All Containers & Data
Here we have created a variable named adcContainer which is a LocalSettings object for working with our local data. Now we get to the meat of our little program. The next order of business is to add the code to store a value with the use of the adcContainer object. Add the following code :
Code segment 4 – Storing Local data
'Store Information
Private Sub btSaveData_Click(sender As Object, e As RoutedEventArgs) Handles btSaveData.Click
'Create Named Container For Our Data
Dim adcDataKey As ApplicationDataContainer = _
adcContainer.CreateContainer("AppData_Example_Container", ApplicationDataCreateDisposition.Always) 'Always Create Container Again
'Ensure Container Does In Fact Exist
If adcContainer.Containers.ContainsKey("AppData_Example_Container") Then
'Store TextBox Text Into Newly Created Setting
adcContainer.Containers("AppData_Example_Container").Values("AppData_Example_Value") = tbAppText.Text
End If
End Sub
First, we created a container named AppData_Example_Container for our data that we want stored. Whilst creating this object we specify that it should always create the container. We then did a small test to see if this container object exists, then store a value inside of it. This value we obtain from the TextBox named tbAppText. We are halfway!
Once the information is stored, we need to obviously retrieve it, let us add the retrieval code now :
Code segment 5 – Retrieving Local data
'Retrieve Informartion
Private Sub btReadData_Click(sender As Object, e As RoutedEventArgs) Handles btReadData.Click
'Determine If We Have A Key To Work With
Dim blnContainerExist As Boolean = adcContainer.Containers.ContainsKey("AppData_Example_Container")
Dim blnSettingExist As Boolean = False 'To Determine If A Valid Value Present In Key
If blnContainerExist Then 'Container / Key Exists
'Check To See If It Has A Valid Value
blnSettingExist = adcContainer.Containers("AppData_Example_Container").Values.ContainsKey("AppData_Example_Value")
'Display Retrieved Value
tShowText.Text = adcContainer.Containers("AppData_Example_Container").Values("AppData_Example_Value")
Else
tShowText.Text = ""
End If
End Sub
In the above code segment, we do a test to see whether or not the DataContainer named AppData_Example_Container exists or not. We then do another test to see if there is a value stored inside the AppData_Example_Container. If there is indeed a value, we display the value present. If there isn’t a value, we show nothing.
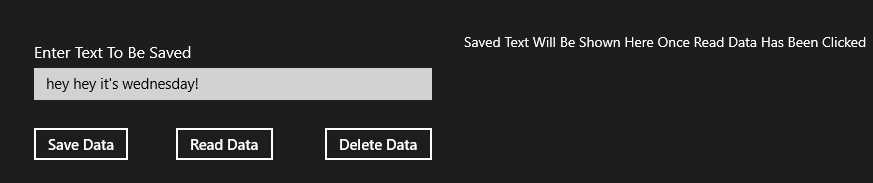
If we were to run this app now, we will be greeted with a screen similar to Figure 2, where we can enter information.
Figure 2 – Entering and Storing data
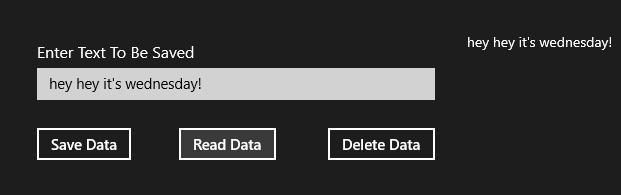
Once we have stored the data and clicked on Read Data, your screen will resemble Figure 3.
Figure 3 – Retrieved Data
The finish line is in sight! We already have a working project that we can build on and customize exactly to our needs. I do, however just want to show you one more thing, that is: deleting ApplicationdataContainers. Let us add the last code for our program :
Code segment 6 – Deleting ApplicationdataContainers
'Delete Key / Container
Private Sub btDelData_Click(sender As Object, e As RoutedEventArgs) Handles btDelData.Click
adcContainer.DeleteContainer("AppData_Example_Container") 'Delete Container
End Sub
This simply deletes the Container named AppData_Example_Container
I hope you have enjoyed today’s lesson as much as I have, until next time, happy coding!
About the author

Hannes (AKA. Ockert J. du Preez ) has been actively engaged with the community since 1998. He has been involved with CodeGuru since 2001. Since then he has accumulated almost 11,000 posts on CodeGuru. He has been writing articles for CodeGuru since 2005. He is a trainer at National Computer College Vereeniging (South Africa) since 1998. He provides sessions on the following languages: Visual Basic 5 – 6, Visual Basic.NET, C, C++, C#, Java, HTML 4-5, CSS, JavaScript, PHP, VBScript, SQL and ASP.NET. You can learn more about Hannes on his website or Facebook page.
About MVP Monday
The MVP Monday Series is created by Melissa Travers. In this series we work to provide readers with a guest post from an MVP every Monday. Melissa is a Community Program Manager, formerly known as MVP Lead, for Messaging and Collaboration (Exchange, Lync, Office 365 and SharePoint) and Microsoft Dynamics in the US. She began her career at Microsoft as an Exchange Support Engineer and has been working with the technical community in some capacity for almost a decade. In her spare time she enjoys going to the gym, shopping for handbags, watching period and fantasy dramas, and spending time with her children and miniature Dachshund. Melissa lives in North Carolina and works out of the Microsoft Charlotte office.