SharePoint 2013 Apps: Build and Sell Branding Apps in Office Marketplace
Editor’s note: The following post was written by SharePoint MVP Yaroslav Pentsarskyy
SharePoint 2013 apps: build and sell branding apps in office marketplace
SharePoint apps are not just about useful webpart-like components; using the new app model you can build custom branding and themes for SharePoint 2013 and share them with the rest of the world with office markeplace
Today we’re going to see how you can package your custom SharePoint 2013 branding as an app.
If you’ve been involved in SharePoint branding before, you definitely want to consider selling your creative branding on the marketplace to thousands of potential customers. The cool part about selling your branding as an app is that there isn’t much to technicalities of building an app and all of your existing CSS and JavaScript skills are transferable; the rest we’ll cover here!
Step 1. Get yourself an online developer site
Before getting into development you obviously need a reliable platform for developing your app. The easiest way to get a starter development environment is to sign up for office 365 developer site.
You can get a fully functional limited trial Office 365 developer site here
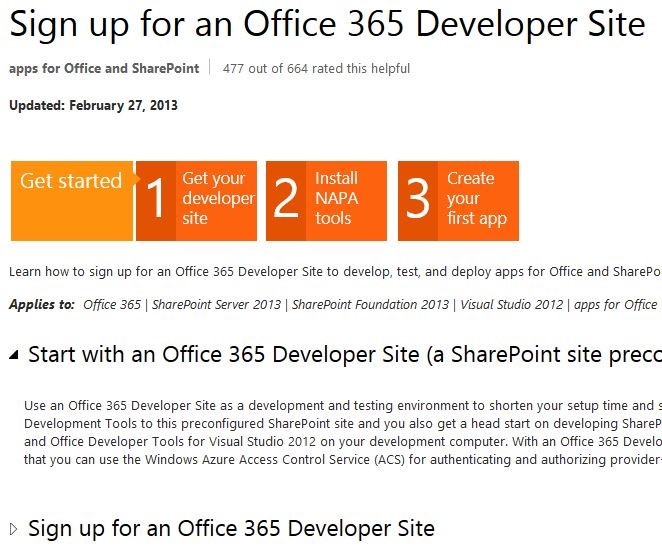
Follow the usual sign up process and you will be set up with working developer site in no time.
Next, ensure you have Visual Studio 2012 installed with office 2013 developer tools available here: https://aka.ms/OfficeDevToolsForVS2012
Step 2. Start modifying site master page
Once you have a developer site going and Visual Studio 2012, you’re ready to go with branding development
Download an existing SharePoint master page from your developer site
- · Click Gear icon | Site settings | Masterpages
- · From the library download one of the existing master pages: oslo.master or seattle.master
Modify your master page with custom markup, CSS, and JavaScript
Find the downloaded master page and add any markup, JavaScript, and CSS you need to make it your own. Since this is a creative process you can go as simple or as complex as you want. For the purposes of following this tutorial you may want to add a piece of markup to easily identify that your master page has been applied.
In my case I added a bit of markup right above the suite bar of the master page as you can see below:

Save the master page.
Step 3. Create SharePoint 2013 app project in Visual Studio 2012
Yes, it’s time to create an app project in Visual Studio:
- · Create new Visual Studio project of type: App for SharePoint 2013
- · Specify the app name, your developer site URL similar to how I have it below, obviously entering your own values:
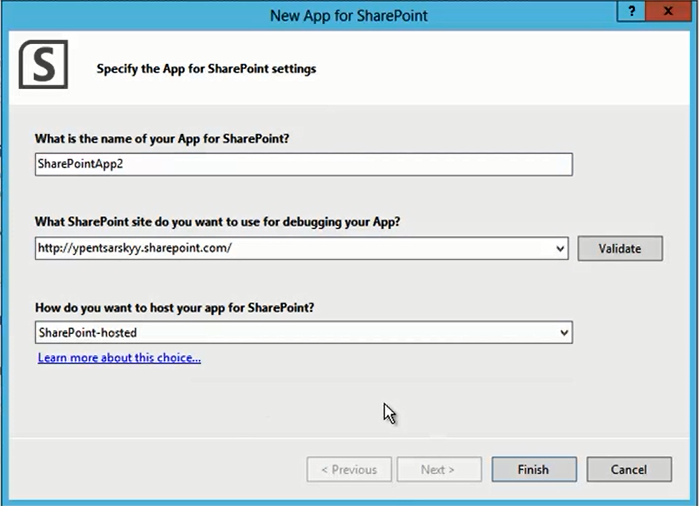
- · Click Finish to create a project
Once the project has been create, we’ll add a new module which will carry our master page:
- · Right click the project name
- · From the context menu select Add | New Item …
- · In the resulting dialog select Module as an item name and for the name type Masterpages
- · Click Add
- · In your Solution Explorer, you’ll notice Visual Studio added a module with a couple of sample files. Delete the Sample.txt
- · Right click on the module and select Add | Existing Item …
- · Locate your modified master page from Step 2; your solution structure will look similar to below

Step 4. Writing a script to set your master page
Master page is ready, now we need to add a script which will set it as a current site master page so everyone can see it, here is what needs to be done:
- · Open the Scripts module in your Solution Explorer and locate the file called App.JS
This script is called from the app page so every time the app default page is called the script gets executed, we’ll change the script to perform our custom set up actions.
- · Replace the contents of App.JS with the following custom JavaScript:
var context;
var web;
var user;
function sharePointReady() {
updateMaster();
}
function updateMaster() {
var clientContext = new SP.ClientContext('/');
this.web = clientContext.get_web();
// replace the ‘SharePointApp2’ with the name of your app this.web.set_masterUrl('/SharePointApp2/MasterPages/yaroslav.master');
clientContext.load(this.web);
clientContext.executeQueryAsync(
Function.createDelegate(this, this.onQuerySucceeded), Function.createDelegate(this, this.onQueryFailed)
);
}
function onQuerySucceeded(sender, args) {
alert('New Master Page set to: ' + this.web.get_masterUrl());
}
function onQueryFailed(sender, args) {
alert('Request failed. ' + args.get_message() + '\n' + args.get_stackTrace());
}
Essentially what happens above is that the function called from our main app page invokes the code which set the current master page on the site to be Yaroslav.master . You need to make sure you modify the name of the master page to be your master page also change the path to the app from SharePointApp2 to whatever the name you gave to your app in Step 3.
Step 5. Ensuring your app has proper permissions
Since your app will need to change the current master page on the site, it will have to request permission to do so. If your user agrees to give it such permission, your app will run.
To ensure your app requests proper permission:
- · Double click the AppManifest.XML in your solution explorer.
- · Under permission requests category, set Web as a scope, and Full Control as a permission as shown below:

Step 6. Deploy your app
We’re now ready to test our app, so right click on the project name in your Solution Explorer and select Deploy. The app fill now be deploy to your developer site.
You will be prompted to enter credentials to your SharePoint developer site so the provisioning continues.
Watch the output window to see when your app is deployed.
Once the app is deployed, your will see permission request page in your browser similar to below:
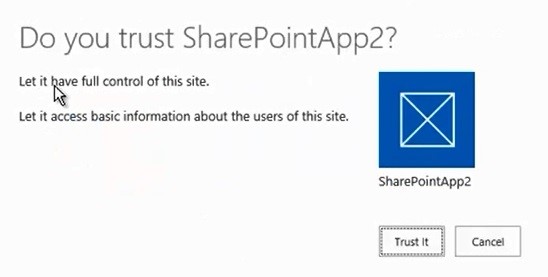
This page is a result of configuration we performed in Step 5 to request permission. If we didn’t set the app to request permissions, this page would not have come up but our script would fail. In our case, we’ll just click Trust It so the app runs.
Once the install succeeds you will see your app in the list of all the apps.
Step 7. Running the app
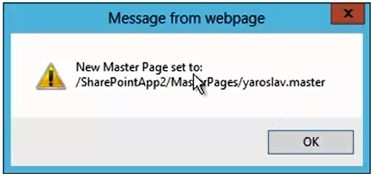
Now, we’re ready run the app. Click the app icon to run the app; this will invoke the app default page which runs our master page set up script.
As a result, if everything is successful we’ll see the message similar to below:
When you navigate to the root of your developer site, you will see that the master page has been switched and now your site looks differently according to your branding specs.
Step 8. Making it production ready
So that’s it, our app is functional and ready for sale? Well there are few things you need to consider before making your app public:
- · Create proper configuration interface. In our app, we set the current master page to our custom as soon as the user click on the app. That’s great for prototype but for production you probably want to give your users a drop down option with a button allowing them to choose to set master page to whatever they want and reverse their configuration.
- · Ensure that site inheriting master page from the root site look properly. With our example, the master page has been set on a root site. Many sites that live off the root site automatically inherit the master age from the root site. This means that if you change the master page for the root site, it will be switched for child sites and components on those site may not be ready for such change. Make sure the child sites render properly or allow user to pick which sites your custom master page applies to.
- · Test your app on all browsers supported by Office 365. Since Office 365 is supported by a variety of browser it would be a shame if your app only worked properly on one or two – so make sure you test it and fix any issues
That’s it! Ready to publish YOUR branding app on a marketplace?
About the author
![]()
Yaroslav has been involved in SharePoint solution architecture and implementation since 2003 as well as a Microsoft MVP since 2009. Yaroslav frequently presents at local and worldwide tech events as well as online. He is an avid blogger and writer. His blog offers fresh information and perspective on the latest SharePoint innovation. He has also published several books on SharePoint including, his latest best seller: Rapid SharePoint 2013 development; as well as: Top 60 custom solutions built on SharePoint 2010, SharePoint 2010 branding in practice, Microsoft SharePoint and PowerShell Expert Cookbook. Follow him on Twitter.
About MVP Monday
The MVP Monday Series is created by Melissa Travers. In this series we work to provide readers with a guest post from an MVP every Monday. Melissa is a Community Program Manager, formerly known as MVP Lead, for Messaging and Collaboration (Exchange, Lync, Office 365 and SharePoint) and Microsoft Dynamics in the US. She began her career at Microsoft as an Exchange Support Engineer and has been working with the technical community in some capacity for almost a decade. In her spare time she enjoys going to the gym, shopping for handbags, watching period and fantasy dramas, and spending time with her children and miniature Dachshund. Melissa lives in North Carolina and works out of the Microsoft Charlotte office.