Use Digital IDs (Certificates) to prove your identity in Outlook email transactions
Digital signatures are encryption-based, secure stamp of authentication on a macro or document.
This signature confirms that the macro or document originated from the signer and has not been
altered. Digital IDs includes digital certificate (certificate: A digital means of proving your identity.
When you send a digitally signed message you are sending your certificate and public key.
Certificates are issued by a certification authority, and like a driver's license, can expire or be
revoked. The key a sender gives to a recipient so that the recipient can verify the sender's signature
and confirm that the message was not altered. Recipients also use the public key to encrypt (lock)
email messages to the sender.), used to sign the contents of an Email message proves to the
recipient that you are not an imposter.
Note: You must get a digital ID before you can digitally sign an email message.
In this article, I will guide you through various steps involved in signing Email messages and
identify the validity of a signed message in in Outlook 2010.
How to ‘Digitally sign’ an Email message in Microsoft Outlook?
Note: You should purchase a Digital ID, from a trusted third party Certificate provider or get a Digital ID
from your organization’s CA. You may go here, to find out some of the Digital ID providers. Copy the .pfx
file to your computer before proceeding to the following steps:
The following steps are prepared in Outlook 2010 Professional.
Open Outlook 2010 and perform the following operations to include a Digital ID in outlook and send email
using that:
- Open the ‘Email Security’ section in Outlook 2010
- Click the File tab and click Options
- Click Trust Center from the left side menu of the window shown.
- Click Trust Center Settings button
- Select E-mail Security from the left side menu of the window shown:
This will evoke a window as shown below:
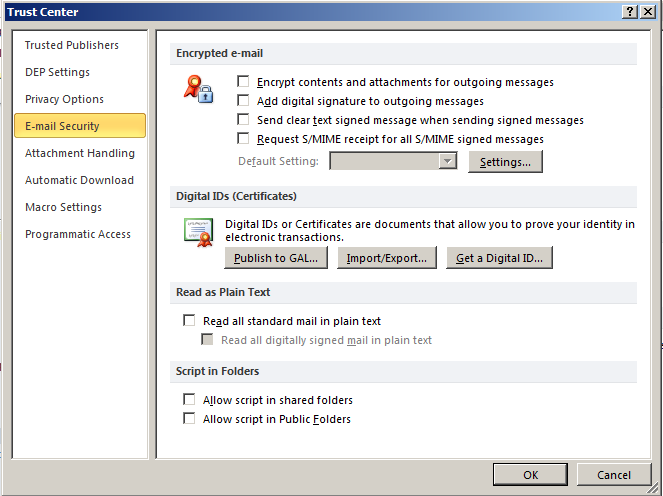
2. Under Encrypted e-mail section, select the Add digital signature to outgoing messages check box.
3. If available, you can select one of the followingoptions:
-
- If you want recipients who don't have S/MIME (S/MIME: Secure Multipurpose Internet Mail
Extensions (S/MIME) is aspecification for secure email messages that uses the X.509
format for digitalcertificates and uses various encryption algorithms such as 3DES.) security
to be able to read the message, select the Send clear text signed message when sending
signed messages check box. - To verify that your digitally signed message was received unaltered by the intended
recipients, select the Request S/MIME receipt for all S/MIME signed messages check
box. You can request notification tellingyou who opened the message and when it was
opened, when you send a message that uses an S/MIME return receipt request, this
verification information is returned as a message sent to your Inbox.
- If you want recipients who don't have S/MIME (S/MIME: Secure Multipurpose Internet Mail
4. Now we want to import the Digital ID stored in your computer to the outlook system.
-
- Click Import/Export button at the Trust Center window
- Browse the Digital ID (.pfx file) stored location in your computer. Give the password used for
encryption. Also give a friendly name. Press ‘OK’ in the window to import the digital id to the
outlook system. - You will be prompted with ‘Importing a new Private Exchange key’ window. You can set
thesecurity level of usage of the certificate there. Press ‘OK’ after doing necessary changes.
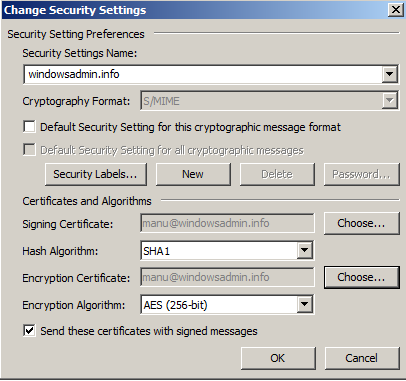
5. Now we want to choose the Digital ID for our email signing purposes
-
- Click ‘Settings’ button at the ‘Trust Center’ window and you will be prompted with
‘Change Security Settings’ window as shown below:
- Click ‘Settings’ button at the ‘Trust Center’ window and you will be prompted with
-
- Give a friendly security settings name
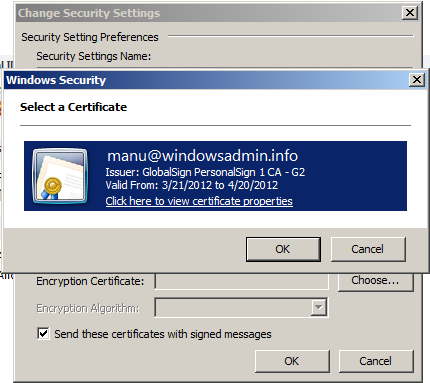
- In ‘Certificates and Algorithm’ section press ‘Choose’ to choose the certificate imported for
the purpose. You will be able to get the certificate as shown in the below screen shot:
-
-
- Press ‘OK’ to select the certificate
- Now you may set the ‘Hashing Algorithm’ and ‘Encryption Algorithm’, according your
security concerns in the ‘Change Security Settings’ window
6. Accept the changes in the open windows by pressing ‘OK’ buttons. Now you will be able to use the
Digital ID to sign the email send from the corresponding email address configured in your outlook
application
7. You can see the following highlighted changes in the sent email as shown below:

8. The recipient can check the ‘digital signature’ of the email received, by clicking the right most
security icon. Click there to get the following screen:
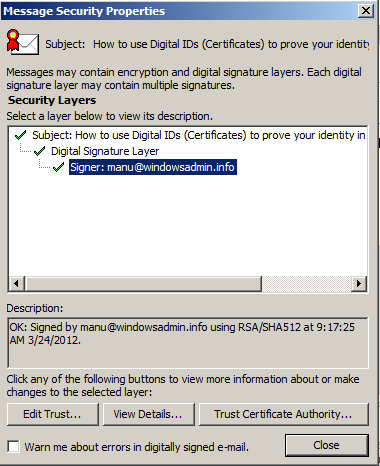
9. You may now ‘edit trust’, ‘View certificate details’ or ‘can trust the certification authority’ in the window.
Author's Bio

MVP Mondays The MVP Monday Series is created by Melissa Travers. In this series we work to provide readers with a guest post from an MVP every Monday. Melissa is a Community Program Manager for Dynamics, Excel, Office 365, Platforms and SharePoint in the United States. She has been working with MVPs since her early days as Microsoft Exchange Support Engineer when MVPs would answer all the questions in the old newsgroups before she could get to them. |
 |