Configure Remote BLOB Storage (RBS) with the FILESTREAM provider (SharePoint 2010)
In this article I am describing about how to install and configure Remote BLOB Storage (RBS) with the
FILESTREAM provider on a Microsoft SQL Server 2008 database server that supports a Microsoft
SharePoint Server 2010 system. RBS is typically recommended in the case where the content
databases are 4 gigabytes (GB) or larger.
SharePoint stores the files (or the blobs) in content database. The advantage of that approach is it
simplifies the backup and restores process. We can back up a site collection related data in one file.
The disadvantage is the database size can be enormous if Site contains large number of files. It
may a critical problem if you use SQL Server Express Edition which has a limitation in database file
size. RBS is a library API set that is incorporated as an add-on feature pack for Microsoft SQL Server
2008 and Microsoft SQL Server 2008 Express. RBS is designed to move the storage of binary large
objects (BLOBs) from database servers to commodity storage solutions. RBS ships with the RBS
FILESTREAM provider, which uses the RBS APIs to store BLOBs.
We can configure SharePoint to stores the blob in the file system, instead of in database by possible
by leveraging FILESTREAM feature of SQL Server 2008 and Remote BLOB Storage (RBS). With
SharePoint 2010, the Remote Blob Storage (RBS) functionality allows putting documents into the
database file system instead of the database itself. Each content database is located in a specific
section of the file system where all the documents are stored.
Enable File Stream in SQL Server
Connect to SQL Server
Start -> All Programs -> Microsoft SQL Server 2008 ->Configuration Tools -> SQL Server
Configurations ManagerIn the Services list, click "SQL Server Services"
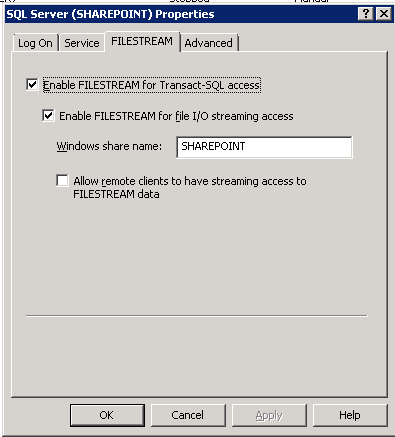
Choose your SQL instance (For me "SQL Server (SHAREPOINT)") and right click Properties.
Switch to the FILESTREAM tab and check all the available checkboxes
Click Apply -> OK
Now start SQL Server Management Studio
Open a query windows and execute the below SQL Statement mater database is fine
EXEC sp_configure filestream_access_level, 2
RECONFIGURE
Next we should have a web application and a content database created for the same.
If you didn't created create a content data base for your web application. I have created
a content data base with the name SP2010_BlobYou can use Power shell to create a new content DB with the following command
New-SPContentDatabase -name SP2010_Blob-WebApplication url
Now we have to enable our new content DB to be prepared to use FILE STREAM
Start
-> All Programs -> Microsoft SQL Server 2008 R2 ->SQL Server Management
StudioRight click on SP2010_Blob and select a query window and execute the below
statement. Replace "C:\BlobFiles " by your storage-pathuse [SP2010_Blob]
if not exists (select * from sys.symmetric_keys where name =
N'##MS_DatabaseMasterKey##')create master key encryption by
password = N'Admin Key Password !2#4'use [SP2010_Blob]
if not exists (select groupname from sysfilegroups where
groupname=N'RBSFilestreamProvider')alter database [SP2010_Blob] add
filegroup RBSFilestreamProvider contains filestreamuse [SP2010_Blob]
alter database [SP2010_Blob] add file (name = RBSFilestreamFile, filename
= 'c:\ BlobFiles) to filegroup RBSFilestreamProvider
Install RBS on Web Server
You must install RBS on the database server and on all Web servers and application
servers in the SharePoint farm. You must configure RBS separately for each
associated content database.On any Web server, go to https://go.microsoft.com/fwlink/?LinkID=177388
(https://go.microsoft.com/fwlink/?LinkID=177388) to download the RBS.msi file.Click Start and then type cmd in the text box. In the list of results,right-click cmd, and
then click Run as administrator. Click OK.Copy and paste the following command at the command prompt:
Make sure you are running this command in the downloaded RBS.msi folder
msiexec /qn /lvx* rbs_install_log.txt /i RBS_X64.msi
TRUSTSERVERCERTIFICATE=true FILEGROUP=PRIMARY
DBNAME="<ContentDbName>"
DBINSTANCE="<DBInstanceName>"
FILESTREAMFILEGROUP=RBSFilestreamProvider
FILESTREAMSTORENAME=FilestreamProvider_1
Where:
1. <ContentDbName> is the database name in my case SP2010_Blob.
2. <DBInstanceName> is the SQL Server instance name in my case DB
SERVERNAME\SHAREPOINT.Please note you should give full name like I givenTo install RBS on all additional Web and application servers
Click Start and then type cmd in the text box. In the list of results, right-click cmd,
and then click Run as administrator. Click OK.Copyand paste the following command at the command prompt:
msiexec /qn /lvx* rbs_install_log.txt /i
RBS_X64.msi DBNAME="ContentDbName"
DBINSTANCE="DBInstanceName"
ADDLOCAL="Client,Docs,Maintainer,ServerScript,FilestreamClient,FilestreamServer"
You should repeat this procedure on all Web servers and application servers. If you do
not install RBS on every Web and application server, users will encounter errors when
they try to write to the content databases.The rbs_install_log.txt log file is created in the same location as the RBS.msi file. Open
the rbs_install_log.txt log file with a text editor and scroll toward the bottom of the file.
Within the last 20 lines of the end of the file, an entry should read as follows:
"Product: SQL Remote Blob Storage - Installation completed successfully".The script has created a some tables in the database, the following query help us to
check that
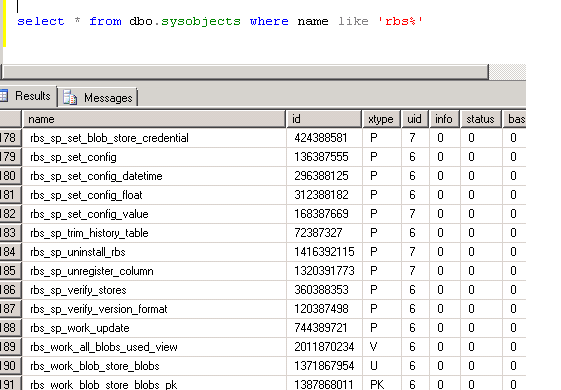
use SP2010_Blobselect * from dbo.sysobjects
where name like 'rbs%'
To enable RBS
On the Start menu, click Programs, click Microsoft SharePoint 2010 Products, and then
click SharePoint 2010 Management Shell.At the Windows PowerShell command prompt, type each of the following commands.
$cdb = Get-SPContentDatabase -WebApplication Your
URL$rbss = $cdb.RemoteBlobStorageSettings
$rbss.Installed()
$rbss.Enable()
$rbss.SetActiveProviderName($rbss.GetProviderNames()[0])
$rbss
We almost did with the configuration. Create a site collection and should use
the content database "SP2010_Blob".Connect to WFE
Go to SharePoint 2010 Central Administration
Under Application Management - Manage Content Databases Choose the applicable
Web Application from the drop down aboveConfigure the Content Database to put the next site collection to "SP2010_Blob"
Go back to the main site of Central Administration
Application Management - Create Site Collection
Make sure by going to content database that the site collection we created will be in the
content database that we configured
To test the RBS data store
- Connect to a document library on any Web server.
- Upload a file that is at least 100 kilobytes (KB) to the document library.
- Documents below 100 kB will not be put to the file system but will be stored in the
database. - On the computer that contains the RBS data store, click Start, and then click
Computer. - Browse to the RBS data store directory.
- Browse to the file list and open the folder that has the most recent modified date
(other than $FSLOG). In that folder, open the file that has the most recent modified date.
Verify that this file has the same size and contents as the file that you uploaded
Author's Bio
 |
Destin Joy is a Microsoft MVP on SharePoint Server. He isan author, speaker and a blogger in Microsoft technology. Currently Destin isin the final phase of creating his second EBook on “SharePoint 2010 CapacityPlanning”, which will be published in C# corner. |
MVP Mondays The MVP Monday Series is created by Melissa Travers. In this series we work to provide readers with a guest post from an MVP every Monday. Melissa is a Community Program Manager for Dynamics, Excel, Office 365, Platforms and SharePoint in the United States. She has been working with MVPs since her early days as Microsoft Exchange Support Engineer when MVPs would answer all the questions in the old newsgroups before she could get to them. |
 |