MVPs for Office 365: Pre-Populating InfoPath 2010 Forms
Editor's Note: The following MVP Monday post is by SharePoint Server MVP Clayton Cobb.
One of the most powerful features of InfoPath 2010 is the ability to dynamically populate fields in the form
with already-known data without input from the user – or with minimal input. With out-of-the-box (OOTB)
list forms, we cannot do this, which makes OOTB forms very limiting in their native form. However, once
we switch to InfoPath forms,the possibilities increase immensely.
In this article, we will provide a prequel to the article by Laura Rogers named SharePoint Designer
Workflow Tasks and InfoPath 2010. In that article, Laura showed us how to display relevant Expense
Report data when working with task forms within a SharePoint Designer workflow. In this article, I will
show you how to auto-populate data in the original form that the user is filling out to trigger the workflow,
and my scenario will be a Leave Request approval system, which is another common process in most
organizations.
The Components
The following components will be involved in the Leave Request approval solution:
- Leave Request - SharePoint form library that contains all leave requests that employees submit
for approval - InfoPath Designer 2010 - This software will be used in order to create the Leave Request form
that the user fills out - Data
Connections –
Multiple data connections will be used in the InfoPath form in order to retrieve and
auto-populate relevant data, thus making it easier, more efficient, and more accurate for the
employees - Rules – Action rules within the InfoPath form template will be leveraged for retrieving
parameterized data and for subsequently auto-populating form fields
The Leave Request Form Template
The Leave Request form template contains
the following columns (Fig. 1):
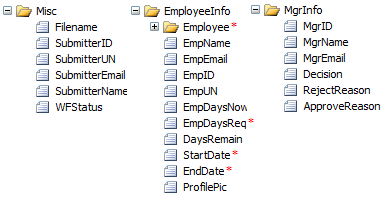
Figure 1 – InfoPath form fields used in the Leave Request form template
Some of these fields get promotedto the form library for display purposes and for usage in the
workflow, but others are used strictly within the form for comparison and matching purposes
while the form is open.
The run-time version of the form template looks like this (Fig. 2):
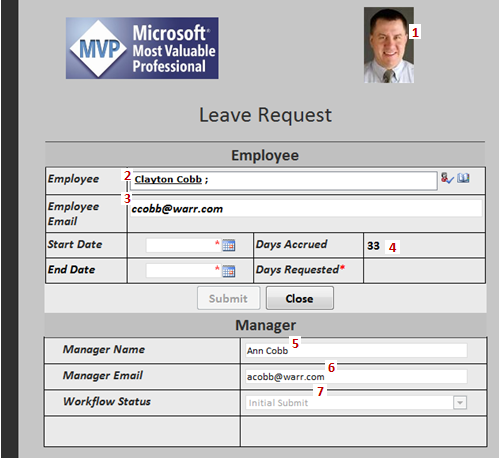
Figure 2 – InfoPath Leave Request run-time experience
Figure 2 above shows exactly what the user sees upon initially opening a Leave Request.
Let’s take a look at all the fields that are visibly auto-populated, and then we’ll show how each one
was done:
- Profile Picture
- Employee (Contact Selector)
- Employee Email
- Days Accrued
- Employee’s Manager
- Manager’s Email
- Workflow Status (this is driven
dynamically by the process via workflow and is read-only)
Let’s start by proving that the first 6 items in the above list really are coming from external data
sources (Fig. 3):
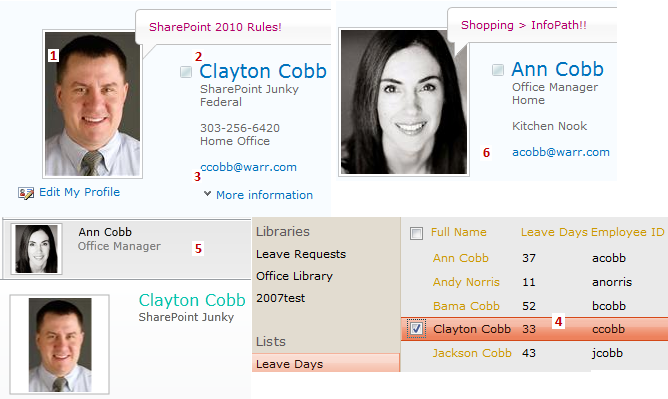
Figure 3 – Proof of external data sources
In Figure 3 above, you can see the following items:
- My profile picture, which is coming from my Profile and is being shown in the form
- My full name, which is coming from my Profile and is being shown as a fully-resolved
identity in the Contact Selector of the form - My email address, which is coming from my Profile and is being shown in the form
- My Leave Days accrued, which is coming from an External List in SharePoint 2010 and
is being shown in the form - My Manager, which is coming from my Profile and can be seen in the Silverlight
Organization Browser. Ann’s name is being shown in the form. - My Manager’s email address, which is coming from her Profile and is being shown in
the form
Data Connections
In order to retrieve this external data, we need to add the appropriate data connections as seen below (Fig. 4):
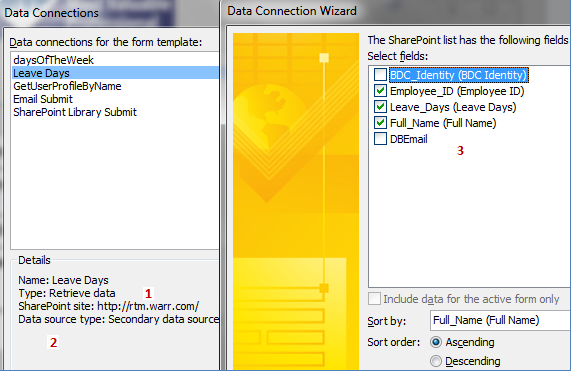
Figure 4 – Proof of external data sources
In Figure 4 above, you can see five data connections, but the two key ones for this article are
the ones named Leave Days and GetUserProfileByName. I’ve highlighted the Leave Days data
connection in this case in order to explain it in detail. You can get an in-depth
explanation of how to set up and use the GetUserProfileByName data connection here:
InfoPath - Get user information without writing code (extended).
Notice these details regarding the Leave Days data connection:
- It is a SharePoint list data connection
- It is set to NOT automatically retrieve data every time the form is opened. You can
tell this is true, because it does not show the detail line that says, “Data retrieved: Every
time form is opened.” - Three fields are being retrieved: Employee ID, Leave Days, and Full Name
Bullet #2 is very important, because this is something you want to always try to do whenever
it is possible. I am not querying the data connection on form load, because I want to query the
Leave Days list using a known value. If you query automatically on form load, then the resulting
data set includes all data from the source. If the source contains hundreds or thousands of items,
then your form’s performance will suffer. Instead, we are performing a parameterized query
so that the resulting data set only contains the information we need. This can still be done on
form load, but it cannot be done dynamically within the data connection settings itself. Instead, we
perform the steps shown below (Fig. 5 and 6):
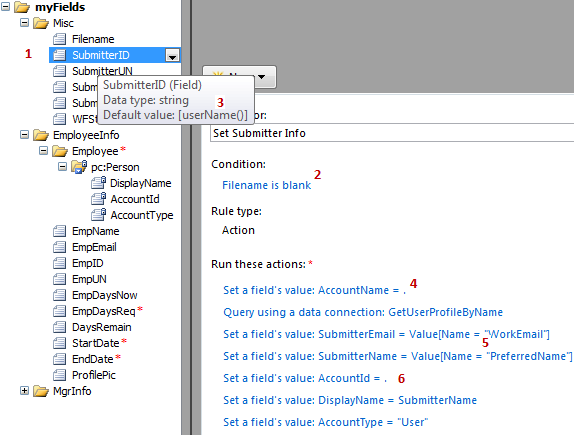
Figure 5 –Action rules that fire after form load, thus starting the auto-population process
Figure 5 above shows the initial actions that take place when the form is first opened.
Notice the following details:
- This action rule is associated with the SubmitterID field
- The action rule is set to only run if the Filename field is blank, which means it will only run
the first time the form is opened - The SubmitterID field has a default value, which is set to the userName() function.
Since this is a browser form, the userName() function will retrieve the full AccountName
value. In a Claims Mode web application, this value will resemble something like this:
i:0#.w|warr\ccobb - The first action in the rule is to set the AccountName query field of the
GetUserProfileByName data connection to the value of the current field
(SubmitterID), and that value is the same as the userName() value - Next, we set the SubmitterEmail and SubmitterName fields in the form to the
WorkEmail and PreferredName values from the GetUserProfileByName data
connection - After that, we set the three fields of the Employee Contact Selector. This causes
the Contact Selector to properly resolve to the identity of the user who opened
the form. This value can then be changed by the Submitter, which would then trigger
all the corresponding fields to change to the values of the selected user:- AccountId = current field’s value (SubmitterID)
- DisplayName = SubmitterName
- AccountType = “User” (static text without the quotes)
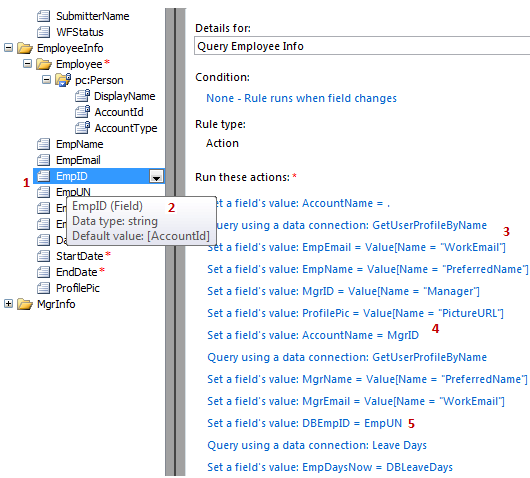
Figure 6 – Additional action rules that continue the auto-population process
Figure 6 above shows the next string of actions that auto-populate the rest of the fields in the form:
- First, notice that this action rule is associated with the EmpID field
- The EmpID field has a default value, which is set to the value of the AccountId field.
If you recall from Step 6 of Figure 5, the AccountId field is part of the Employee Contact
Selector, and its value is equal to the AccountName of the original user who opened
the form OR the Employee selected in the Contact Selector by the original submitter. - The first thing the rule does is to retrieve profile information for the selected user from
the Contact Selector including the following fields:- EmpEmail = WorkEmail
- EmpName = PreferredName
- MgrID = Manager (this is the AccountName of the selected user’s
Manager) - ProfilePic = PictureURL (this is the URL to the selected user’s profile picture)
- Next, the GetUserProfileByName data connection is re-queried using the MgrID so that
we can get the Manager’s profile info:- MgrName = PreferredName
- MgrEmail = WorkEmail
- Lastly, we set the Employee ID (DBEmpID) query field of the Leave Days data
connection to the EmpUN field of the form so that we can retrieve the selected user’s
accrued # of leave days. This step isn’t shown, but the EmpUN field has a default value that is
set to the username portion of the EmpID field by using the following function:
substring-after(EmpID, "\") . This function takes the value of i:0#.w|warr\ccobb and converts
it to ccobb, which is the format of the username value stored in the Leave Days list shown in
Figure 3. The summary of steps is as follows:- Set the Employee ID query parameter of the Leave Days data connection to the
selected user’s username - Query the Leave Days data connection
- Set the Days Accrued field of the form’s main data source to the Leave Days field of
the LeaveDays data connection
- Set the Employee ID query parameter of the Leave Days data connection to the
The result
of this string of steps is that we only retrieve the data for the current/selected user (i.e. Clayton Cobb)
instead of the entire data set, and then we auto-populate the most important field – Days
Accrued - with the current user’s actual # of accrued leave days per the master data source. Again,
this technique is extremely important to master, because it will streamline your solutions while
ensuring the least amount of overheard with your data connections. This technique will allow you to
deal with large data sets in an efficient manner while resulting in excellent performance.
Putting
forth the effort on the front-end of your solution so that your form template populates as many fields
as possible is highly recommended. Approaching forms in this manner allows your users to spend
less time, have less frustration, have fewer mistakes, and have more meaningful interactions with
your solutions. Doing this helps transform frustrating paper-based processes into streamlined
electronic-based processes.

