Release Management and DSC
This is the second post in a series. The first post can be found here.
In this post we’ll look at three things – configuring a server from scratch, deploying the required PowerShell DSC modules and using variables in the PowerShell DSC scripts.
Note
In the Windows Management Framework 5.0 which is currently in preview, the process for deploying DSC modules will (or can) change. More information on WMF 5.0 and the new PowerShell Gallery can be found here. With WMF 5.0 you can execute the PowerShell command Install-Module –Name xxxx and the module will be installed directly from the gallery. The method being provided here can be used as an alternate if you don’t want to do this (also, I really wanted to show a clean installation without having to pre-install WMF 5.0).
Deploying PowerShell DSC Modules as part of the Release and configuring the server from scratch
Let’s start with the basics – a clean machine. I loaded up a new machine in Azure and did absolutely nothing with it except to add the http endpoint so I could check to see if the website actually installed successfully. The name of the server is, appropriately I think, “AppFromScratch”.
Next, I’m going to continue with the BlogDemo example from the previous post so if you haven’t read that, it’s probably good to skim it.
I’ll quickly go through the setup for this walkthrough.
- Create a new build called “BlogDemo From Scratch”
- In the RM client I linked the new environment and server
- I created a new path with only a Development environment pointed to the clean server
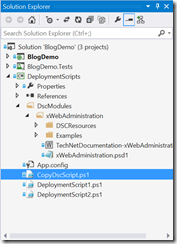
Next, I’ll go through the changes in the solution – specifically the DeploymentScripts project. At the end of this the project will look like that in Figure 1.
Figure 1 – Solution at the end of this section of the walkthrough
The first thing to do is to add the xWebAdministration PowerShell to source code. This is kind of a pain in the butt and I’m working on a better solution. The reason it’s a pain is because it requires you to go into every folder and mark each file as “Copy if newer”. But stay tuned for a more streamlined approach to be presented in a later blog. I’ll come back and update this post with a link.
The next thing to do is to add a new PowerShell script file called “CopyDscScript.ps1”. This script looks like the following:
1: configuration FileCopy
2: {
3: node localhost
4: {
5: File CopyDSCModules
6: {
7: Ensure = "Present"
8: Type = "Directory"
9: Recurse = $true
10: SourcePath = join-path $applicationPath "DSCModules"
11: DestinationPath = "C:\program files\WindowsPowerShell\Modules"
12: }
13: }
14: }
15:
16: FileCopy
This is a pretty basic DSC configuration – it just copies the DSCModules folder from the output location to one of the PowerShell module locations on the server (there are ways to get this value but in many cases they return multiple locations so it’s just hard-coded here as a safe location that’s always available).
Next, add a new deployment script called “DeploymentScript2.ps1” which looks like the following:
1: configuration FullSetup
2: {
3: Import-DscResource -Module xWebAdministration
4:
5: node localhost
6: {
7: WindowsFeature IIS
8: {
9: Ensure = "Present"
10: Name = "Web-Server"
11: }
12:
13: WindowsFeature ASPNet45
14: {
15: Ensure = "Present"
16: Name = "Web-Asp-Net45"
17: DependsOn = "[WindowsFeature]IIS"
18: }
19:
20: File CopyDeploymentBits
21: {
22: Ensure = "Present"
23: Type = "Directory"
24: Recurse = $true
25: SourcePath = join-path $applicationPath "_PublishedWebsites"
26: DestinationPath = "C:\inetpub\wwwroot"
27: DependsOn = "[WindowsFeature]ASPNet45"
28: }
29:
30: xWebsite DefaultSite
31: {
32: Ensure = "Present"
33: Name = "Default Web Site"
34: State = "Stopped"
35: PhysicalPath = "C:\inetpub\wwwroot"
36: DependsOn = "[File]CopyDeploymentBits"
37: }
38:
39: xWebsite NewWebsite
40: {
41: Ensure = "Present"
42: Name = "BlogDemo"
43: State = "Started"
44: PhysicalPath = "c:\inetpub\wwwroot\BlogDemo"
45: DependsOn = "[xWebsite]DefaultSite"
46: }
47: }
48: }
49:
50: FullSetup
The only thing different in this listing than the DeploymentScript1 from the previous blog post is that (well, besides the fact that I changed the name of the configuration to “FullSetup” since it more accurately describes the script) I added the installation of the IIS server and ASP.NET 4.5 as noted between lines 7 and 18.
Save all of this and check it into source control.
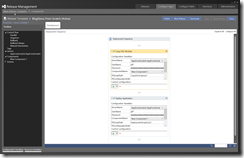
Next up is the release template. I created a new template called BlogDemo from Scratch which is shown in Figure 2.
Figure 2 – New Release Template
In this template there are two “Deploy Using PS/DSC” actions which I’ve renamed to illustrate their purpose. The configuration of both is identical except that I’m calling a different script. In the first one I’m deploying the DSC Module(s) and in the second I’m performing the server setup and deploying the application. You can of course break these up however you wish.
The beauty of DSC is that if IIS is already installed or ASP.NET 4.5 is already installed, those steps are skipped. This means that the second time I deploy to this server it will go much faster. In addition this servers as a communication point with Operations. Hence the new industry buzzword of “DevOps”. Anybody from Operations can see that this requires a web server with ASP.NET 4.5 installed.
Using variables in the PowerShell script
Up to this point everything has been hard-coded. As this is a fairly simple application there isn’t a huge need to parameterize the file but in any reasonably complex environment this is almost a requirement. In this section I’ll show you how to parameterize the physical path of the website because while it might be fine to deploy the web application c:\inetpub\wwwroot\BlogEngine it isn’t likely that Operations wants you to deploy your website their for numerous reasons. By parameterizing this value it can be changed per environment as needed.
There are two ways to do this. You can add the variable to the component (New Component 1 in this case) or you can add it directly into the action on the release design surface. The reason for the different approaches is that by adding the variable to the component it is available to all releases which use that component. Adding the variable to the release template makes it available only to that release. In this case I’ll add it to the component.
On the Configure Apps tab, select the Component page and edit New Component 1. On the Configuration Variables page add a new variable called physicalPath as shown in Figure 3.
Figure 3 – New configuration variable
Save and close the component and jump over to the release template.
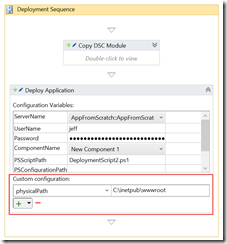
Expand the activity that deploys the application and click the green + under Custom Configuration. The physicalPath variable will be available for you in the drop down for the first path. Select it and then add the path in the second column as shown in Figure 4.
Figure 4 – Configuration variable used as part of a release template
To add a variable in the release template without adding it to the component you would just type the name in the first column here but otherwise everything would be the same.
Next, go back and edit the DeploymentScript2 as follows:
1: configuration FullSetup
2: {
3: Import-DscResource -Module xWebAdministration
4:
5: node localhost
6: {
7: WindowsFeature IIS
8: {
9: Ensure = "Present"
10: Name = "Web-Server"
11: }
12:
13: WindowsFeature ASPNet45
14: {
15: Ensure = "Present"
16: Name = "Web-Asp-Net45"
17: DependsOn = "[WindowsFeature]IIS"
18: }
19:
20: File CopyDeploymentBits
21: {
22: Ensure = "Present"
23: Type = "Directory"
24: Recurse = $true
25: SourcePath = join-path $applicationPath "_PublishedWebsites"
26: DestinationPath = $physicalPath
27: DependsOn = "[WindowsFeature]ASPNet45"
28: }
29:
30: xWebsite DefaultSite
31: {
32: Ensure = "Present"
33: Name = "Default Web Site"
34: State = "Stopped"
35: PhysicalPath = "C:\inetpub\wwwroot"
36: DependsOn = "[File]CopyDeploymentBits"
37: }
38:
39: xWebsite NewWebsite
40: {
41: Ensure = "Present"
42: Name = "BlogDemo"
43: State = "Started"
44: PhysicalPath = join-path $physicalPath "BlogDemo"
45: DependsOn = "[xWebsite]DefaultSite"
46: }
47: }
48: }
49:
50: FullSetup
The specific changes are on lines 26 and 44. The reason line 35 wasn’t changed is because that’s the physical path of the default website and we don’t have any control over that (it’s also a different location than where we might put our website).
Check the change in and when the new release kicks off the website will have been updated successfully.
Hopefully this post has given you some more insight into what you can do with DSC and RM. In the next post I’ll expand this to a more typical scenario which will provide for deploying a database as part of the release. After that, well, we’ll see as there are a lot of places to go with this…


