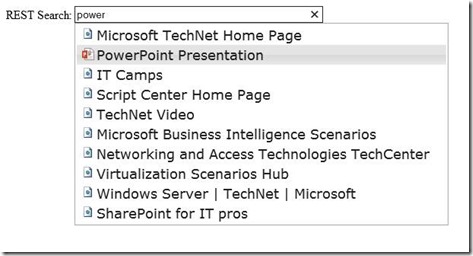
Using jQuery UI autocomplete with the REST API to get search results in the search box
SharePoint 2013 comes with a beautiful REST API that supports both search and suggestions. In this post I’ll show how to easily integrate search results into the search box to quickly show the users the results they want.
The example shows normal search results, but it could easily be changed to show e.g. products from a product search demo like Contoso Electronics.
The REST API in SharePoint 2013 can easily be integrated using javascript, as the returns can be returned as JSON.
I start with a very simple html page, which includes jQuery and jQueryUI from the jquery CDN.
    1: <html>
    2: <head>
    3: <title>REST demo</title>
    4: <link rel="stylesheet" href="https://code.jquery.com/ui/1.10.0/themes/base/jquery-ui.css" />
    5: <link rel="stylesheet" href="https://code.jquery.com/ui/1.10.0/themes/base/jquery.ui.autocomplete.css" />
    6: <script src="https://code.jquery.com/jquery-1.8.3.js"></script>   1:     2: <script src="https://code.jquery.com/ui/1.10.0/jquery-ui.js">   1: </script>   2: <script type="text/javascript" src="restSearch.js"></script>
    7: </head>
    8: <body>
    9: <table>
   10:    <tbody>
   11:       <tr>
   12:          <td>REST Search:</td>
   13:          <td>
   14:             <div id="menu-container" style="width:600px">
   15:                 <input type="text" id="restSearch" size="50"/>
   16:             </div>
   17:          </td>
   18:      </tr>
   19:    </tbody>
   20: </table>
   21: </body>
   22: </html>
The input-box with ID restSearch will be referenced later in my script restSearch.js, as well as the div tag with ID menu-container.
The script restSearch.js uses ajax to do a search against the REST API:
    1: // Parse an item and create an title/value dictionary with all the properties available
    2: function getFields(results) {
    3:     r = {};
    4:     for(var i = 0; i<results.length; i++) {
    5:         if(results[i] != undefined && results[i].Key != undefined) {
    6:             r[results[i].Key] = results[i].Value;
    7:         }
    8:     }
    9:     return r;
   10: }
   11:
   12: $(document).ready(function() {
   13:
   14:     var autocomplete = $( "#restSearch" ).autocomplete({
   15:         minLength: 3,
   16:         source: function( request, response ) {
   17:             $.ajax({
   18:                 beforeSend: function (request)
   19:                 {
   20:                     request.setRequestHeader("Accept", "application/json;odata=verbose;charset=utf-8");
   21:                 },
   22:                 url: "/_api/search/query?querytext='" + request.term + "*'",
   23:                 dataType: "json",
   24:                 success: function( data ) {
   25:                     response( $.map( data.d.query.PrimaryQueryResult.RelevantResults.Table.Rows.results, function( item ) {
   26:                         return {
   27:                             fields: getFields(item.Cells.results)
   28:                         }
   29:                     }));
   30:                 },
   31:                 error: function( data ) {
   32:                     alert('search error');
   33:                 }
   34:             });
   35:         },
   36:         // Run this when the item is in focused (not selected)
   37:         focus: function( event, ui ) {
   38:             //$( "#restSearch" ).val(ui.item.value );
   39:             return false;
   40:         },
   41:         // Run this when the item is selected
   42:         select: function( event, ui ) {
   43:             location.href = ui.item.fields.Path;
   44:         },
   45:         appendTo: $('#menu-container')
   46:     }).data( "uiAutocomplete" )._renderItem = function( ul, item ) {
   47:         // format the documents using the OOTB SharePoint icons
   48:         img = "ic" + item.fields.FileType + ".png";
   49:         if(item.fields.FileType == "html") {
   50:             img = "html16.png";
   51:         }
   52:         return $("<li>").append('<a><img style="margin-right:3px;top:3px;" src="/_layouts/15/images/'+ img +'">' + item.fields.Title + '</a>' )
   53:             .appendTo( ul );
   54:     };
   55: });
This is more or less out of the box jQueryUI-autocomplete magic. The first function getFields parses the JSON result item in to a key/value dictionary which makes all the managed properties easily available. The $.ajax function executes the query against the REST API and gets a result set in JSON back.There is a select function that will redirect the user direct to the result when selecting a hit. At the end there is some custom formatting of the autocomplete entries to show the document format icon in the list.
It ends up looking like this:
I’veattached the script file, just put them somewhere on your SharePoint and it will work fine.
