Creating a Custom Login Page for a LightSwitch Application
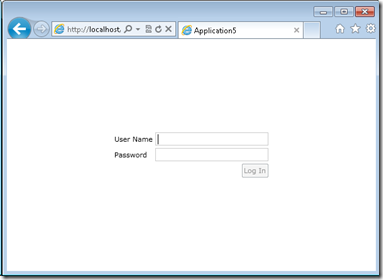
When configuring a Visual Studio LightSwitch application to use Forms authentication, the application user is prompted with the following login UI when they open the application:
Many LightSwitch customers have asked about creating their own custom UI in place of this default login experience. Maybe you’d like to display the company logo, for example. This post will show you the steps for creating your own fully customizable login page.
LightSwitch doesn’t have not have built-in support for customizing this UI. However, since LightSwitch is an ASP-NET based application you can use the features in ASP.NET to workaround this. What I’m going to demonstrate here is how to create an ASPX page that will authenticate the user when they open the app. Since you write the content of the ASPX page, you get to control exactly how it looks to the user. But I’ll make it easy for you by providing some sample markup that you can use and customize.
NOTE:
These instructions are for creating a custom login page for Web-based LightSwitch applications (meaning, the application is hosted within the browser). There isn’t a way to create a custom login page for a Desktop LightSwitch application. In addition, these instructions assume that you have Visual Studio Professional or higher installed in addition to LightSwitch. This isn’t necessarily required, but it makes the task of adding ASPX files to the project simpler; otherwise, you’d have to do this by hand which I won’t be describing in this post.
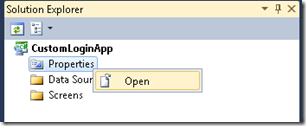
First, let’s start with a brand new LightSwitch project and open up the application properties window:
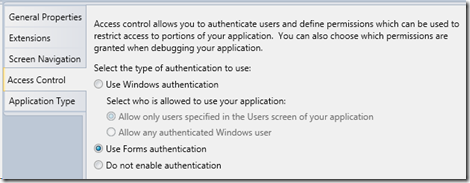
In the application properties window, select the Access Control tab and enable Forms authentication:
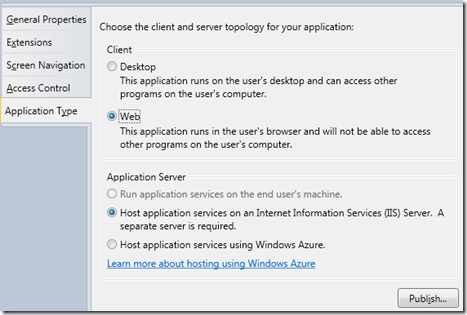
Select the Application Type tab and change the client type to Web:
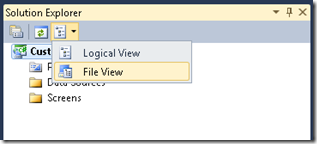
Now switch Solution Explorer into File View in order to manage the physical files that make up a LightSwitch application:
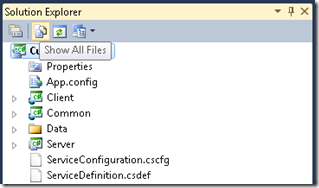
Next, click the “Show All Files” toolbar button. This shows all the hidden files within the project.
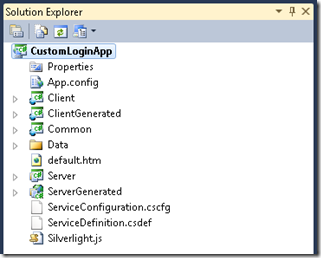
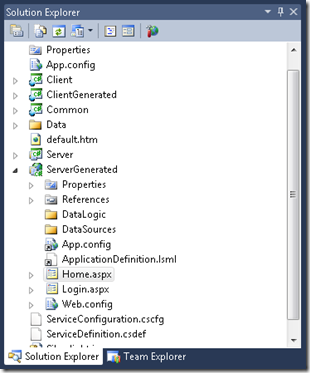
This is what the resulting project looks like now:
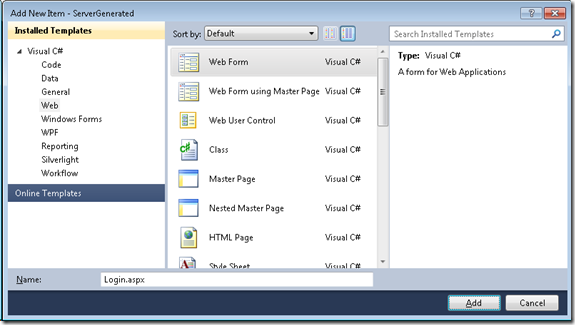
Add a new ASPX page to the ServerGenerated project by selecting the ServerGenerated project and hit Ctrl+Shift+A. Then select “Web Form” from the Web node and change the filename to “Home.aspx”. Click the Add button.
Follow the same steps again to add another ASPX file but name this one “Login.aspx”. You should now have two ASPX files in your ServerGenerated project:
Open Login.aspx and paste over the existing markup with the following:
C#:
 <%@ Page Title="Log In" Language="C#" AutoEventWireup="true"
    CodeBehind="Login.aspx.cs" Inherits="LightSwitchApplication.Login" %>

<form id="Form1" runat="server">
  <div style="text-align:center">
   <!— Add an optional image by replacing this fake image URL with your own –>
   <!--<asp:Image runat="server" ImageUrl="https://contoso.com/logo.gif" />-->
   <asp:Login runat="server" BackColor="#F7F6F3"
           BorderColor="#E6E2D8" BorderPadding="4"
           BorderStyle="Solid" BorderWidth="1px"
           Font-Names="Verdana" Font-Size="0.8em"
           ForeColor="#333333">
       <InstructionTextStyle Font-Italic="True" ForeColor="Black" />
       <LoginButtonStyle BackColor="#FFFBFF" BorderColor="#CCCCCC"
           BorderStyle="Solid" BorderWidth="1px" Font-Names="Verdana"
           Font-Size="0.8em" ForeColor="#284775" />
       <TextBoxStyle Font-Size="0.8em" />
       <TitleTextStyle BackColor="#5D7B9D" Font-Bold="True"
           Font-Size="0.9em" ForeColor="White" />
   </asp:Login>
 </div>
</form>
VB:
 <%@ Page Title="Log In" Language="vb" AutoEventWireup="true"
    CodeBehind="Login.aspx.vb" Inherits=".Login" %>

<form id="Form1" runat="server">
  <div style="text-align:center">
   <!— Add an optional image by replacing this fake image URL with your own –>
   <!--<asp:Image runat="server" ImageUrl="https://contoso.com/logo.gif" />-->
   <asp:Login runat="server" BackColor="#F7F6F3"
           BorderColor="#E6E2D8" BorderPadding="4"
           BorderStyle="Solid" BorderWidth="1px"
           Font-Names="Verdana" Font-Size="0.8em"
           ForeColor="#333333">
       <InstructionTextStyle Font-Italic="True" ForeColor="Black" />
       <LoginButtonStyle BackColor="#FFFBFF" BorderColor="#CCCCCC"
           BorderStyle="Solid" BorderWidth="1px" Font-Names="Verdana"
           Font-Size="0.8em" ForeColor="#284775" />
       <TextBoxStyle Font-Size="0.8em" />
       <TitleTextStyle BackColor="#5D7B9D" Font-Bold="True"
           Font-Size="0.9em" ForeColor="White" />
   </asp:Login>
 </div>
</form>
For more details on how to customize the Login control to suit your needs, see the following MSDN article: Customizing the Appearance of ASP.NET Login Controls.
For the Home.aspx page, you can leave the default markup code since this page will never be visible by the user. We’re only going to use it as a redirection mechanism.
NOTE:
This redirection logic is only needed to workaround an issue in LightSwitch V1 where it will remove from the web.config file at publish-time a configuration setting that will deny anonymous users access. If you have the ability to modify your web.config file after the app has been published, you can configure it to deny anonymous users by adding the following to the system.web section of the web.config file:
 <authorization>
  <deny users="?"/>
</authorization>
If you end up doing this, the Home page described in this blog post would not be necessary within your site.
To setup the redirection logic, open up the code-behind for the Home page, Home.aspx.cs, and replace its contents with the following code:
C#:
 using System;
using System.Web.Security;

namespace LightSwitchApplication
{
    public partial class Home : System.Web.UI.Page
    {
        protected void Page_Load(object sender, EventArgs e)
        {
            if (!this.User.Identity.IsAuthenticated)
            {
                FormsAuthentication.RedirectToLoginPage();
            }
            else
            {
                this.Response.Redirect(FormsAuthentication.DefaultUrl);
            }
        }
    }
}
VB:
 Imports System.Web.Security

Public Class Home
    Inherits System.Web.UI.Page


    Protected Sub Page_Load(ByVal sender As Object,
                            ByVal e As System.EventArgs) _
                        Handles Me.Load
        If Not Me.User.Identity.IsAuthenticated Then
            FormsAuthentication.RedirectToLoginPage()
        Else
            Me.Response.Redirect(FormsAuthentication.DefaultUrl)
        End If
    End Sub

End Class
Next, we need to configure the default page for the site to use this new Home page. Open the web.config file contained in the ServerGenerated folder. It will have a section that looks like this:
 <defaultDocument>
  <files>
    <clear />
    <add value="default.htm" />
  </files>
</defaultDocument>
To configure the new default page, change “default.htm” to “Home.aspx”.
In addition, we need to configure default.htm to be the page that is redirected to after a successful login. To do this, find the forms element in the web.config file and add the bolded text:
 <authentication mode="Forms">
  <forms name="CustomLoginApp" defaultUrl="default.htm"  />
</authentication>
The last step is to configure the main LightSwitch project to be aware of the new ASPX files that were added so that they will be published along with the app. To do this, unload the main LightSwitch project:
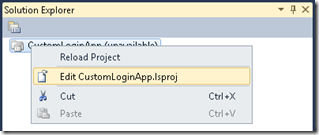
With the project unloaded, open the physical .LSPROJ file in the IDE:
Do a search for “_BuildFile” and append the following text within that section of the file:
 <_BuildFile Include="ServerGenerated\Login.aspx">
  <SubFolder>
  </SubFolder>
  <PublishType>
  </PublishType>
</_BuildFile>
<_BuildFile Include="ServerGenerated\Home.aspx">
  <SubFolder>
  </SubFolder>
  <PublishType>
  </PublishType>
</_BuildFile>
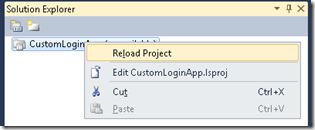
Reload the LightSwitch project:
Your LightSwitch app is now configured to use your new custom Login page. When you publish your app and connect to it, you’ll be redirected to your login page. After successfully logging in, you’ll be redirected to the LightSwitch app.
