Silverlight: VisualState Manager, Storyboards and why designers should care about them both.
I've seen a lot of talk around VisualState Manager online and it mostly covers button states and so on. What I want to do here in this post is illustrate why VisualState Manager is a handy tool for the average interactive designer out there and how it can kind of short-cut a lot of animation transition logic automatically for you.
You can make your own States.
In Silverlight via Expression Blend you will have the ability to make your own VisualStates. In my case I have a Menu that when a button is clicked it fly's down. Once clicked again, it fly's back up.
First things first, I setup a basic wire-frame UI (always prototype people!) in which I have an outer-chrome and underneath it, I have a Green rectangle which represents the "menu".
Closed:
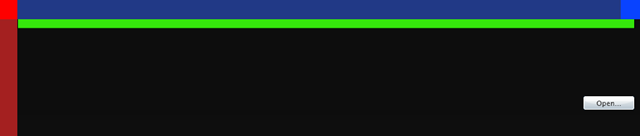
Opened:

That's the intent anyway.
Inside Expression Blend, on the Far left you should see this:
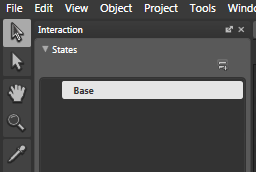
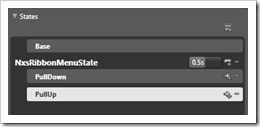
This is the area where you can add your own VisualStates. In this case, if you click on the  icon, you will get "Add State Group", which should automatically add a StateGroup for you.
New StateGroup added.
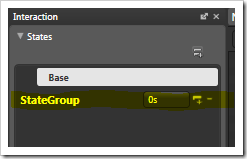
Now, notice the 0s next to the StateGroup Label (You can change the Label if you want by the way to suite a more appealing name). The 0s input is essentially the total duration of time it will take to go between each state housed within this group. It's currently at 0s which means that there will be no animated transition between states. To enable an animation between states, bump this up to more than 0, (0.5seconds will be great starting point, as anything lower and it's hard to visually gauge the transition).
At this point, go ahead and Add two States via the  menu (+ meaning add, - meaning remove).
You should end up with the following:
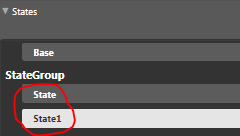
Setting up the States.
At this point, go ahead and rename the State and State1 to PullDown and PullUp.
Click on PullDown's state.
If you are familiar with the way StoryBoards work inside Expression Blend, then you will notice that the timelines per state can exist (by default they aren't added until you add them via clicking on the  icon). This is called "in-state animation".
This is quite a powerful, as basically we've provided you the ability to add your own amount of animation per state. In this case, I've made my Green Rectangle fly down from 0y to 130y within the PullDown in-state animation.


I've made the duration for the animation around 2seconds which in this case means that although my animation for that state is expected to run for 2 seconds it won't (well not quite like that)
Why won't it?

The 0.5s here will add to the overall actual animation. As the way VisualStateManager works is that it will take 0.5s to go from PullUp state to PullDown state. Once the transition has completed, it will then play the 2second animation.
In total, your entire transition will take 2.5 seconds. Important thing to note here, is that should you want it to take 2seconds you just make the actual StateGroup (NxsRibbonMenuState) 0s.
The reason I would opt for a 0s Duration is that this allows you to attach your own easing (in/out) sequence per state, whilst allowing you to have a multi-step animation (meaning the animation can play different effects per tick on the Timeline).
This could also be done simply using a basic Storyboarding approach, but you don't get the flexibility of accessing the VisualStateManager via code-behind and you also have to write your own reverse routines should the user wish to interrupt the sequence of animation.
Why use States for Animations then?
In my case I wanted to enable a Menu to come down and up when the user clicks on a button. I also want it to also allow the user to change their minds and reverse the animation should they click the button half way.
VisualState Manager's can provide a great way to achieve this, as in my Button's Click handler, I simply tell it which state to go to and the rest automatically takes care of itself.
What does that mean though? say you've clicked on PullDown and the animation of PullDown state is half-way through (meaning 1sec into the animation). If you then trigger the state change to PullUp, VisualStateManager will automatically figure out how to transition all properties adjusted whilst in PullDown State back to PullUp state, automatically.
Note: When I say automatically (it's half true) what really happens is that Blend will create some storyboards within the VisualState tags. This is done at design-time but at run-time it essentially is automated in terms of figuring out how to go from AS-IS to a TO-BE.
Pretty powerful yes?
Here's some code to illustrate how you switch between states.
1: public partial class NxsRibbon : UserControl
2: {
3: public NxsRibbon()
4: {
5: InitializeComponent();
6: CURRENT_STATE = "PullDown";
7: VisualStateManager.GoToState(this, CURRENT_STATE, true);
8: this.btnTest.Click += new RoutedEventHandler(onButtonTestClick);
9: }
10:
11: public string CURRENT_STATE;
12: void onButtonTestClick(object sender, RoutedEventArgs e) {
13:
14: switch (CURRENT_STATE)
15: {
16: case "PullDown":
17: CURRENT_STATE = "PullUp";
18: break;
19:
20: default:
21: CURRENT_STATE = "PullDown";
22: break;
23: }
24: VisualStateManager.GoToState(this, CURRENT_STATE, true);
25: }
26: }
VisualState Manager is quite a powerful feature within Silverlight and Expression Blend. You just have to treat it with care, and keep your eye on the durations as the StateGroup will always win the fight.