How to build a custom site definition which has child sites (webs)
I did this for a customer over a year ago, and have simply just not had the chance to put key to screen and document it. Perhaps someone out there has already done this, but I thought it might still be useful looking at the way in which I did it. Grab some coffee, this post is long.
In MOSS you get a Collaboration Portal definition and a Publishing Portal site definition, when you create a site from either of these the site automatically has sub-sites (sub-webs) provisioned. This is unlike the team site definition, which only creates a root site (web). The question which arose from this was "how do I create a site definition which automatically provisions sub-sites (webs) just like the collaboration portal and publishing portal site definitions?"
I found two ways, an unsupported method and a supported method. In the unsupported technique you use an existing feature which is included in the collaboration and publishing site definitions which does the provisioning for you. The exact steps are described here, on a blog post from SharePointHack. It works, but is not officially supported by Microsoft.
The second technique is essentially to develop a custom feature which does exactly what the unsupported feature does. Their are 2 advantages to this; 1 - it is supported :-), and 2 - you own the code so you can extend it, change it in anyway which makes sense to you e.g. you might want to add extra provisioning steps for the sub-sites that are created, such as setting a default master page and style sheet.
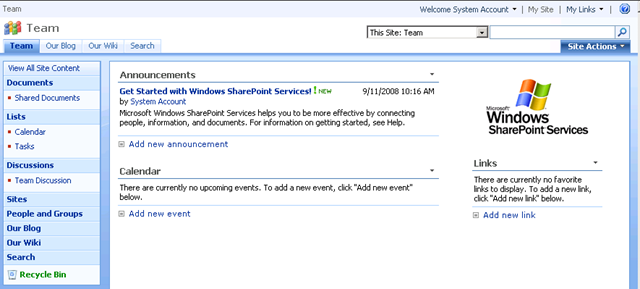
Lets assume that we want to have a team site definition which automatically creates sub sites, the result of which is shown in the graphic below.
Lets look at how to do this
In summary, you create a custom feature (lets call it a provisioning feature) which is executed when the root site is created i.e. team site in this scenario. This custom feature reads an XML file which holds the definition for the sub-sites (webs) to be created, and for each sub-site in the XML file the provisioning feature creates sub-sites (webs) using the WSS API. That's it! Sound simple enough? Now lets walk through the exact steps. All sample code can be found at the end of the post too.
- Step 1 - create custom provisioning feature Visual Studio project
- Step 2 - add XML file for sub-site definitions, and add code to provision sub-sites
- Step 3 - deploy and install the new provisioning feature
- Step 4 - create a new site definition which references the provisioning feature
- Step 5 - create a new site ... done !!!
Step 1 - create custom provisioning feature Visual Studio project
I am personally not a fan of using the Visual Studio extensions for WSS to create my custom features (can explain why another day), I prefer to create an empty Visual Studio class library project and then manually add all the elements I need. You might want to read this article which explains the elements of a custom feature before continuing with this post.
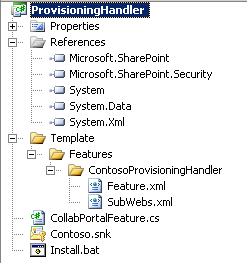
This graphic above shows my custom feature project in Visual Studio. The template folder contains the feature definition files (feature.xml and subwebs.xml) which will be copied into the SharePoint features folder on successful compilation of the project. The CollabPortalFeature.cs class contains the provisioning code which reads the subwebs.xml file and creates the sub-sites. The Contoso.snk is used to sign the assembly (assembly gets deployed into GAC later) and install.bat is what copies the feature files into the SharePoint feature directory and installs the feature using STSADM.exe.
Step 2 - add XML file for sub-site definitions, and add code to provision sub-sites
Lets look at feature.xml. Here you will see the definition for the feature, the title and description. Importantly it is a hidden feature, this prevents users manually activating it from SharePoint administration screens. Why? Because the feature will be activated by the site definition which references it, more on that later. Also we have reference to the assembly and class which hosts the provisioning code. This is also discussed later.
1: <Feature xmlns="https://schemas.microsoft.com/sharepoint/"
2: Title="Contoso Collaboration Portal Provisioning Handler"
3: Id="5664944F-24C5-4524-BABB-D1FAC37709CF"
4: Description="This feature is designed to be added to a custom site definition,and will create sub sites inside the new root web"
5: Version="1.0.0.0"
6: Scope="Web"
7: Hidden="TRUE"
8: DefaultResourceFile="core"
9: ReceiverAssembly="Contoso.SharePoint.ProvisioningHandler, Version=1.0.0.0, Culture=neutral, PublicKeyToken=179f3ffc3fc551f9"
10: ReceiverClass="Contoso.SharePoint.ProvisioningHandler.CollabPortalFeature" >
11: <ElementManifests>
12: <ElementFile Location="subwebs.xml" />
13: </ElementManifests>
14: </Feature>
Now let's look at the XML inside of subwebs.xml.
1: <rootWeb>
2: <webs>
3: <web url="Wiki" siteDefinition="WIKI#0" displayName="Our Wiki" description="Our teams wiki allows us to brainstorm online." />
4: <web url="Blog" siteDefinition="BLOG#0" displayName="Our Blog" description="Our department's blog shows key updated information about our department." />
5: <web url="Search" siteDefinition="SRCHCENTERLITE#0" displayName="Search" description="We need to be able to search dont we" />
6: </webs>
7: </rootWeb>
What you can see if that in this scenario we are going to get 3 sub-sites created, a team wiki, a team blog and a search site. You can add, remove and edit as many nodes as you want here. Each sub-site needs a URL, a site definition name which it should be based on, a display name and a description. Of course you could extend this schema to include any custom fields or flags you may want to use during provisioning. e.g. inherit permissions from parent web.
Note: some sub-sites require certain features to be activated on the parent site in order for them to work e.g. if you tried to create a report center under a team site it would break, unless the team site had the publishing feature activated.
Now for the logic inside the class which does most of the work. Let's look at some code inside the featureactivated method. I have left out some code which I don't think needs explanation, but have kept the most important snippet to show you.
1: //get the file path to the path to subwebs.xml, this is where the subweb to create are defined
2: string filePath = this.GetProvisioinerFilePath(properties.Definition);
3:
4: if (System.IO.File.Exists(filePath))
5: {
6:
7: XmlDocument doc = new XmlDocument();
8: doc.Load(filePath);
9:
10: XmlNode subWebs = doc.DocumentElement.SelectSingleNode("webs");
11: if (subWebs != null)
12: CreateSubWebs(web, subWebs);
13:
14: }
In the above code the first step is to get the path to the subwebs.xml file (you could hard code the path, but that probably wouldn't be a good idea). It then calls CreateSubWebs for each web node inside the subwebs.xml file. Let's now look at the CreateSubWebs method.
1: private void CreateSubWebs(SPWeb web, XmlNode websNode)
2: {
3: foreach (XmlNode webItem in websNode.ChildNodes)
4: {
5: //only attempt to create it if XML node has all the information required
6: if (webItem.Attributes["url"] != null && webItem.Attributes["siteDefinition"] != null
7: && webItem.Attributes["displayName"] != null && webItem.Attributes["description"]!=null)
8: {
9: string url = webItem.Attributes["url"].Value;
10: string siteDefinition = webItem.Attributes["siteDefinition"].Value;
11: string displayName = webItem.Attributes["displayName"].Value;
12: string description = webItem.Attributes["description"].Value;
13:
14: Debug.WriteLine("ProvisioningHandler:CollabPortal, Creating sub web called " + displayName);
15: //create the new subweb
16: SPWeb newWeb = web.Webs.Add(url, displayName, description, web.Language, siteDefinition, false, false);
17: //tell new subweb to use parents navigation
18: newWeb.Navigation.UseShared = true;
19:
20: web.Properties["__IncludeSubSitesInNavigation"] = "True"; //make sure sub webs show their child sites in navigation
21: //update props
22: web.Properties.Update();
23: //update new web created
24: newWeb.Update();
25: }
26:
27: }
28: }
Once again, not rocket science, just a simple function which takes the attributes from the web node and uses them to create the sub-site (sub-web). You will also see that some defaults are set.
Step 3 - deploy and install new provisioning feature
To deploy the feature, you need to:
1. Compile the project and take the assembly generated and add it to the GAC. I do this manually for now i.e. drag and drop it into the GAC

2. You must then copy the public key token and place it in your feature.xml on your receiver class definition file. This is so that your feature is referencing the correct assembly.
3. Now it is time to install the feature, if I run install.bat this will do all that work for me i.e copy feature files to SharePoint feature directory and then run the feature install command (note: we do not active the feature)
Here is a snippet from install.bat
1: @SET TEMPLATEDIR="c:\program files\common files\microsoft shared\web server extensions\12\Template"
2: @SET STSADM="c:\program files\common files\microsoft shared\web server extensions\12\bin\stsadm"
3:
4: Echo Copying files
5: xcopy /e /y TEMPLATE\* %TEMPLATEDIR%
6:
7: Echo Installing features
8: %STSADM% -o installfeature -filename ContosoProvisioningHandler\feature.xml -force
Step 4 - create a new site definition which references the provisioning feature
Now that the feature is installed, we need to create a new custom site definition which references the custom provisioning feature. Therefore when a site is created from the new site definition, the custom provisioning feature will execute and create the sub-sites.
I am not going to walk through the steps for creating a custom site definition, rather have a good read of the following article which describes it in great detail.
In my example, I copied and pasted the team site definition and then added a reference to the custom provision feature in ONET.xml. The snippet below shows that reference in the <WebFeatures> section of ONET.xml.
1: <WebFeatures>
2: <Feature ID="00BFEA71-4EA5-48D4-A4AD-7EA5C011ABE5" />
3: <!-- TeamCollab Feature -->
4: <Feature ID="F41CC668-37E5-4743-B4A8-74D1DB3FD8A4" />
5: <!-- MobilityRedirect -->
6: <!-- Custom provisioning handler feature-->
7: <Feature ID="5664944F-24C5-4524-BABB-D1FAC37709CF" />
8: </WebFeatures>
Here the feature ID is the one which is found in the feature.xml for the custom feature.
Step 5 - create a new site
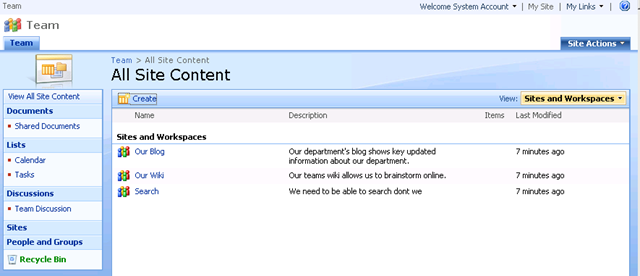
Now if we try and create a new site, we should have the new site definition as an option in the create site page. This is shown below, where in my case my new site definition was called "Team site with sub sites"....boring but simple.

Now if we navigate to the new site and select the sites link we will have the list of sub-sites under it.
Important: Where is my top navigation with links to my sub-sites? Because I chose to create the top level site as a team site and a team site doesn't have publishing features enabled the top navigation does not list the sub-sites. If you want it to, you could enable the publishing feature for the top site (site collection feature and site feature). Once that is done, you can edit the sites navigation to show sub-sites. If you started with your top site being the collaboration or publishing portal, they would already have these features enabled and you won't have this issue.

Once that is done, you will have the full top navigation.

Done!! :-)
The full Visual Studio project with all the code used in this sample can be downloaded using the link below.
You can imagine the power of the provisioning feature, where you could set default master page for sub-sites, set custom style sheet for sub-sites, permissions, add stuff the web property bags etc.
I hope this made some sense and you found it useful. Happy Provisioning!
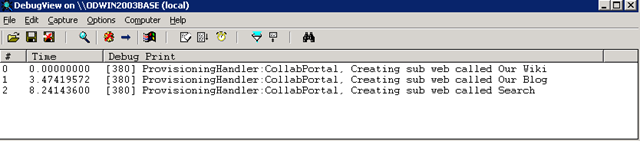
Debugging Tip: I scatter in my code debug output statements e.g. Debug.WriteLine("some statement");. Then I use DebugView tool from sysinternals to view those statements when the provisioning code executes. For example, if nothing shows it is probably because your provisioning assembly is not being called / loaded. The image below shows the code being executed and debugging statements showing that the 3 sub sites are being created.
Another options if for you to attach the Visual Studio debugger to the code, insert a break point and let the code break where you need to start debugging, just make sure you have the PDF file inside your local bin folder for the IIS site where you are creating the site from alternatively their is a wacky way to get the PDB into the GAC for this to work too.
Michael