Create a Hub Tile Control for WinRT XAML
Hi,
Today we will create a new control to emulate the behavior of the Windows Start Screen tiles animations.
The idea is to have a welcome page in your Windows store application, with tiles objects, where you can browse to different sections. Here is a screenshot of the final result :

(Check the video à the end of this post too ![]() )
)
Before starting, you should take a look at this articles:
- Callisto : A set of controls provided by Tim Heuer
- A Control sample provided by Thomas Lebrun
This article is my own implementation of a complete Hub Tile Component. You can download the source here : HubPicker.zip
Introduction
Each “Tile” is animated with various animations. The idea is to develop a core component, the tile control, and provide an animation with a dependency property.
In this way, the tile control is totally independent from its animation. You can create many animations and plug one of them with the tile control.
Here is a screenshot of a tile control with a vertical animation :

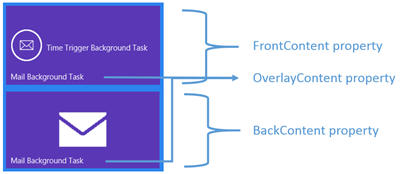
The tile control will provide 3 visuals parts for each part of the tile:
- The FrontContent property
- The BackContent property
- The OverlayContent property
The OverlayContent is a particular element that will be fixed. No animation occurs on this part

For this control, we will create 8 animations behavior:
- UpAndDownTileAnimation
- UpTileAnimation
- DownTileAnimation
- RightToLeftTileAnimation
- RightTileAnimation
- LeftAnimation
- RotationHorizontalTileAnimation
- RotationVerticalTileAnimation
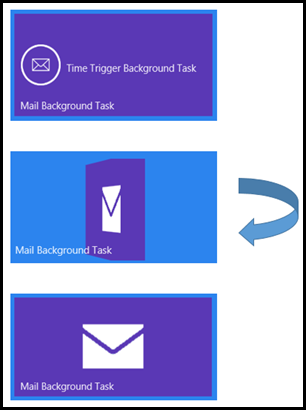
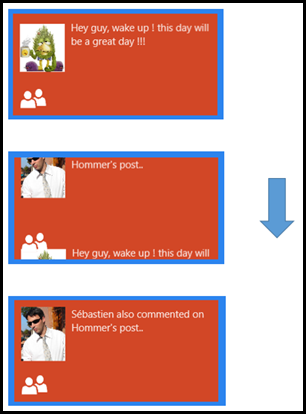
Here is two Tiles, animated with a UpAndDownTileAnimation and a RotationHorizontalTileAnimation:


On the first example (Mail) you can see that “Mail Background Task” is the OverlayContent and is not animated (well, to be honest, you will see “much better” this animation in the sample provided with this post)
Here is the Xaml Code for the First One (mail sample with the Rotation animation) The component is divided in 4 parts:
 <HubPicker:Tile  Grid.Row="1" Tapped="TimeSampleClicked" Background="#5A38B5"
                    Margin="637,43,429,435" Width="300" Height="150"  HubPicker:TiltEffect.IsTiltEnabled="True"  >
       <HubPicker:Tile.TileAnimation>
           <animations:RotationHorizontalTileAnimation />
       </HubPicker:Tile.TileAnimation>
       <HubPicker:Tile.OverlayContent>
           <Grid HorizontalAlignment="Stretch" VerticalAlignment="Stretch" >
               <TextBlock Text="Mail Background Task" HorizontalAlignment="Left" Style="{StaticResource SubtitleTextStyle}"
                      VerticalAlignment="Bottom" Margin="10" ></TextBlock>
           </Grid>
       </HubPicker:Tile.OverlayContent>
       <HubPicker:Tile.FrontContent>
           <Grid HorizontalAlignment="Stretch" VerticalAlignment="Stretch" Background="#5A38B5" >

               <Grid.ColumnDefinitions>
                   <ColumnDefinition Width="80"></ColumnDefinition>
                   <ColumnDefinition Width="*"></ColumnDefinition>
               </Grid.ColumnDefinitions>
               <Image Source="ms-appx:///Assets/MailIcon.png" Width="60" ></Image>
               <TextBlock Grid.Column="1" TextWrapping="Wrap"
                          VerticalAlignment="Center" Margin="0"
                          Style="{StaticResource SubtitleTextStyle}"
                          >Time Trigger Background Task</TextBlock>
           </Grid>
       </HubPicker:Tile.FrontContent>
       <HubPicker:Tile.BackContent>
           <Grid HorizontalAlignment="Stretch" VerticalAlignment="Stretch" Background="#5A38B5">
               <Image Source="ms-appx:///Assets/MailIcon2.png" RenderTransformOrigin="0.5,0.5" Width="100" />
           </Grid>
       </HubPicker:Tile.BackContent>
   </HubPicker:Tile>
As you can see, each part is independent, there is no databinding in this sample, but you can bind all the content with you ViewModel if necessary
Tile Control
As we have seen, there is 3 visual parts in this control, so the control will be declared with 3 TemplatePart for each property.
Each property will be a dependency property. As we can set anything in each property, the Object type will be perfect.
And by the way, we don’t forget to get the Style visual with the override of the OnApplyTemplate() method:
 [TemplatePart(Name = "PART_FrontContentPresenter", Type = typeof(Tile))]
[TemplatePart(Name = "PART_BackContentPresenter", Type = typeof(Tile))]
[TemplatePart(Name = "PART_OverlayContentPresenter", Type = typeof(Tile))]
public class Tile : Control
{
 public Object OverlayContent
 {
     get { return GetValue(OverlayContentProperty); }
     set { SetValue(OverlayContentProperty, value); }
 }

 // Using a DependencyProperty as the backing store for OverlayContent.  This enables animation, styling, binding, etc...
 public static readonly DependencyProperty OverlayContentProperty =
     DependencyProperty.Register("OverlayContent", typeof(Object), typeof(Tile), new PropertyMetadata(null));

 public Object FrontContent
 {
     get { return GetValue(FrontContentProperty); }
     set { SetValue(FrontContentProperty, value); }
 }

 // Using a DependencyProperty as the backing store for FrontContent.  This enables animation, styling, binding, etc...
 public static readonly DependencyProperty FrontContentProperty =
     DependencyProperty.Register("FrontContent", typeof(Object), typeof(Tile), new PropertyMetadata(null));


 public Object BackContent
 {
     get { return GetValue(BackContentProperty); }
     set { SetValue(BackContentProperty, value); }
 }

 // Using a DependencyProperty as the backing store for BackContent.  This enables animation, styling, binding, etc...
 public static readonly DependencyProperty BackContentProperty =
     DependencyProperty.Register("BackContent", typeof(Object), typeof(Tile), new PropertyMetadata(null));

 protected override void OnApplyTemplate()
  {

      FrontContentPresenter = this.GetTemplateChild("PART_FrontContentPresenter") as ContentPresenter;
      BackContentPresenter = this.GetTemplateChild("PART_BackContentPresenter") as ContentPresenter;

      if (this.FrontContentPresenter != null)
          this.SetPlaneProjection(this.FrontContentPresenter);

      if (this.BackContentPresenter != null)
          this.SetPlaneProjection(this.BackContentPresenter);


  }
}
Here is an extract of the default style:
 <Style TargetType="hubPicker:Tile">
      <Setter Property="Template">
          <Setter.Value>
              <ControlTemplate TargetType="hubPicker:Tile">
                  <Canvas x:Name="canvas" Background="{TemplateBinding Background}" Height="{TemplateBinding Height}"
                                  Width="{TemplateBinding Width}">

                      <Border  BorderBrush="{TemplateBinding BorderBrush}" BorderThickness="{TemplateBinding BorderThickness}"
                                  Height="{TemplateBinding Height}" Width="{TemplateBinding Width}"
                                  Canvas.ZIndex="99" />

                      <Border  Height="{TemplateBinding Height}"
                               Width="{TemplateBinding Width}"
                               BorderThickness="{TemplateBinding BorderThickness}" >

                          <Grid x:Name="PART_InnerGrid" HorizontalAlignment="Stretch" VerticalAlignment="Stretch">

                              <ContentPresenter x:Name="PART_BackContentPresenter"
                                            Content="{TemplateBinding BackContent}"  />

                              <ContentPresenter x:Name="PART_FrontContentPresenter"
                                            Content="{TemplateBinding FrontContent}" />

                              <ContentPresenter x:Name="PART_OverlayContentPresenter"
                                            Content="{TemplateBinding OverlayContent}" />
                          </Grid>
                      </Border>
                  </Canvas>
              </ControlTemplate>
          </Setter.Value>
      </Setter>
  </Style>
Tile Animation
To animate the control, we will define a dependency property. Of course this property will be an Interface. This interface will be simple. We just need to provide the Tile control itself :
 public interface ITileAnimation
{
    Storyboard GetStoryboard(Tile tile);
}
This interface object will be used as a dependency property in the tile control :
 public ITileAnimation TileAnimation
 {
     get { return (ITileAnimation)GetValue(TileAnimationProperty); }
     set { SetValue(TileAnimationProperty, value); }
 }

 // Using a DependencyProperty as the backing store for TileAnimation.  This enables animation, styling, binding, etc...
 public static readonly DependencyProperty TileAnimationProperty =
     DependencyProperty.Register("TileAnimation", typeof(ITileAnimation),
                                                  typeof(Tile),
                                                  new PropertyMetadata(new UpAndDownTileAnimation()));
And the implementation with xaml part, with a RightToLeftAnimation object :
 <HubPicker:Tile  Grid.Row="1" IsAnimationEnabled="True" Background="Black"
                     Margin="322,43,744,435" Width="300" Height="150"
                     Tapped="AsyncTaskClicked"
                     HubPicker:TiltEffect.IsTiltEnabled="True" >
        <HubPicker:Tile.TileAnimation>
            <animations:RightToLeftTileAnimation />
        </HubPicker:Tile.TileAnimation>
The implementation of the interface is pretty simple. We just have to provide the animation storyboard.
Here is the simpliest object code (provided in the sample)
 public class RightToLeftTileAnimation : ITileAnimation
   {
       public Storyboard GetStoryboard(Tile tile)
       {
           var storyboard = new Storyboard();

           var animDuration = new Duration(TimeSpan.FromMilliseconds(1000d));
           var offset = tile.BorderThickness.Right + tile.BorderThickness.Left;
           var end = tile.ActualWidth - offset;
           var start = 0d;

           if (tile.IsFrontSide)
           {

               storyboard.AddToStoryboard(start, -end, animDuration,
                            tile.FrontContentPresenter,
                            "(UIElement.Projection).(PlaneProjection.GlobalOffsetX)");

               storyboard.AddToStoryboard(end, start, animDuration,
                             tile.BackContentPresenter,
                             "(UIElement.Projection).(PlaneProjection.GlobalOffsetX)");

               storyboard.Completed += (sender1, o1) =>
               {
                   tile.FrontContentPresenter.Visibility = Visibility.Collapsed;
                   tile.IsFrontSide = false;
               };

           }
           else
           {

               storyboard.AddToStoryboard(-end, start, animDuration,
                            tile.FrontContentPresenter,
                            "(UIElement.Projection).(PlaneProjection.GlobalOffsetX)");

               storyboard.AddToStoryboard(start, end, animDuration,
                             tile.BackContentPresenter,
                             "(UIElement.Projection).(PlaneProjection.GlobalOffsetX)");


               storyboard.Completed += (sender1, o1) =>
               {
                   tile.BackContentPresenter.Visibility = Visibility.Collapsed;
                   tile.IsFrontSide = true;
               };
           }

           return storyboard;

       }
Point of Interest
I encountered a small problem with this control when I tried to implement a random timer scheduler.
I started using the Random Class, but Random class is not “really” random. To provide a real random number, you need to use Windows.Security.Cryptography.CryptographicBuffer class. This class make high usage of CPU. So I just used it to get a random seed and then, I use the random class.
Here is the implementation :
 public Tile()
        {
            Int32 generateNumber = (Int32)Windows.Security.Cryptography.CryptographicBuffer.GenerateRandomNumber();
            random = new Random(generateNumber);

            dispatcherTimer = new DispatcherTimer();
            dispatcherTimer.Interval = TimeSpan.FromSeconds(random.Next(3, 10));
            dispatcherTimer.Tick += DispatcherTimerOnTick;

            if (!Windows.ApplicationModel.DesignMode.DesignModeEnabled && this.IsAnimationEnabled)
                dispatcherTimer.Start();
        }
Demonstration
Here is a video of the sample provided with this post.