Azure Active Directory Authentication (Easy Auth) with Custom Backend Web API
A common scenario in web application development is a frontend web application accessing some backend API. The backend API may provide an interface to some shared business system or database (e.g., a customer or inventory database) and the frontend web application may be a business system interacting directly with customers or employees. We see this scenario when a frontend application uses services such as Microsoft Graph API. In a previous blog post, I have discussed how to configure web app authentication (a.k.a. Easy Auth) such that it provides user authentication for the web app but also grants a token to the Graph API. In this blog post, I will expand on this scenario by showing how one can do the same with a custom backend API.
The scenario is illustrated below:
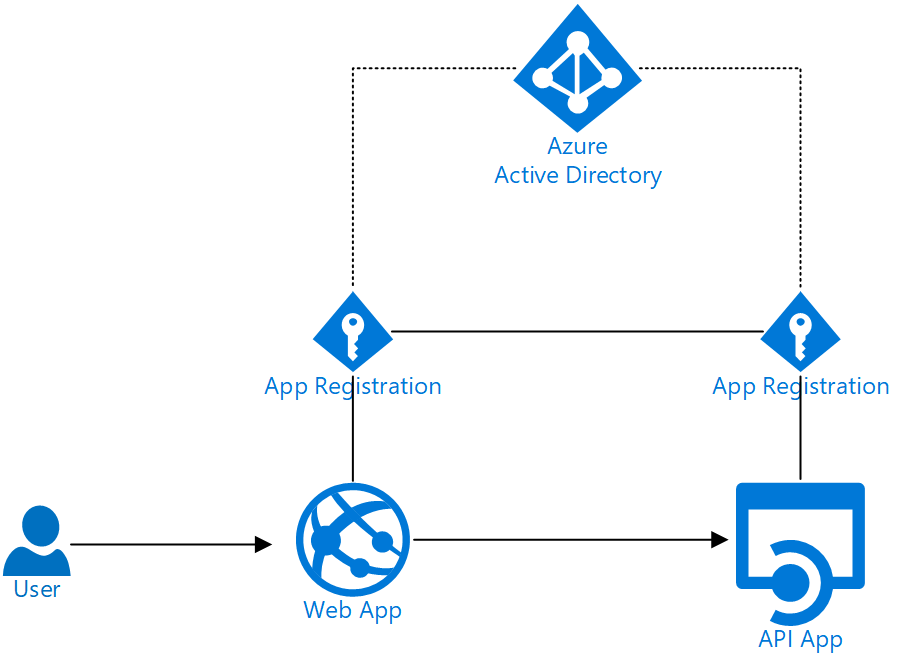
Specifically, the backend Web API requires users to present a bearer token when accessing this API. This token authorizes the user to access the API and based on claims in the token the user may have access to all or parts of the API. However, the user does not access the API directly, rather access happens through a web app and the user will authenticate with Azure Active Directory (AAD) credentials when accessing the web app. Once authenticated, the user will obtain a token for accessing the backend API and the web app will present this token to the API when it needs to access it.
As illustrated, this scenario actually requires two AAD app registrations; one for the Web API and one for the web frontend. We will walk through how to create these and connect them appropriately such that when the user authenticates using the app for the frontend web app, they will get a token for the backend API.
I have created a very simple example backend Web API, which you can find here on GitHub. This is a API uses bearer token authentication and will allow users to create lists in a database. They can be to do lists, shopping lists, etc. Each user will only have access to their own lists. As you can see in the code we use an Azure Active Directory app registration to set up the bearer token authentication.
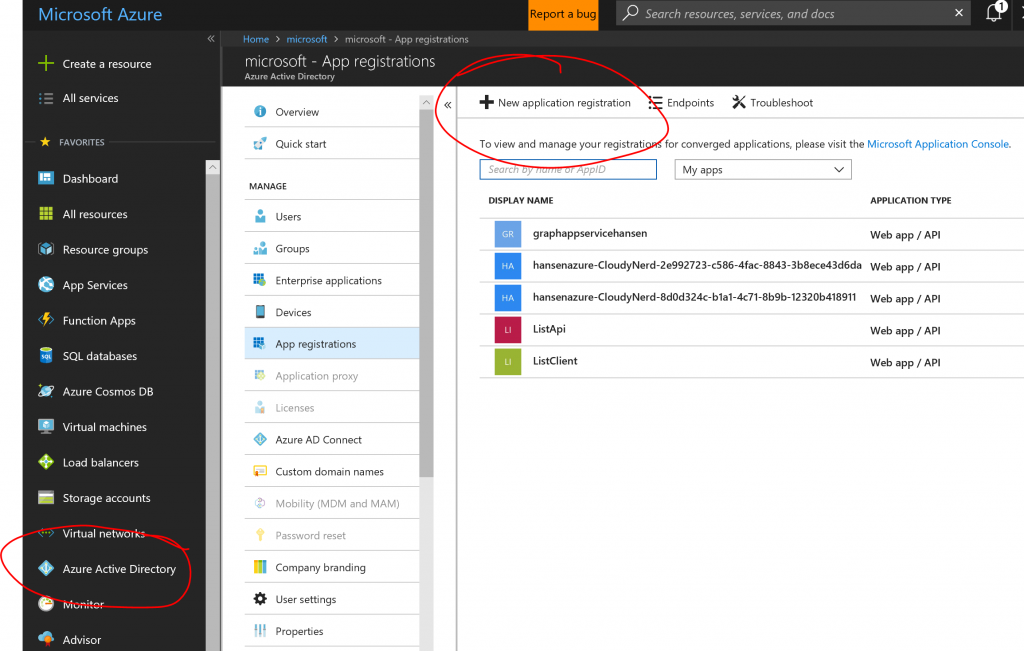
To set up the app registration, go to the Azure portal and find the App Registrations pane in Active Directory:
After creating the app registration, we will modify the manifest for it to define some scopes for the API. The simple API above doesn't actually use any sophisticated features like that, but if you have had to select which delegated privileges the application should require, e.g. User.Read, User.ReadBasic.All, etc. for Graph API, you will be familiar with the concept and you may wish to define such scopes for your API. Hit the "Manifest" button to edit:
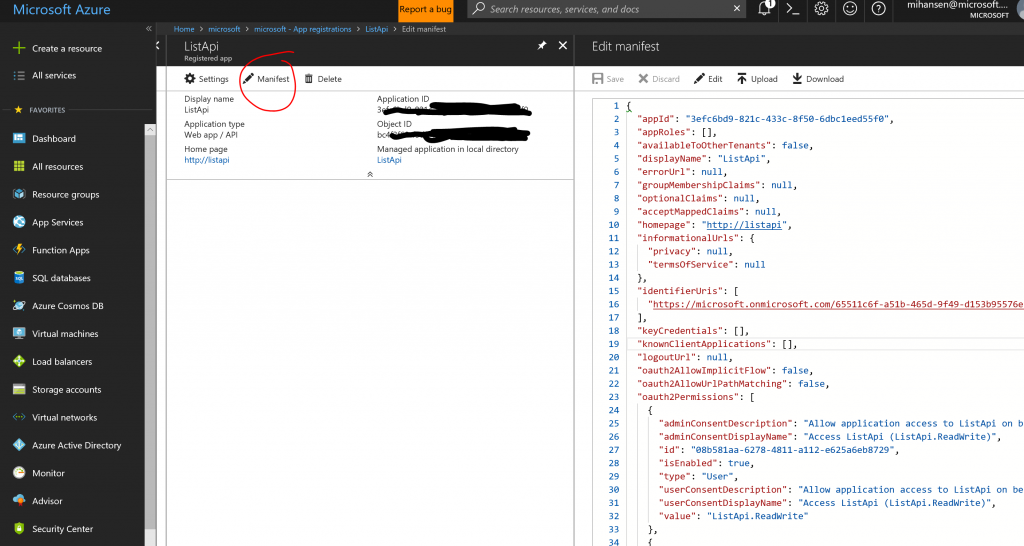
I will not repeat the whole manifest here, but to define a new scope called ListApi.ReadWrite, I have modified the oauth2Permissions section as follows. The id for the new scope is a GUID that you can generate yourself, e.g. with the New-Guid PowerShell cmdlet.
[js]
"oauth2Permissions": [
{
"adminConsentDescription": "Allow application access to ListApi on behalf of user",
"adminConsentDisplayName": "Access ListApi (ListApi.ReadWrite)",
"id": "08b581aa-6278-4811-a112-e625a6eb8729",
"isEnabled": true,
"type": "User",
"userConsentDescription": "Allow application access to ListApi on behalf of user",
"userConsentDisplayName": "Access ListApi (ListApi.ReadWrite)",
"value": "ListApi.ReadWrite"
},
{
"adminConsentDescription": "Allow the application to access ListApi on behalf of the signed-in user.",
"adminConsentDisplayName": "Access ListApi",
"id": "de81bb7a-4378-4e61-b30b-03759f49ba53",
"isEnabled": true,
"type": "User",
"userConsentDescription": "Allow the application to access ListApi on your behalf.",
"userConsentDisplayName": "Access ListApi",
"value": "user_impersonation"
}
]
[/js]
After this, we are done with the app registration for the API. Make a note of the application ID and you should also make a note of your AAD tenant ID. You can deploy the API in an Azure API App, you will need to define the following app settings:
[js]
{
"ADClientID": "SET-TO-APPLICATION-ID",
"ADInstance": "https://login.microsoftonline.com/TENANT-NAME-OR-ID/"
}
[/js]
In this case, the app registration is in an AAD tenant in the commercial cloud (as indicated by the login.microsoftonline.com URL) but you could have used an Azure Government tenant instead.
With the API deployed, we will move on to the app regstration for the frontend web application. In the same way as before, we will create a new app registration. Make a note of the Application ID and for this application, we will need to create a key. To understand why this is necessary, consider the fact that once the user is authenticated we will need to ask for a token for the backend API on behalf of the user and in that role the this app registration will act as an identity of sorts and it will need a password. So hit the Keys pane:
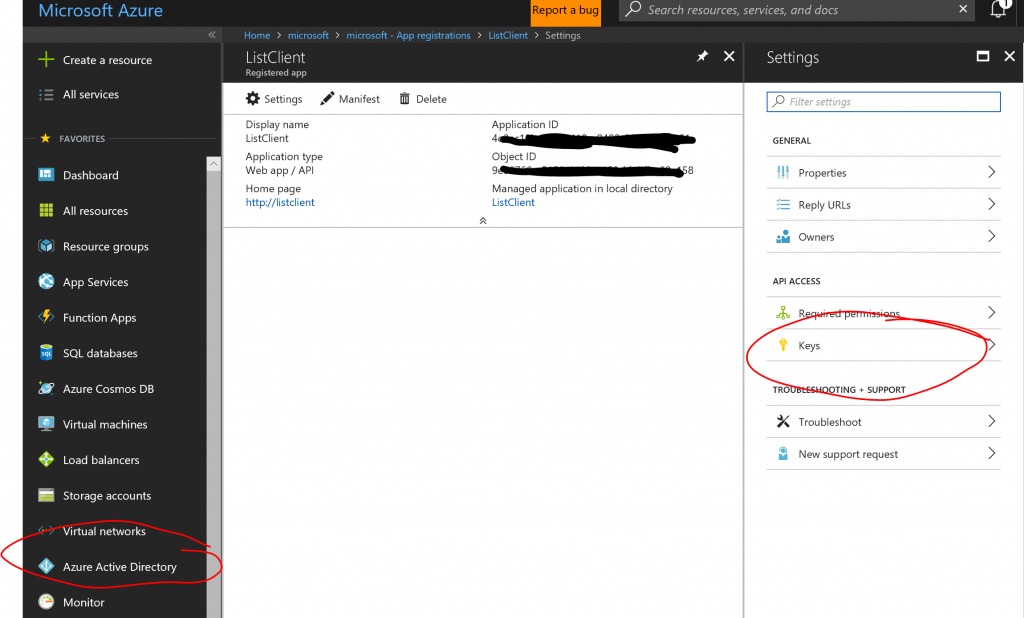
You can create a key by giving it a name, a duration and hit save. The key will be displayed when you hit save and only once. After you navigate away from that page, the key will not be shown again, so make sure you make a note of it.
Next step is to connect this app registration to the app registration for the backend API. You will do this in the same way that you add "Required Permissions" for say the Graph API:
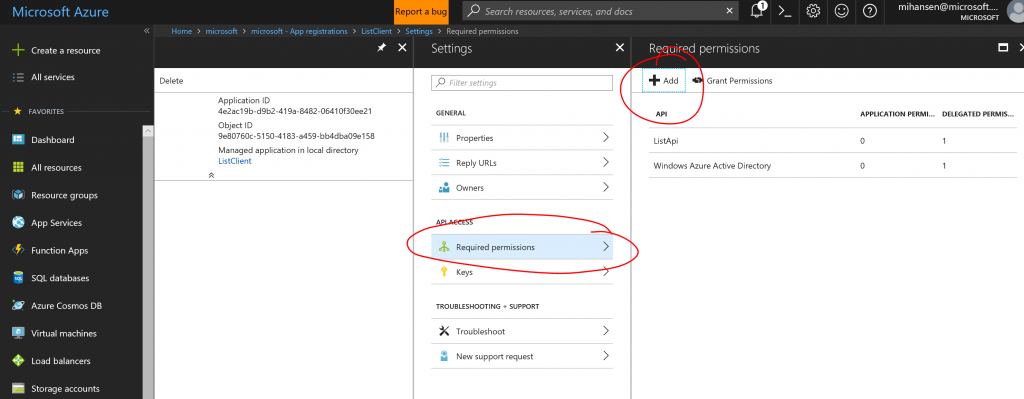
In this case, hit "Select API" and search for the name of the app registration that you created from for the API. Once you select it, you can choose which scopes the application will need:
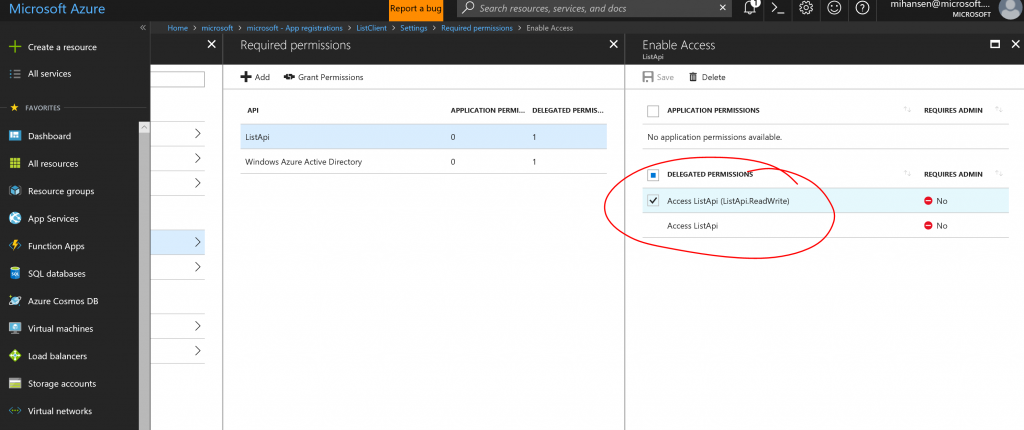
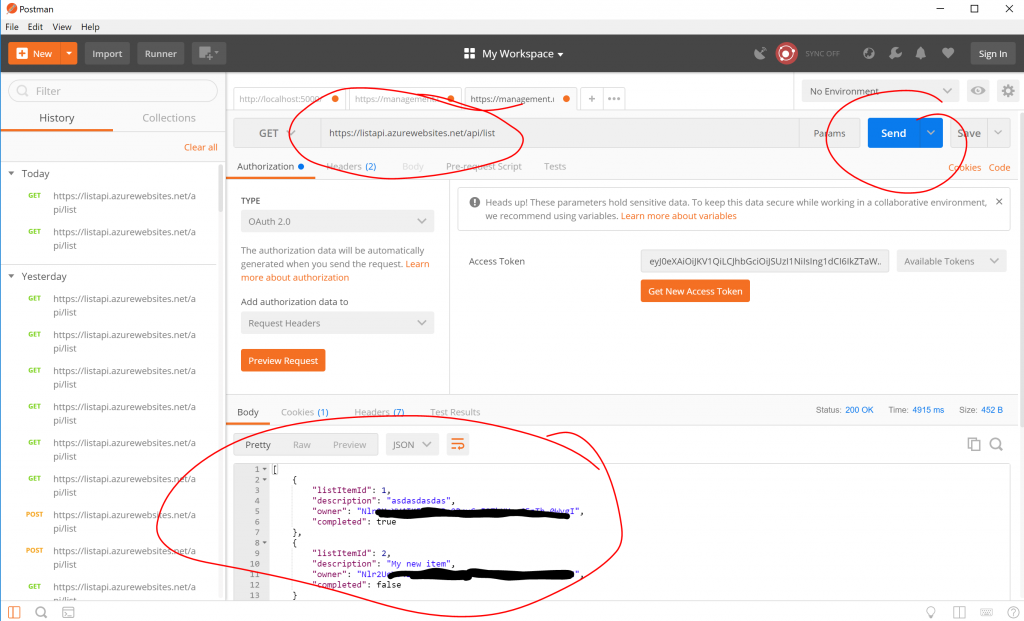
Notice that the scope we defined above shows up and you can select it. Before we actually deploy a client, this is a good time to check that all of this works. I will show you how to do this using Postman. First step is to select OAuth2 authentication:
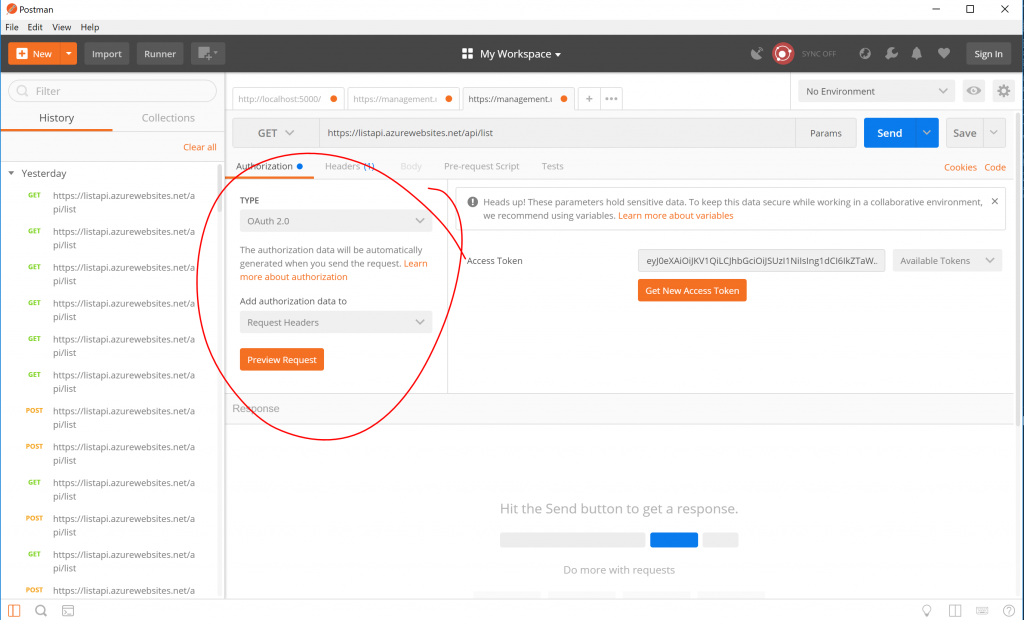
Then hit "Get New Access Token", which will bring up this dialog:

Here are the values you need to enter:
- Grant Type:
Authorization Code - Callback URL:
https://www.getpostman.com/oauth2/callback - Auth URL:
https://login.microsoftonline.com/TENANT-ID-OR-NAME/oauth2/authorize?resource=APPLICATION-ID-FOR-FOR-WEB-API - Access Token URL:
https://login.microsoftonline.com/TENANT-ID-OR-NAME/oauth2/token - Client ID:
APPLICATION-ID-FOR-FRONT-END-WEB-APP - Client Secret:
YOUR SECRET CREATED IN PORTAL - Scope:
ListApi.ReadWrite - Client Authentication:
Send client credentials in body
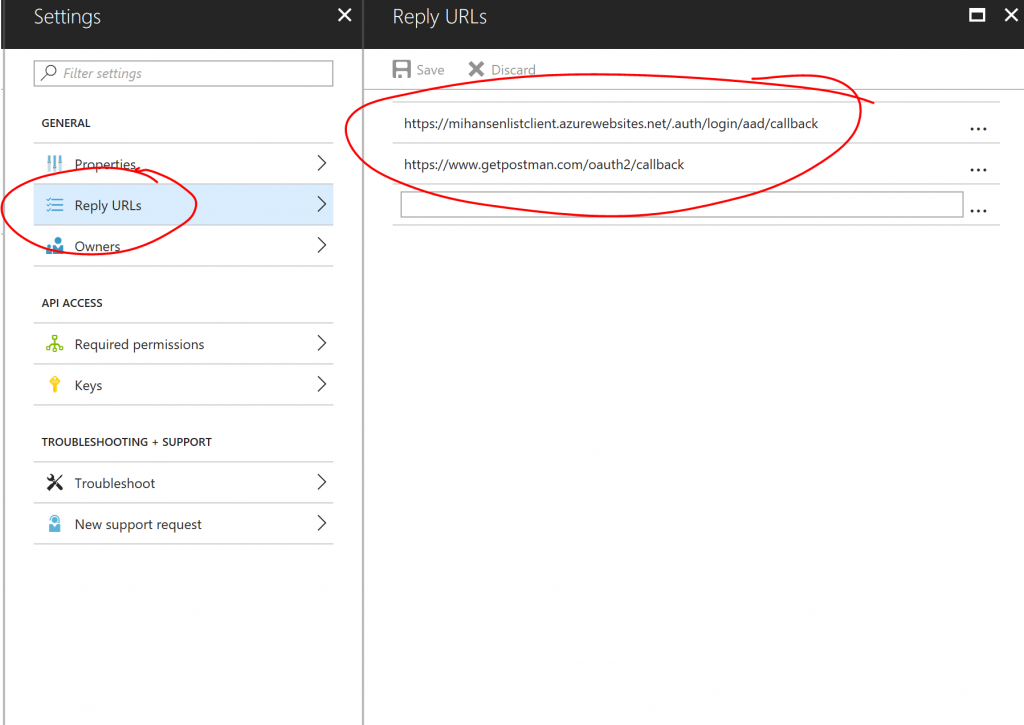
A note on the "Callback URL", you have to register this callback URL for your app registration for this to work. Otherwise you will get an error saying it is not a registered callback URL and you should add it. You will also need to add the callback URL for actual client application. Say we deploy the client in a web app called mywebapp and we set up Easy Auth (see below), the callback URL would be something like https://mywebapp.azurewebsites.net/.auth/login/aad/callback. Here is how those reply URLs look in this examples:
After hitting "Request Token" you will be taken through the login procedure for AAD and the token should be displayed. If you have the option of using a PIN, don't. Postman doesn't handle that well, use username and password (combined with MFA) instead. Hit "Use Token" at the bottom of the dialog and it will populate the token field in Postman. After that, you should be able to query the backend API:
Now that we know that we have a backend API and we can get a token for it using the app registration for the frontend web app, we can go ahead and deploy the frontend web application (the client). I have written a simple List Client MVC application, which calls the backend API. The application is designed to be deployed with Easy Auth, once the user has authenticated and if we have made sure that access to the backend resource is requested (see below), we can use code such as this:
[csharp]
public async Task<IActionResult> Delete(int id)
{
string accessToken = Request.Headers["x-ms-token-aad-access-token"];
var client = new HttpClient();
client.DefaultRequestHeaders.Authorization = new AuthenticationHeaderValue("Bearer", accessToken);
var response = await client.DeleteAsync("https://listapi.azurewebsites.net/api/list/" + id.ToString());
return RedirectToAction("Index");
}
[/csharp]
In this example function we are deleting a list item. Notice that we are using the x-ms-token-aad-access-token request header, which will contain the bearer token after signin and we are passing that token on to the API.
You can deploy the code into an Azure Web App and then set up Easy Auth with powershell. Because we need to make sure that we set additionalLoginParams for the web app authentication, it is not straightforward to do it in the portal. If you would like to learn how to set this manually using Postman, you can look at this blog post. I have also made a PowerShell tool called Set-WebAppAADAuth that does it all for you, it is part of my HansenAzurePS PowerShell module as of version 0.5. You can install this module with:
[ps]
Install-Module HansenAzurePS
[/ps]
Or browse the source if you just want to see the steps for setting up authentication. With the tool, you can set the authentication as seen below. Here is a script that creates a web app and sets the authentication correctly:
[ps]
$ClientID = "APP-REG-ID-FRONTEND-WEB-APP"
$ClientSecret = "SECRET-FOR-FRONTEND-WEBAPP"
$IssuerUrl = "https://login.microsoftonline.com/TENANT-ID-OR-NAME/"
$AdditionalLoginParams = @( "resource=APP-REG-ID-BACKEND-WEB-API")
$ResourceGroupName = "ListClientResourceGroup"
$WebAppName = "ListClientAppName"
$Location = "eastus"
#New resource group
$rg = New-AzureRmResourceGroup -Name $ResourceGroupName -Location $Location
#App Service plan
$asp = New-AzureRmAppServicePlan -Name $WebAppName `
-ResourceGroupName $rg.ResourceGroupName -Location $rg.Location
#New Web App
$webapp = New-AzureRmWebApp -ResourceGroupName $rg.ResourceGroupName `
-AppServicePlan $asp.Id -Location $rg.Location -Name $WebAppName
#Finally the authentication settings.
Set-WebAppAADAuth -ResourceGroupName $rg.ResourceGroupName `
-WebAppName $webapp.Name -ClientId $ClientID `
-ClientSecret $ClientSecret -IssuerUrl $IssuerUrl `
-AdditionalLoginParams $AdditionalLoginParams `
-Environment AzureCloud
[/ps]
The Environment parameter refers to the cloud where your web app is location. In the example above, we are using AAD in commercial Azure and the web app is also in commercial Azure, but you can mix and match to suit your specific scenario.
With the application deployed, you can now try to access it. You should get prompted for login credentials and you will be asked to accept that the application will have access to information on your behalf, including access to the List API as defined above:
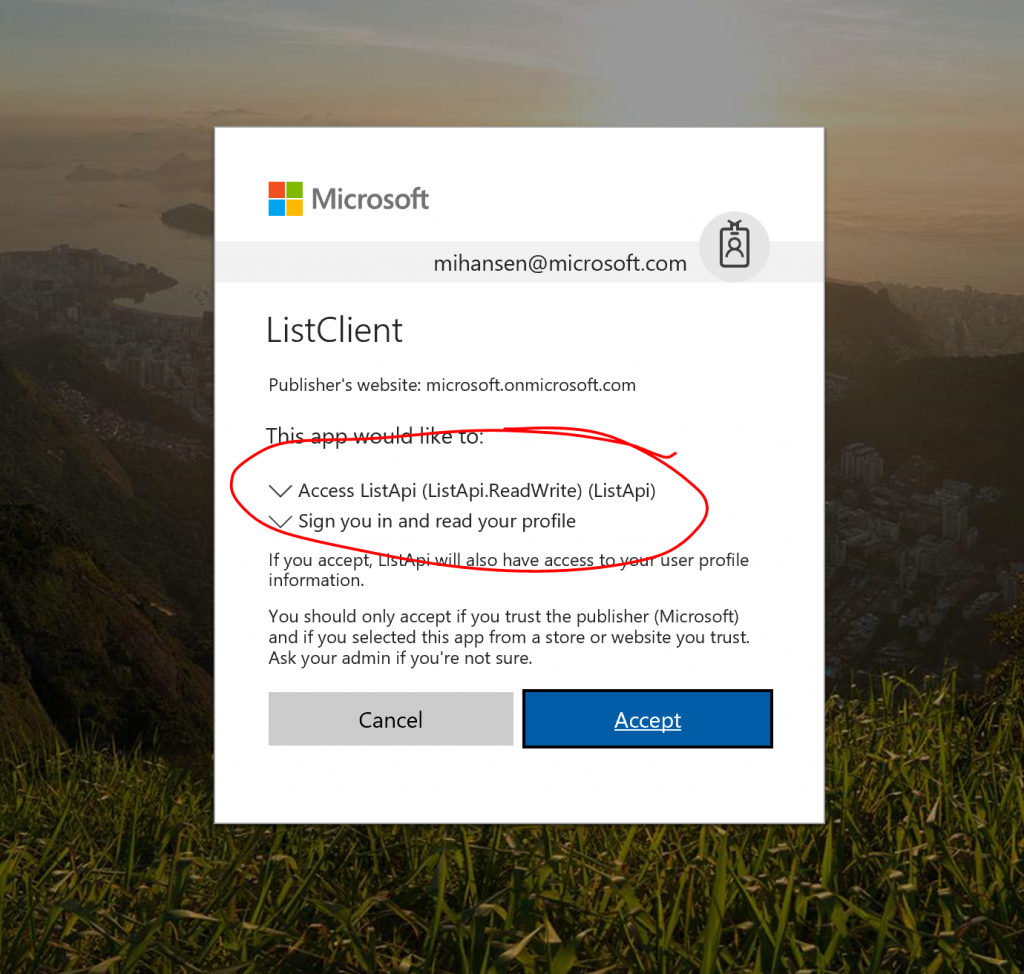
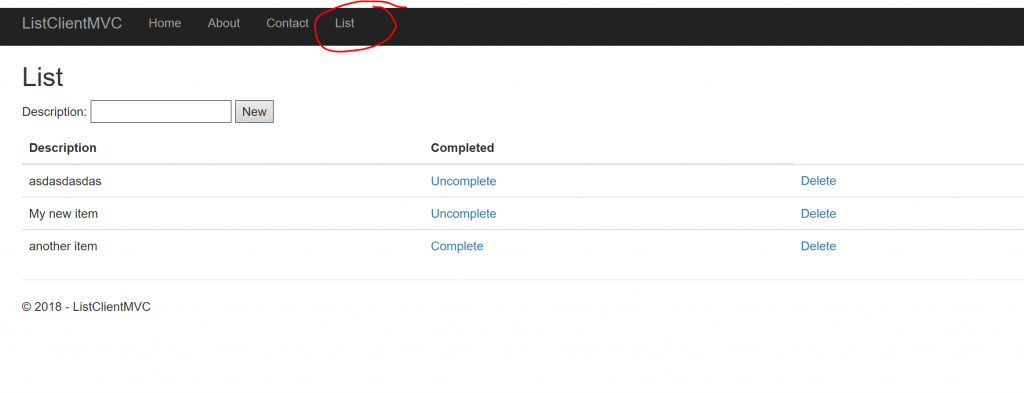
If you hit OK, you will get access and through the "List" link at the top of the page, you can now access your list (e.g., to do list or shopping list):
The toy application used in this example is not intended to be production code. The List API uses an in memory database, so when the app restarts all the lists are gone. It is only intended to be used for illustration purposes.
The workflow presented above, where we add the additional resource parameter to get a token for the API, only solves part of the problem if you need to access multiple backend APIs. Say for instance you want to access the Graph API and a custom API. In that case, you need to use an "on-behalf-of" workflow in your code to obtain tokens for additional APIs. This may be a subject of a later blog post, in the meantime, if you want to learn more about Azure Active Director and how to integrate it with your applications, please consult the Azure Active Directory Developers Guide, where you can find lots more information about app registrations and various authentication workflows.
Let me know if you have questions/comments/suggestions.