CI/CD for ColdFusion with Azure Web App
This tutorial covers how to set up Continuous Integration (CI) and Continuous Delivery (CD) of a ColdFusion application to an Azure Web App. In order to follow this tutorial, you should know how to deploy ColdFusion to an Azure Web App, you can find a detailed tutorial on this here. If you need a general walkthrough on how to set up web applications and CI/CD in Visual Studio Team Services (VSTS), you can find it here.
The basic steps that will be covered in this tutorial is:
- How to package a ColdFusion application into a single
*.warfile using Ant. - How to set up a build job on VSTS to using the Ant build process.
- How to deploy the build artifact (
*.war) file produced by the build to an Azure web app.
Packaging a ColdFusion Application using Ant
We will be working on a very simple ColdFusion Application, which contains a single *.cfm file, which looks like this:
 <html>

<head>
<title>Test</title>
</head>
<body>

  <cfset message = "WORLD"/>
  <cfoutput>Hello <b>#message#</b>!</cfoutput>

</body>

</html>
In order to package that into a *.war file with the ColdFusion server application, we will use an Ant build.xml file, which looks something like this:
 <project name="MyCFProject" basedir="." default="UpdateWar">
    <property name="base.war.url" value="<URL OF BASE WAR FILE>" />
    <property name="code.dir" value="code/" />
    <property name="target.war.name" value="cfusion.war" />
    <property name="target.prefix" value="myApplication" />

    <target name="UpdateWar" description="Updates WAR file">
    <delete dir="build" />
    <mkdir dir="build" />
    <get src="${base.war.url}" dest="build/${target.war.name}" />
        <war destfile="build/${target.war.name}" update="true">
            <zipfileset dir="${code.dir}"  prefix="target.prefix"/>
        </war>
    </target>

</project>
For an introduction to the Ant build system and how to write simple build files look here.
What this build.xml file does is:
- Download a base
*.warfile containing ColdFusion. Please see this tutorial for details on how to generate such a file. You should not upload that to a URL that is publically accessible without a key. One solution would be to use Azure BLOB storage with a shared access signature (SAS). - Take the code in a certain folder (
code/in this case) and add it to that*.warfile (in a specified location)
The resulting cfusion.war file will be stored in the build folder. This *.war file is ready to be deployed on a JEE server (e.g. a Tomcat server running on a Web App in Azure).
Setting up CI/CD with VSTS
Create a git repository containing:
    |
   |-code
   |   |
   |   +-index.cfm
   |
   |-build.xml
   |
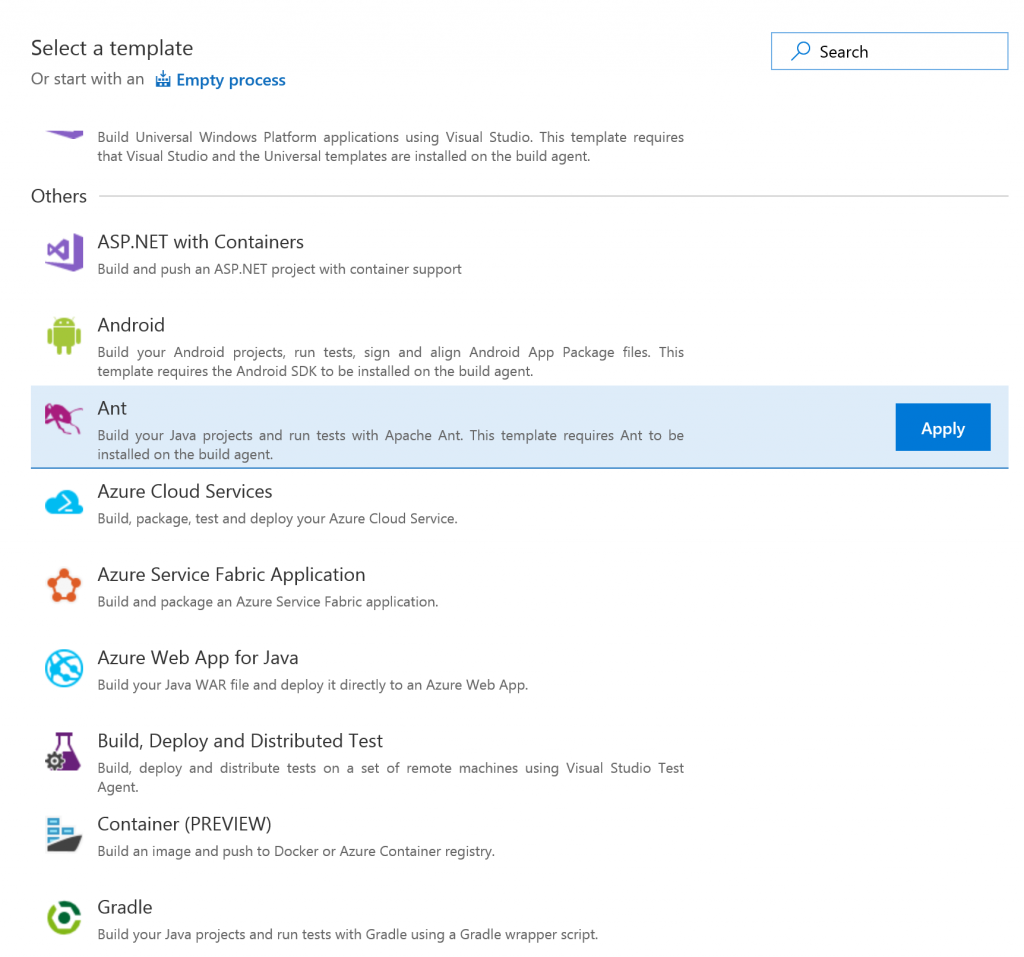
Push this repository to a VSTS projects code repository and select "Set Up Build". If this is an unfamiliar process to you, please walk through the basic CI/CD Web App Tutorial. You should pick the Ant build template:
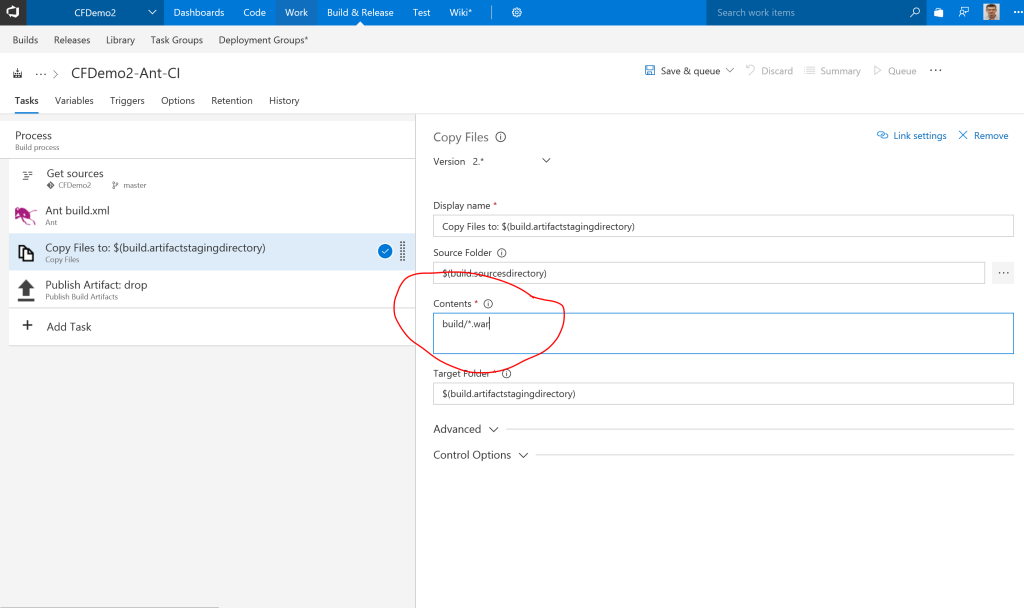
Select a "Hosted" agent and in the Copy step, modify the copy process to cope the *.war file the Ant build is creating:
Remember to set up triggering if you want the build to run automatically when code is checked into the repository.
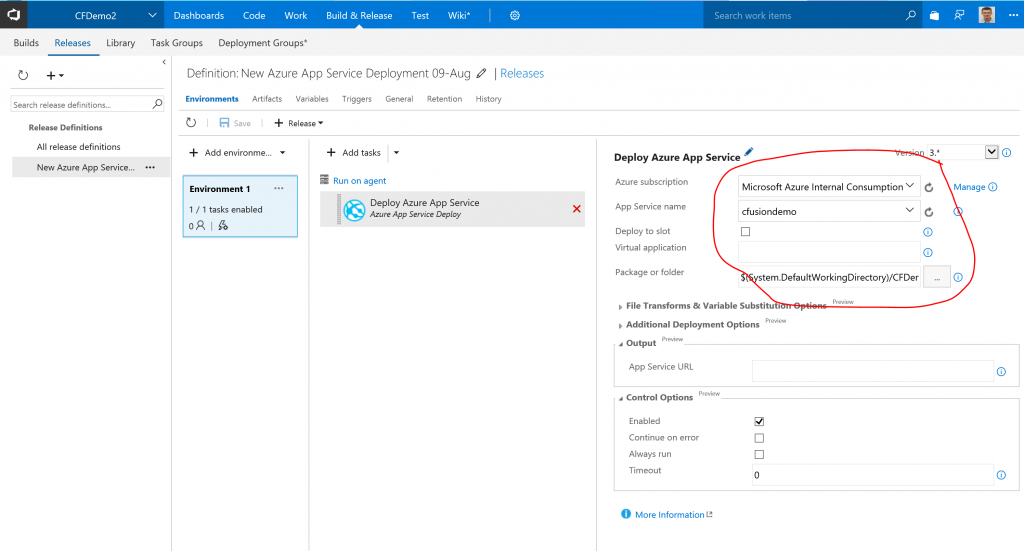
After that select "Save and Queue" to queue up a build with your new configuration. Once the build has succeeded you can create a new release definition using the "Deploy Azure App Service" template. Configure the Azure App Service deployment to pick up the *.war file created by the build and deploy it to an Azure Web App running a Tomcat server.
Let me know if this tutorial was helpful to you and if you have any questions/comments.