【Xamarin】濾鏡軟體不求人,自己動手做!
現在手機拍照對大家來說不再只是「留影」,如何留下「最美麗的照片」,並分享給親朋好友才是最重要的。今天就來教大家用 Xamarin.Android 做一個簡單的照片濾鏡,示範如何撰寫調整照片亮度和對比度的功能。
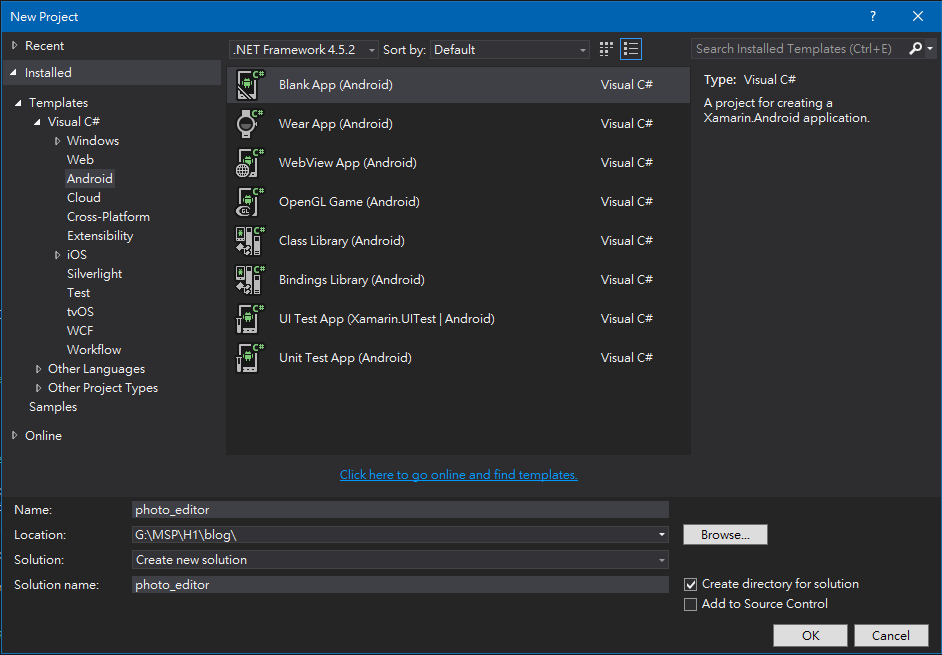
首先,我們在 Visual Studio 上新增一個 Android 專案。
File → New → Project,在左側欄位點選 Visual C# → Android,建一個 Blank App(Android),我們把專案名稱叫做 photo_editor。
設計 layout 介面
專案建好後我們點開 Main.axml,先把我們的介面拉出來,並設定一些元件的 id,方便我們後面在撰寫主程式 MainActivity.cs 時連接對應觸發事件。
Resource → layout → Main.axml
<?xml version="1.0" encoding="utf-8"?> <LinearLayout xmlns:android="https://schemas.android.com/apk/res/android" android:orientation="vertical" android:layout_width="match_parent" android:layout_height="match_parent" > <Button android:id="@+id/select" android:layout_width="match_parent" android:layout_height="wrap_content" android:text="Select an image from image gallery" /> <ImageView android:id="@+id/imageviewer" android:layout_width="wrap_content" android:layout_height="500px" /> <TextView android:text="Brightness" android:layout_width="match_parent" android:layout_height="wrap_content" android:textSize="12pt" /> <SeekBar android:layout_width="fill_parent" android:layout_height="wrap_content" android:id="@+id/brightness" android:max="300" android:progress="150" /> <TextView android:text="Contrast" android:layout_width="match_parent" android:layout_height="wrap_content" android:textSize="12pt" /> <SeekBar android:layout_width="fill_parent" android:layout_height="wrap_content" android:id="@+id/contrast" android:max="300" android:progress="150" /> </LinearLayout>
在這裡我們做了一個 Button 來給使用者選擇自己手機裡面的照片,一個 ImageView 來顯示要處理的圖片,以及兩個 SeekBar 分別用來調整亮度及對比度的值,我們設定最大值為 300,預設值為 150;兩個 TextView 則是亮度、對比度的標題文字
主程式 --- 初始化設定
一開始我們先在 OnCreate() 裡的 base.OnCreate(bundle); 下設定要連接的 layout,我們就連接剛剛寫好的 Main.axml。這部分預設已經幫我們寫好如下:
// Set our view from the "main" layout resource SetContentView(Resource.Layout.Main);
接著透過 FindViewById,用前面設定的 id 連接 Main.axml 裡面的元件,指派給宣告的變數,並指定觸發的事件負責處理的函式。
- imageSelectBtn 是選擇照片的按鈕,按下這個按鈕會觸發 Click 事件,我們用 ImagesSelectBtnClick 來定義使用者按下按鈕後程式要處理的事情。
- brightnessBar是給使用者調整亮度的bar,我們設定bar的值一次跳 1,並用AdjustBrightness處理 bar 值改變要觸發的動作。
- contrastBar 與 brightnessBar 結構相同,AdjustContrast 負責處理對比度的部分。
// Get our ImageView, Button and SeekBar from the layout resource, // and attach an event to them imageViewer = FindViewById<ImageView>(Resource.Id.imageviewer);var imageSelectBtn = FindViewById<Button>(Resource.Id.select); imageSelectBtn.Click += ImagesSelectBtnClick;//brightness var brightnessBar = FindViewById<SeekBar>(Resource.Id.brightness); brightnessBar.KeyProgressIncrement = 1; brightnessBar.ProgressChanged += AdjustBrightness;//contrast var contrastBar = FindViewById<SeekBar>(Resource.Id.contrast); contrastBar.KeyProgressIncrement = 1; contrastBar.ProgressChanged += AdjustContrast;
由於imageViewer不只在 OnCreate() 用到,因此我們在 OnCreate() 上面宣告這個 ImageView 類別的變數。
ImageView imageViewer;protected override void OnCreate(Bundle bundle) { ...
另外,我們使用 ColorMatrix 來處理圖片的顏色轉換問題,並把宣告的 ColorMatrix 變數餵給 ColorMatrixColorFilter 來得到圖片顏色的濾波器 (filter),接著把這個濾波器丟給負責記錄類型和顏色資訊的 Paint 類別變數的 SetColorFilter()。後面使用 Canvas 來裝 Bitmap 的時候,會需要使用到這個 paint。
//Color matrix //4x5 matrix for transforming the color and alpha components of a Bitmap.The matrix can be passed as single array. colorMatrix = new ColorMatrix();//ColorFilter //Create a color filter that transforms colors through a 4x5 color matrix. colorMatrixFilter = new ColorMatrixColorFilter(colorMatrix);//The Paint class holds the style and color information about how to draw geometries, text and bitmaps. paint = new Paint(); //Set the paint's colorfilter. paint.SetColorFilter(colorMatrixFilter);
同樣的,我們需要在 OnCreate() 上面宣告 ColorMatrix、ColorMatrixColorFilter 和 Paint 類別的變數。
ColorMatrix colorMatrix; ColorMatrixColorFilter colorMatrixFilter; Paint paint;
主程式 --- 事件處理
接下來我們在 OnCreate() 下面定義剛剛指定用來處理觸發事件的函式。
使用這個 App 時,首先我們會按下選擇手機內照片的按鈕,我們撰寫ImagesSelectBtnClick來處理。
void ImagesSelectBtnClick(object sender, EventArgs e) { var intent = new Intent(); intent.SetType("image/*"); intent.SetAction(Intent.ActionGetContent); StartActivityForResult(Intent.CreateChooser(intent, "Select Picture"), 1); }
根據Android開發者文件,Intent 是用來「向另一個應用程式元件要求動作的傳訊物件」。我們現在要去手機所有 image 列表拿圖片到我們的 App,因此宣告一個 Intent 變數,並呼叫 StartActivityForResult 來在 Activity 完成時收到圖片結果。選擇照片的介面,我們使用 Intent.CreateChooser()。
收到照片結果時,我們使用 OnActivityResult 來處理拿到的資料 (Intent data)。
protected override void OnActivityResult(int requestCode, Result resultCode, Intent data) { if (resultCode == Result.Ok && requestCode == 1) { imageSelected = true; originalBitmap = BitmapFactory.DecodeStream(ContentResolver.OpenInputStream(data.Data)); //Create a new mutable Bitmap from original canvasBitmap = Bitmap.CreateBitmap(originalBitmap.Width, originalBitmap.Height, originalBitmap.GetConfig()); //Initialize the canvas assigning the mutable Bitmap to it canvas = new Canvas(canvasBitmap); ShowBitmapInImageViewer(); } } void ShowBitmapInImageViewer() { //Draw the Bitmap into the mutable Bitmap using the canvas. canvas.DrawBitmap(originalBitmap, new Matrix(), paint); //Set the mutalbe Bitmap to be rendered by the ImageView imageViewer.SetImageBitmap(canvasBitmap); }
首先把資料篩選轉換成 Bitmap,用 originalBitmap 存下來,代表原始、沒有被調整過對比及亮度的圖片。另外我們也創建一個 originalBitmap 大小的 Bitmap canvasBitmap 當作修改對比及亮度值後的圖,並用 canvasBitmap 初始化 Canvas類別的變數 canvas。
接著我們把 originalBitmap 利用前面提到的paint來定義顏色,並畫在canvas上。再把 canvas 上新的 canvasBitmap 畫在 App 畫面的 imageViewer 元件上。
我們用 bool 變數 imageSelected 來確認現在是否有圖片在畫面上。
與前面相同,我們在 OnCreate() 上面宣告必要的變數。
Canvas canvas; Bitmap originalBitmap; Bitmap canvasBitmap; bool imageSelected;
接下來,我們介紹最重要的部分,也就是亮度和對比度的調整函式 AdjustBrightness 和 AdjustContrast。
首先是AdjustBrightness。
void AdjustBrightness(object sender, SeekBar.ProgressChangedEventArgs e) { if (!imageSelected) { return; } int brightness = e.Progress - 150; // brightness = -150~150 colorMatrix.Set(new float[] { 1, 0, 0, 0, brightness, // red scaling factor of 1, translation of brightness 0, 1, 0, 0, brightness, // green scaling factor of 1, translation of brightness 0, 0, 1, 0, brightness, // blue scaling factor of 1, translation of brightness 0, 0, 0, 1, 0 }); // alpha scaling factor of 1, translation of 0 UpdateImage(); }
調整色彩的部分,我們用的是前面提過的 ColorMatrix,四列數字分別代表 (r, g, b, a),也就是紅綠藍以及透明度。
其中,int brightness = e.Progress - 150; 是為了讓 colorMatrix 裡面的brightness可以介於 -150~150 之間。
定義完 colorMatrix 後,我們利用它來更新colorMatrixFilter以及 paint,再呈現在 imageViewer 上。
void UpdateImage() { colorMatrixFilter = new ColorMatrixColorFilter(colorMatrix); paint.SetColorFilter(colorMatrixFilter); ShowBitmapInImageViewer(); }
再來是 AdjustContrast 的部分,根據一般影像對比度的算法計算就好,架構與 AdjustBrightness 相同。
void AdjustContrast(object sender, SeekBar.ProgressChangedEventArgs e) { if (!imageSelected) { return; } int seekBarValue = e.Progress - 150; float input = seekBarValue / 150f; float contrastLevel = input + 1f; float contrast = (-0.5f * contrastLevel + 0.5f) * 255f; colorMatrix.Set(new float[] { contrastLevel, 0, 0, 0, contrast, 0, contrastLevel, 0, 0, contrast, 0, 0, contrastLevel, 0, contrast, 0, 0, 0, 1, 0 }); UpdateImage(); }
這樣我們就完成我們的簡易的照片濾鏡了!以下是有用到的 usings。
using Android.App; using Android.Widget; using Android.OS; using Android.Graphics; using Android.Content; using System;
