From the MVPs: Manage media delivery in the Cloud with Microsoft Azure and Media Services
This is the 50th in our series of guest posts by Microsoft Most Valued Professionals (MVPs). You can click the “MVPs” tag in the right column of our blog to see all the articles.
Since the early 1990s, Microsoft has recognized technology champions around the world with the MVP Award . MVPs freely share their knowledge, real-world experience, and impartial and objective feedback to help people enhance the way they use technology. Of the millions of individuals who participate in technology communities, around 4,000 are recognized as Microsoft MVPs. You can read more original MVP-authored content on the Microsoft MVP Award Program Blog .
This post is by ASP.Net/IIS MVP Julien Corioland . Thanks, Julien!
Manage media delivery in the Cloud with Microsoft Azure and Media Services
This article talks about managing media workflows in the cloud using Microsoft Azure Media Services.
Introduction
Today, people want be able to consume videos from any devices and any places: at home on their computers or TV over large bandwidth connections or on the go with their mobile phones over mobile networks.
The diversity of Internet connection qualities, devices and formats is very hard to assume for OVP (Online Video Providers). They need to provide videos that may be readable on phones, tablets, connected-TVs, games consoles, PCs and so more. This is a big issue for them because they need to create files for each platform. The principal effect is the increase of storage cost.
For example, there is currently three different formats that are mostly used to do adaptive streaming: HLS for Apple and Android, Smooth Streaming for Microsoft platforms and MPEG-DASH that is emerging as the one that will be the way to do adaptive streaming in the future, and that is supported by modern web browsers, without plugin, using the HTML 5 video tag.
Media Services is a Microsoft Azure feature that allows to manage media workflows in order to simplify them and reduce the storage costs related to the devices and formats diversity. It can be used in two scenarios: VOD (Video-on-demand) and Live Channels.
In this article, I will cover the first scenario and show you how to use Microsoft Azure and Media Services to build an online video platform that can stream content to a very large panel of devices (like iPhone, iPads, Windows, Android or modern web browsers). To reduce storage costs, Microsoft propose a feature called Dynamic Packaging that allows to package content on-demand in the format the customer is asking for. In this way, you can do adaptive streaming in HLS, Smooth Streaming or MPEG-DASH using the same asset (mezzanine file) and package it on the fly.
Media workflows with Microsoft Azure
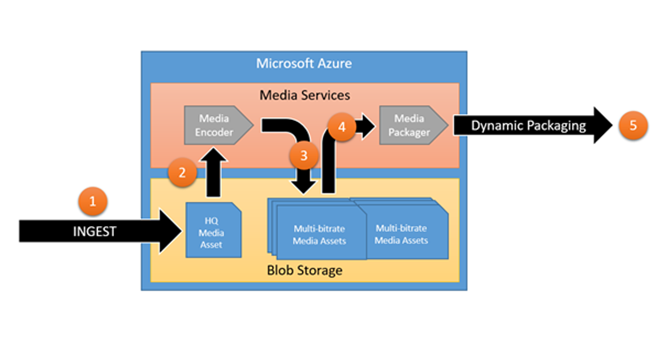
The schema bellow describes the way that Media Services may be used to handle media management workflows with Microsoft Azure:

Media Services uses the Microsoft Azure blob storage to store all media assets. It is possible to split the process in 5 steps:
1) Ingest: the source media file is uploaded in the Azure blob storage. In most of the cases, this file is a high definition media asset (a H264 MP4 file, for example).
2) The file is processed by a media encoder that may be used to encode the file in other formats or qualities. In our case, we will ask Media Services to generate a multi-bitrate MP4. (A multi-bitrate asset contains multiple MP4 files encoded with different bitrate / quality and a metadata file that describe the different files. It allows the server to switch between qualities to adapt the stream to the bandwidth)
3) Once the original asset is processed, all output files are also stored in the Azure blob storage
4) To distribute the file, Media Services offers media packagers that may be used to package the media in different formats to do Smooth Streaming, HLS or MPEG-DASH. Media packagers can be used dynamically or statically. In this example, they will be used dynamically.
5) The file is streamed in the format the consumer ask for
In addition to Azure Media Services, Microsoft Azure offers a lot of Platform-as-a-Service (PaaS) features that you can use to build an online video platform: Azure web jobs and web sites for compute, Azure service bus for distributed messaging and scalability, Azure Active Directory for security and so on…
To keep the article simple I have chosen to divide all steps of the workflow in small console applications. Some of them will be executed in Azure web Jobs on specific triggers (like new blob in a container or new message in a queue) and others will be executed directly on your machine.
The code is available on GitHub: https://github.com/jcorioland/techdays2015/. For readability I have not detailed all the code, so do not hesitate to clone the repository and look directly in the code while reading this article.
Create the services in the Microsoft Azure portal
All the samples in this article use Microsoft Azure so you need to have an account. If you don’t already have an account, you can create a new one for free on this page. It will be automatically credited for free, the first month and you’ll have enough credit to try the samples of this article.
Go to the Azure Management Portal and create a storage account that will be used to store all videos assets of the platform. If it is your first time with Azure, follow this article from the official documentation.
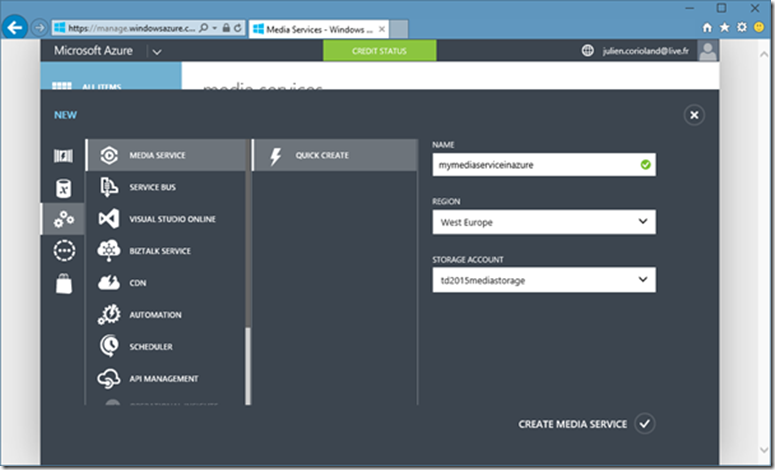
Once the storage account is created, add a new Media Services account to your subscription. To do that, go to the Media Services section in the left menu and click the NEW button at the bottom-left of the page. Choose the “Quick Create” option: enter a name, choose the storage account that must be linked and the region where the service will be created. Validate the creation and wait a moment for the Media Services to be created:

The last service we need for this article is a web site that will run the different web jobs that are triggered at different steps of the media workflow.
To create a new one, click on the Websites section in the left menu and then click NEW at the bottom left of the page. Choose an URL and a hosting plan. Wait for the website to be created. If you are not familiar with Azure Websites and web jobs, you can read some documentation on this page before continuing this article.
Use the .NET SDK to upload video files to Azure BLOB Storage
There are several ways to upload files in Azure BLOB storage and you can do this from any technology that can read a stream and send an HTTP request like Microsoft .NET of course, but also Node.JS, Java, PHP… In this article, I have chosen to use Microsoft .NET SDKs and Visual Studio to create the samples.
There are two kind of blob in Azure Storage: page blobs and block blobs. Azure Media Services uses block blobs. It offers some advantage like the ability to upload file chunks in parallel to speed up the operation and commit the list of blocks once all blocks have been uploaded.
In Visual Studio, create a new Console Application project, open the NuGet Package Manager and install the package Microsoft.WindowsAzure.Storage. It is the only package that is required to upload block blobs in Azure Storage.
This simple console app ask the user for a video file path and upload it directly in Azure Storage in a blob container named “uploads”.
static void Main(string[] args)
{
Console.WriteLine("Enter the path of the file to upload:");
string path = Console.ReadLine();
if (!File.Exists(path))
{
Console.WriteLine("The file was not found");
return;
}
string storageConnectionString = ConfigurationManager.ConnectionStrings["AzureStorage"].ConnectionString;
string uploadContainerName = "uploads";
// create a cloud storage account and a cloud blob client
CloudStorageAccount cloudStorageAccount = CloudStorageAccount.Parse(storageConnectionString);
CloudBlobClient cloudBlobClient = cloudStorageAccount.CreateCloudBlobClient();
// get the reference to the upload container and create it if it does not exist
CloudBlobContainer container = cloudBlobClient.GetContainerReference(uploadContainerName);
container.CreateIfNotExists();
// get a block blob reference
CloudBlockBlob blob = container.GetBlockBlobReference(Path.GetFileName(path));
// upload the file
blob.UploadFromFile(path, FileMode.Open);
Console.WriteLine("The file has been upload to the blob {0}", blob.Uri);
}
We do not need to do anything else to trigger the media workflow in Azure because we are going to develop a web job that will be automatically trigger by the arrival on the blob in the “uploads” container!
Create a web job
In this part, I will explain how to use Visual Studio to create a web job that will be triggered when a blob is uploaded in a specific container. If you are not familiar to Azure web jobs, you can read this article before.
First, create a new Azure web job project in Visual Studio. The project automatically reference all the NuGet packages you need to work with web jobs.
The App.config file contains two connection strings: AzureWebJobsDashboard and AzureWebJobsStorage. You have to fill these settings with the connection string to the storage account that you have created before.
The Program.cs file contains the code that launches the job host and maintains the application up and running.
The project template has generated another code file named Functions.cs that contains a sample storage queue triggered function.
Delete the function and add a new one like the following:
public class Functions
{
public async static Task ProcessNewBlobAsync([BlobTrigger("uploads/{name}")] ICloudBlob cloudBlob, string name, TextWriter logger)
{
}
}
Note the use of the BlobTrigger attribute that indicates to the web job host that this function should be executed when a new blob is uploaded in the “uploads” container of the storage account that is linked to the job. The host will call the method passing the cloud blob as first parameter, its name as second parameter and a text writer used to write logs in the web jobs dashboard as third parameter.
It’s in this method that we are going to work with Azure Media Services to launch encoding and thumbnails generation tasks.
Use Azure Media Services to encode a video
The video file is now in Azure Blob Storage and is ready to be consumed by Azure Media Services. AMS does not work directly with blobs but with media assets.
First you have to reference the NuGet package WindowsAzure.MediaServices. To get a valid media service asset, you have to:
1. Get the blob reference
2. Create the asset via the SDK
3. Create an access policy to be able to write the blob in Azure Media Service
4. Create a locator to access the asset
5. Create an asset file
6. Copy the blob in the asset container
7. Remove the locator, the access policy and the source blob (not mandatory)
As I mentioned it before in the article, the code has been shortened for readability so there are some methods or variables in the code samples that are not defined or explained. If you want the complete code, please go to the GitHub repository.
public async Task<IAsset> CreateMediaServiceAssetFromExistingBlobAsync(string blobUrl)
{
var cloudBlobClient = _cloudStorageAccount.CreateCloudBlobClient();
// get a valid reference on the source blob
var sourceBlob = await cloudBlobClient.GetBlobReferenceFromServerAsync(new Uri(blobUrl));
if(sourceBlob.BlobType != Microsoft.WindowsAzure.Storage.Blob.BlobType.BlockBlob)
{
throw new ArgumentException("Azure Media Services only works with block blobs.");
}
// create a new media service asset
var asset = await _cloudMediaContext.Assets.CreateAsync(
sourceBlob.Name,
AssetCreationOptions.None,
CancellationToken.None);
// create a write policy valid for one hour
var writePolicy = await _cloudMediaContext.AccessPolicies.CreateAsync(
"Write policy",
TimeSpan.FromHours(1),
AccessPermissions.Write);
// get a locator to be able to copy the blob in the media service asset location
var locator = await _cloudMediaContext.Locators.CreateSasLocatorAsync(asset, writePolicy);
// get the container name & reference
string destinationContainerName = new Uri(locator.Path).Segments[1];
var destinationContainer = cloudBlobClient.GetContainerReference(destinationContainerName);
// create the container if it does not exist
if ((await destinationContainer.CreateIfNotExistsAsync()))
{
destinationContainer.SetPermissions(new BlobContainerPermissions()
{
PublicAccess = BlobContainerPublicAccessType.Blob
});
}
// create the asset file
var assetFile = await asset.AssetFiles.CreateAsync(sourceBlob.Name, CancellationToken.None);
// copie the blob
var destinationBlob = destinationContainer.GetBlockBlobReference(sourceBlob.Name);
await destinationBlob.StartCopyFromBlobAsync(sourceBlob as CloudBlockBlob);
// fetch the blob attributes
await destinationBlob.FetchAttributesAsync();
if(destinationBlob.Properties.Length != sourceBlob.Properties.Length)
{
throw new InvalidOperationException("The blob was not well copied");
}
// remove old stuff
await locator.DeleteAsync();
await writePolicy.DeleteAsync();
await sourceBlob.DeleteAsync();
await asset.UpdateAsync();
return asset;
}
Once the asset is created, it’s possible to create Azure Media Services (AMS) jobs. A job in AMS is an operation composed by one or many tasks. In this example, we are going to create a job that is composed of two tasks: the first is used to create a multi-bitrate asset from the input file and the second used to generate thumbnails. Creating a job is really easy using the SDK:
public async Task<IJob> CreateJobAsync(IAsset mediaServiceAsset, string notificationEndpointsQueueName)
{
// create the job
string jobName = string.Format("Multibitrate generation for {0}", mediaServiceAsset.Name);
var job = _cloudMediaContext.Jobs.Create(jobName);
// get the azure media encoder
var azureMediaEncoder = GetLatestMediaProcessorByName("Azure Media Encoder");
// add a task for multibitrate generation
var multibitrateTask = job.Tasks.AddNew(
"Multibitrate",
azureMediaEncoder,
"H264 Adaptive Bitrate MP4 Set 720p",
TaskOptions.None);
multibitrateTask.InputAssets.Add(mediaServiceAsset);
multibitrateTask.OutputAssets.AddNew(
string.Format("Multibirate ouput for {0}", mediaServiceAsset.Name),
AssetCreationOptions.None);
// add a task for thumbnail generation
var thumbnailTask = job.Tasks.AddNew(
"Thumbnails",
azureMediaEncoder,
"Thumbnails",
TaskOptions.None);
thumbnailTask.InputAssets.Add(mediaServiceAsset);
thumbnailTask.OutputAssets.AddNew(
string.Format("Thumbnails ouput for {0}", mediaServiceAsset.Name),
AssetCreationOptions.None);
// create a notification endpoint
await EnsureQueueExistsAsync(notificationEndpointsQueueName);
var notificationEndPoint = await _cloudMediaContext.NotificationEndPoints
.CreateAsync(
"notification",
NotificationEndPointType.AzureQueue,
notificationEndpointsQueueName
);
job.JobNotificationSubscriptions.AddNew(NotificationJobState.All, notificationEndPoint);
// submit the job
job = await job.SubmitAsync();
return job;
}
As you can see in the code above, you associate a media encoder with each task (in this case Azure Media Encoder) and you configure the task with a preset. You can use predefined presets or create your own as XML. You will find more information about Azure Media Services presets on this page.
One of the really cool feature of Azure Media Services is the possibility to define notification endpoints to get notifications directly from AMS when the state of the job is updated. It allows, for example, to easily get feedbacks from encoding states in your back office.
As you can see, Azure Media Services notification endpoints are based on Azure Storage Queue, so it’s possible to use these messages to trigger another web job function that will be in charge of the encoding management.
You can now update the triggered function in the web job to use the media services wrapper to generate the encoding job when the blob is uploaded:
public static async Task ProcessNewBlobAsync(
[BlobTrigger("uploads/{name}")] ICloudBlob cloudBlob,
string name,
TextWriter logger)
{
await logger.WriteLineAsync(string.Format("New blob received: {0}", name));
var mediaServiceWrapper = new MediaServiceWrapper(
_mediaServiceName,
_mediaServiceKey,
_azureStorageAccount);
// create the media service asset from the existing blob
var asset = await mediaServiceWrapper
.CreateMediaServiceAssetFromExistingBlobAsync(cloudBlob.Uri.ToString());
// create a job with two tasks : multibirate mp4 generation and thumbnails generation
var job = await mediaServiceWrapper
.CreateJobAsync(asset, notificationEndpointsQueueName: "job-progress");
await logger.WriteLineAsync(
string.Format("The job has been submitted (job id = {0})",
job.Id));
}
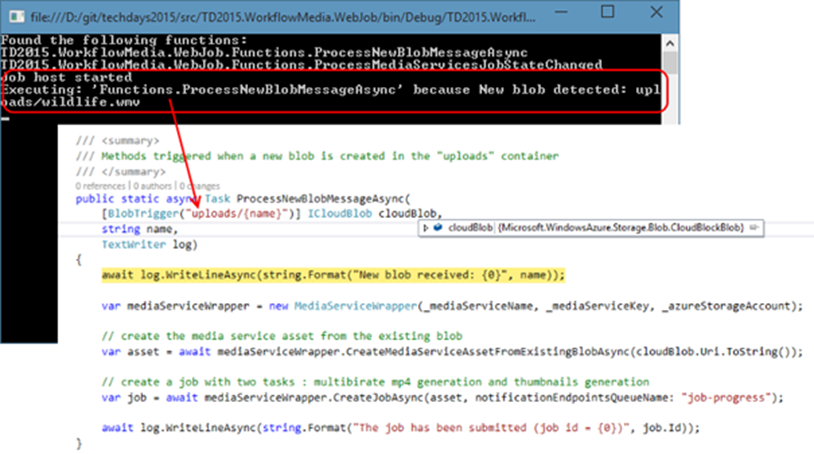
If you run the web job console application (in debug on your machine or in an Azure web site) and if you upload a video file in the upload container, the ProcessNewBlobAsync method should be called automatically and will schedule a new Azure Media Services job:
Handle the encoding state changes
Handling the encoding state changes is very simple using web jobs. Because Azure Media Services will push a new message in a storage queue each time the job state is updated, you can handle it with a triggered function:
public static async Task ProcessMediaServicesJobStateChanged(
[QueueTrigger("job-progress")] CloudQueueMessage message,
TextWriter log)
{
var jobMessage = Newtonsoft.Json.JsonConvert.DeserializeObject<EncodingJobMessage>(message.AsString);
//if the event type is a state change
if (jobMessage.EventType == "JobStateChange")
{
//try get old and new state
if (jobMessage.Properties.Any(p => p.Key == "OldState")
&& jobMessage.Properties.Any(p => p.Key == "NewState"))
{
string oldJobState = jobMessage.Properties.First(p => p.Key == "OldState").Value.ToString();
string newJobState = jobMessage.Properties.First(p => p.Key == "NewState").Value.ToString();
await log.WriteLineAsync(string.Format("job state has changed from {0} to {1}", oldJobState, newJobState));
string newState = jobMessage.Properties["NewState"].ToString();
if (newState == "Finished")
{
string jobId = jobMessage.Properties["JobId"].ToString();
// todo : publish the assets
}
}
}
}
Publish the stream
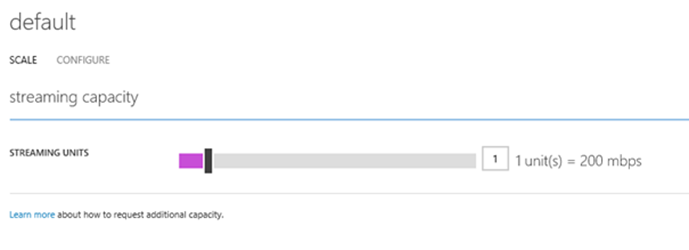
The last step consists in publishing the stream using Azure Media Services origin server. To be able to use dynamic packaging, you need to activate streaming units instance in the Microsoft Azure portal. Go in the details of the media service you have created, click on the “STREAMING ENDPOINTS” tab, select the “default” endpoint and add at least one streaming unit:

Click on the save button to update the configuration.
Now, you can add a new method to publish a stream in the MediaServiceWrapper class:
public async Task<AdaptiveStreamingInfo> PrepareAssetsForAdaptiveStreamingAsync(string jobId)
{
// get the job from the cloud media context
var theJob = _cloudMediaContext.Jobs
.Where(j => j.Id == jobId)
.AsEnumerable()
.FirstOrDefault();
if (theJob == null)
{
throw new InvalidOperationException("The job is not finished");
}
var adaptiveStreamingInfo = new AdaptiveStreamingInfo();
// assets publication
foreach (var outputAsset in theJob.OutputMediaAssets)
{
// multi-bitrate MP4
if (outputAsset.IsStreamable)
{
var streamingLocator = await GetStreamingLocatorForAssetAsync(outputAsset);
adaptiveStreamingInfo.SmoothStreamingUrl = streamingLocator.GetSmoothStreamingUri().ToString();
adaptiveStreamingInfo.HlsUrl = streamingLocator.GetHlsUri().ToString();
adaptiveStreamingInfo.MpegDashUrl = streamingLocator.GetMpegDashUri().ToString();
}
// thumbnails
else
{
var locator = await GetSasLocatorForAssetAsync(outputAsset);
var posterFiles = outputAsset.AssetFiles
.Where(f => f.Name.EndsWith(".jpg"))
.AsEnumerable();
foreach (var posterFile in posterFiles)
{
string posterUrl = string.Format("{0}/{1}{2}", locator.BaseUri, posterFile.Name, locator.ContentAccessComponent);
adaptiveStreamingInfo.Posters.Add(posterUrl);
}
}
}
return adaptiveStreamingInfo;
}
In the previous code, we retrieve the job that is completed and we loop on the output asset collection. For each asset, we test the IsStreamable property used to indicate if the asset can be streamed (the multi-bitrate encoded asset) or not (the thumbnails asset).
For the multi-bitrate asset, we use Azure Media Services to generate an origin locator i.e. a locator that allows to do dynamic packaging, so we can get smooth streaming, HLS or Mpeg-Dash URLs:
private async Task<ILocator> GetStreamingLocatorForAssetAsync(IAsset asset)
{
// the asset should be streamable
if (!asset.IsStreamable)
{
throw new InvalidOperationException("This asset cannot be streamed.");
}
// get the locator on the asset
var locator = asset.Locators
.Where(l => l.Name == "vwr_streaming_locator")
.FirstOrDefault();
// if it does not exist
if (locator == null)
{
// get the access policy
var accessPolicy = await _cloudMediaContext
.AccessPolicies
.CreateAsync("vwr_streaming_access_policy", TimeSpan.FromDays(100 * 365), AccessPermissions.Read);
// create the locator on the asset
locator = await _cloudMediaContext
.Locators
.CreateLocatorAsync(
LocatorType.OnDemandOrigin,
asset,
accessPolicy,
DateTime.UtcNow.AddMinutes(-5),
name: "vwr_streaming_locator");
}
// returns the locator
return locator;
}
If the asset cannot be streamed, we generate a locator based on blob shared access signature to make it available:
private async Task<ILocator> GetSasLocatorForAssetAsync(IAsset asset)
{
string locatorName = string.Format("SasLocator for {0}", asset.Id);
var locator = _cloudMediaContext.Locators
.Where(l => l.Name == locatorName)
.FirstOrDefault();
if (locator == null)
{
// create the access policy
var accessPolicy = await _cloudMediaContext
.AccessPolicies
.CreateAsync(string.Format("SasPolicy for {0}", asset.Id), TimeSpan.FromDays(100 * 365), AccessPermissions.Read);
// create the locator on the asset
locator = await _cloudMediaContext
.Locators
.CreateLocatorAsync(
LocatorType.Sas,
asset,
accessPolicy,
DateTime.UtcNow.AddMinutes(-10),
name: locatorName);
}
// returns the locator
return locator;
}
You can now use this website to test the different streams that you have produced with Azure Media Services.
Conclusion
As you can see in this article, handling media workflows in the cloud is really easy with Microsoft Azure using only PaaS features. One of the thing that is really awesome with Azure Media Services is that all is already packaged for you and you don’t need to think to the hardware configuration, infrastructure or scalability: Microsoft is doing it for you J
In summary, the key steps are:
1) Upload the video file in Azure
2) Create an asset for Media Services
3) Launch a job with one or more tasks
4) Handle the job completion
5) Make the assets available
There are other scenarios that are available with Azure Media Services but that were not covered by this article like using a content delivery network to stream assets or protecting the content with PlayReady for example. For a full list of Azure Media Service capabilities you can go to this page.
I hope this article will be useful and I’ll be happy to answer your questions, so feel free to contact me on Twitter @jcorioland or via my blog (https://www.juliencorioland.net)!
Acknowledgements
Special thanks to the following collaborators who volunteered their time to tech review this article:
- Etienne Margraff (Developer Evangelist, Microsoft France)
- Thomas Lebrun (MVP Client App Dev)
- Sébastien Ollivier (MVP ASP.NET / IIS)
