From the MVPs: “From Macros to Apps: Automating Office 2013”
This is the 28th in our series of guest posts by Microsoft Most Valued Professionals (MVPs). You can click the “MVPs” tag in the right column of our blog to see all the articles.
Since the early 1990s, Microsoft has recognized technology champions around the world with the MVP Award. MVPs freely share their knowledge, real-world experience, and impartial and objective feedback to help people enhance the way they use technology. Of the millions of individuals who participate in technology communities, around 4,000 are recognized as Microsoft MVPs. You can read more original MVP-authored content on the Microsoft MVP Award Program Blog.
This post is by Stephanie Krieger , an Office System MVP and author of Documents, Presentations, and Workbooks: Using Microsoft Office to Create Content That Gets Noticed (Microsoft Press, 2011). Thanks much, Stephanie!
Stephanie here! Millions of people use Microsoft Office to create nearly as many types of content. But one thing holds true for just about all of us: whatever we need to do with Office—regardless of how much experience we have doing it—we always want ways to do it faster or easier.
So, in this post, we’ll look at two timesaving, simplifying, and downright horizon-expanding features—one brand new and one that’s not new at all. This post is all about automating the tasks you need (or want) to do with Office and maybe those you didn’t know you could do. We’ll look at a longtime favorite tool of mine—recording and writing macros—and one great, new idea that’s not just for your smartphone anymore: apps.
Reintroducing a true classic: get to know macros
A macro is a set of actions that you can name and save for easy access. Yes, technically a macro is programming—but please don’t let that stop you from reading on. You don’t have to be a programmer to use them.
For example, say that you’re creating a report in Word that will contain dozens of tables you’re pasting in from other sources. Each time you add a new table, you have to take several steps—such as clearing the existing formatting and applying a table style. If you record a macro while taking those steps in one table, you can then apply all of those steps to each subsequent table with just a click.
If you want to take that one step further to save far more time, learn a bit about how to edit and write your own macros and then edit that macro to apply those steps to every table in your document at once (or even just to tables that meet specific criteria).
In Word, Excel, Visio, and Project, you can record macros without ever seeing a single line of code. Or, if you learn just a bit about the language behind macros, you can also edit and write your own macros in those programs as well as in PowerPoint, Outlook, Access, and Publisher.
Note: Even though you can’t record macros in Outlook, you can automate many repetitive tasks easily using the really cool Quick Steps feature, which is not a programming language. Click here for more info on creating Quick Steps.
Exploring built-in features first
Each time a new version of Office is released, regardless of how many new and cool features it brings, one question I always hear more than most is how to save time on repetitive tasks. But the answer is often not new at all. Sometimes, it’s an existing feature that’s designed to save time and improve results, and it might be much easier than you think. For example:
· Use a paragraph style in Word to save and reuse a collection of formatting attributes and apply them to text with one click.
· Customize a slide layout in PowerPoint to automatically size and position content consistently across multiple slides.
· Convert a range to a table in Excel for shortcuts such as built-in sort and filter tools or the ability to add a formula to an entire column of data at once.
· Use the Replace feature in Word or Excel to replace formatting.
· Convert a bulleted list in PowerPoint to a SmartArt diagram.
I love macros and can’t recommend strongly enough that almost any experienced Microsoft Office user can benefit from knowing a little bit about them, even if it’s just using the macro recorders. But the simplest method is usually the best way to go about any task in Office, and this is no exception. So, if there is a built-in feature to do what you need, it might be faster and easier than trying to do it with any type of code. But for tasks that don’t have a built-in feature to offer as a solution, the answer is often to record or write a macro.
To help you get started with macros in Office 2013, I’m not going to give you the basic steps you can get from many other places. Instead, let’s take a look at some tips to save you time and help you feel like a pro from the get-go.
Getting started with macros
Before you start working with macros, keep the following tips in mind:
· Use a macro-enabled file format: In Word, Excel, and PowerPoint (and, in Office 2013, in Visio as well) be sure that you’re using a macro-enabled file format if you want to save macros directly in the file you’re editing.
To do this, click File and then click Save As. Browse to the location you want and then, in the Save As dialog box, select a macro-enabled file format from the Save As Type list. Macro-enabled file formats end with the letter ‘m,’ such as .docm in Word, .xlsm in Excel, or .pptm in PowerPoint.
Note: In Excel, the binary file format .xlsb also enables macro storage.
· You can add your own macros to the Quick Access Toolbar or the ribbon in any Office 2013 program that supports both macros and customizing the ribbon. If you’re recording macros, you don’t have to do this when you create it. See help later in this post for getting this done.
· Macro names can include letters, numbers, and some characters (such as an underscore) but no spaces. Names must begin with a letter.
Recording macros
You can search Help in any Office 2013 program in which you can record macros to get the basics (just press the F1 key to open Help), so here are a few tips instead to save you a bit more time:
· To start recording a macro, you can use the Record Macro option on the Developer tab of the ribbon, but you don’t have to add that ribbon to record a macro. Instead, on the Status bar (the bar that goes across the bottom of the program window), click the Record Macro button.
Note: In Project 2013, the Record Macro button isn’t visible on the Status bar by default. Right-click the Status bar and then click Macro Recording to add it.
When you’ve recorded all you want to include in your macro, just click the box to stop recording.
· When you begin to record a macro, pay attention to where you save it.
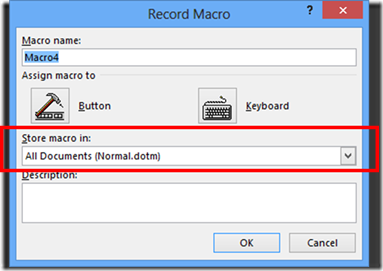
By default, macros you record in Word are saved in the default global template, Normal.dotm, which loads each time you start Word. Macros stored in this template are available to all of your documents by default. You can also choose to store the macro in the active document (or template), or another loaded global template.
In Excel, macros you record are stored by default in the active workbook. You can also select the option to create a personal workbook specifically for storing your macros, from the Store Macro In list. Similar to Normal.dotm for Word, the personal macro workbook (Personal.xlsb) loads each time you start Excel, which makes macros stored in your personal workbook available to all open workbooks.
The Store Macro In list in Visio 2013 lists some .vssx (stencil) files as options that you can’t actually use. As mentioned earlier, macros can only be saved in macro-enabled file formats. So if you choose one of the macro-free format (.vssx) stencil files listed there, you’ll get an error and be prompted to select another file location and format.
· Name the macro while creating it. It’s easy to add or edit a description later and to create a button for the macro at any time. But if you’re just starting to record macros and not quite ready to see what the code looks like underneath them, name them now. It’s easy to rename a macro later, but you do have to go into the Visual Basic Editor to do it.
· When you record a macro, it records literally every step you take. For example, if you click record and then use the arrow keys to move your cursor to the position where you want to start your actions, the macro will record the steps you took to move that cursor before anything else. So, it’s best to ensure that your cursor is where you want it, and plan out the steps you need, before you begin recording.
Also keep in mind the settings that are available in dialog boxes you use while recording macros. For example, if you want to change paragraph alignment as a step in your macro, you might want to do so on the Home tab, in the Paragraph group on the ribbon. If, instead, you open the Paragraph dialog box, the macro will include not just the alignment setting but every setting in that dialog box when you click OK.
Note: There are exceptions to the dialog box rule, such as the program Options dialog box (i.e., Word Options, Excel Options)—where only your changes (those that can be recorded) will be included in the macro.
· If you can’t do a task while recording the macro, it probably means the action can’t be recorded. There are exceptions to that rule—you might be able to go about the task a different way. But don’t spend too much time fighting with it to find a way. If you think you’ve included a task in a macro and it doesn’t work when you play it back, keep in mind you might not have done it wrong—there are actions that can’t be recorded.
If you are planning to learn to write macros as well, note that many tasks you can’t record can be included in macros when you write them.
Accessing your macros
You can view a list of the macros you’ve created and add or edit their descriptions through the Macros dialog box. Access this on the Developer tab.
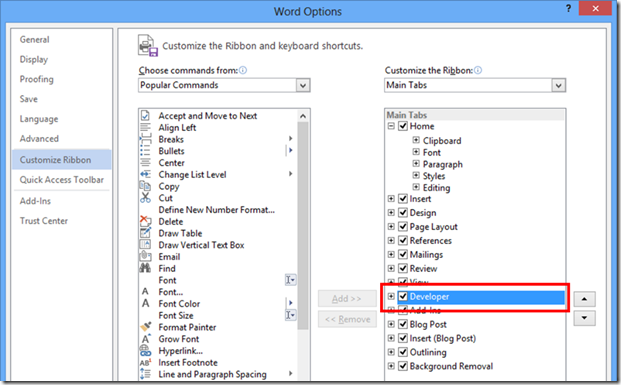
To add the Developer tab to the ribbon in the active program, do the following:
1. Right-click a ribbon tab and then click Customize the Ribbon.
2. On the right side of the dialog box, you see a list of ribbon tabs. Check the box labeled Developer and then click OK.
Adding your macros to the Quick Access Toolbar or Ribbon
You can add your macros to a button in Office 2013 at any time after you’ve created the macro. To get this done, do the following:
1. Right-click a ribbon tab and then click either Customize the Ribbon or Customize the Quick Access Toolbar.
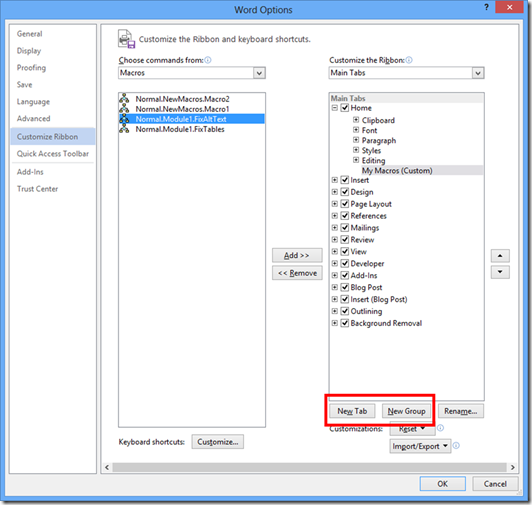
2. Regardless of your choice, on the left side of the main dialog box window, you see a list labeled Choose Commands From (as you see in the preceding screenshot for the Customize Ribbon dialog box). From that dropdown list, select Macros.
When you select that option, you’ll see a list of all macros that are available from your active file. For example, in Word, this includes any macros saved in the active document, the template upon which the document is based, or any global template that’s currently loaded (such as Normal.dotm).
3. If you are customizing the Quick Access Toolbar:
On the right side of the dialog box, select the option to add the new button to the toolbar for all documents or just the active file.
If you are customizing the Ribbon:
Before you can add custom commands, you need to add either a custom group to an existing tab or add a new tab for your custom commands. Notice that you can select the desired tab, and even the position within a tab, where you want to add a group. Or select a tab to add a new tab following it.
4. Select the macro name from the left column and then click Add to add it at the selected position on the right.
Notice that you have options to reorder items on the toolbar or ribbon (up and down arrows), to rename your custom items, and to reset the toolbar or ribbon if you don’t like your changes.
Editing and writing your own macros
As mentioned earlier, if you learn a bit about VBA, the language in which macros are written, you can write much more powerful macros that can save you far more time. And you might be surprised at how easy it is to learn the basics, even if you have no programming experience at all—just because of what you already know about using Microsoft Office.
So why might you want to make the effort to learn to write and edit your own macros?
To use the same example as provided earlier, if you record a macro to format a table, you can save time over what it would take to do each step on each new table you add to your document. But if you know how to write some basic VBA, you can add just a few lines of code (literally) that will tell the macro to loop through all (or specified) tables in the document and take the same steps on each one automatically.
In fact, you don’t even need a few lines of code to do some things with VBA that might surprise you. One of my favorite features in VBA is called the Immediate Window. You use just one line of code at a time in that window, and you might be really amazed at what you can do with it.
For example, have you ever been frustrated by an Excel worksheet that insists the used range on the worksheet is far larger than it is, even after you delete all content in unused rows and columns, or even delete the rows or columns? If so, the next time you’re working on a worksheet with this problem, try the following:
1. In Excel, with the offending worksheet active on your screen, on the Developer tab, click Visual Basic. Or, press Alt+F11.
2. Press Ctrl+G to open or activate the Immediate Window. By default, this window appears at the bottom of the screen.
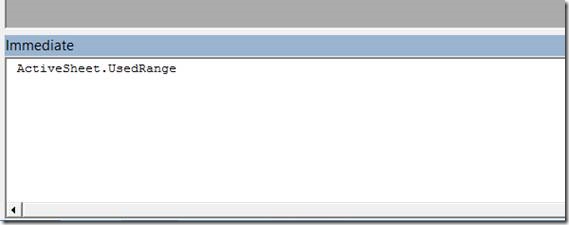
3. Type ActiveSheet.UsedRange. Your window will look something like this:
4. With your insertion point still in that line of code, press Enter.
Pressing Enter runs the active line of code when you’re in this window, which means you’re done! Just one line of code and you’re ready to print it, share it, and move on.
(You can press Alt+F11 to switch back to your active worksheet and test the used range again (such as by pressing Ctrl+End) to see that it’s been fixed.)
Ready to start reading, writing, and exploring VBA for yourself? Check out the resources that follow.
Resources for getting started with VBA
Many of these resources were written for Office 2007 or Office 2010, but they still apply in Office 2013.
· Chapter 21: VBA Primer: The beginning of the VBA primer from my Office 2007 book is available free, online on the MSDN Office Developer Center. It’s written entirely for advanced users of Office who don’t have previous developer experience, and the online excerpt should definitely take you far enough to know if it’s something you want to learn more about. (And, if you have my Office 2007 or Office 2010 books, you have a complete VBA primer available in both.)
· Learn more about using the Immediate Window: Extending Word 2007, Excel 2007, and PowerPoint 2007 with a Single Line of VBA Code
· Get many more resources for getting started and going further with VBA on the Office Developer Center: VBA for Office Developers
Introducing a new classic: Apps for Office
You use them on your phone, you use them on your tablet, and—if you’re using Windows 8—you might already be using them on your PC. But did you know that apps have also come to Microsoft Office?
Unlike with macros, this post isn’t going to tell you to run out and start writing apps if you’re not a developer. Creating apps is a developer task. But using apps is for everyone—it’s as simple as using an app on your phone. And a lot of the apps you can get today can be great timesavers and really cool tools.
Many apps are available for free, and just like with most app marketplaces, you can browse the Office Store to see what’s available. (Also keep in mind that this is new technology, and lots of people are just starting to build (or learn how to build) apps for Office—so you’re going to see more apps added to the store all the time.)
Additionally, developers can write apps to publish in the Office Store or can publish custom, proprietary apps that are only available to your organization.
So, whether you’re an Office user and curious about what type of things you can do with apps for Office and where to find them—or you’re a developer (or even just an adventurer) and want information on getting started with app development—read on.
Exploring available apps
Where to find apps in your Office 2013 programs:
· In Word, Excel, and PowerPoint, access Apps for Office on the Insert tab of the Ribbon.
· In Project Professional, find Apps for Office on the Project tab.
· In Outlook 2013, if you’re on an Exchange 2013 server, click File and then click Manage Apps. (Note that many apps for Outlook are also available for Outlook Web App.)
Note: Apps for Outlook work a bit differently from apps currently available for other Office applications. Since this post is about ways to save time when creating content in Office, we’ll focus on apps for Word, Excel, PowerPoint, and Project. For more about how to get started using and exploring apps for Outlook, click here.
In Word, Excel, PowerPoint, or Project, when you click Apps for Office, you see a list of your recently-used apps (if any) and the See All option. Click See All to open the Apps for Office dialog box.
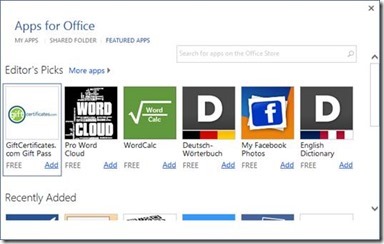
In this dialog box (shown here in Word), you see either two or three options beneath the title at the top of the box:
· My Apps are apps you’ve already installed that are available in the active program. For example, you might have added an app for Excel that also works in Word. (A link at the bottom of this tab of the dialog box will also open the Office Store in a web browser, if you prefer a larger window for browsing available apps.)
· Shared Folder is for apps that are internal to your organization. If you don’t have any internal apps, you might not see this option.
· Featured Apps, shown in the preceding screenshot, is a quick way to explore and search for new apps. This pane updates periodically to show off different apps. As you can see, you can also search the Office Store directly from this location.
When you add an app, it becomes available for you to open in a document. Apps in Word, PowerPoint, and Project open in a task pane. In Excel, some types of apps open in a task pane and others open as an object on the worksheet.
Note: If you leave an app open in a document, keep in mind that it will remain visible in that document even if you send the file to someone else. (If the recipient doesn’t have access to the app—such as with an app that’s just for your company—they may still see the app pane with an error message.) If the recipient is using an earlier version of Office, they won’t see the app but they can still use the document.
If you don’t want the recipient of the document to see the app regardless of what version of Office they’re using or whether or not the app is available to them, just close the app before saving and sharing the file. To easily get an app back in a document after you close the task pane or content item, insert it again from the Apps for Office dialog box.
Additionally, you might find some very cool apps that are already resident in templates you can get for free from Office.com. For example, when you go to File, New in either Word 2013 or Excel 2013, you see some templates that include apps.
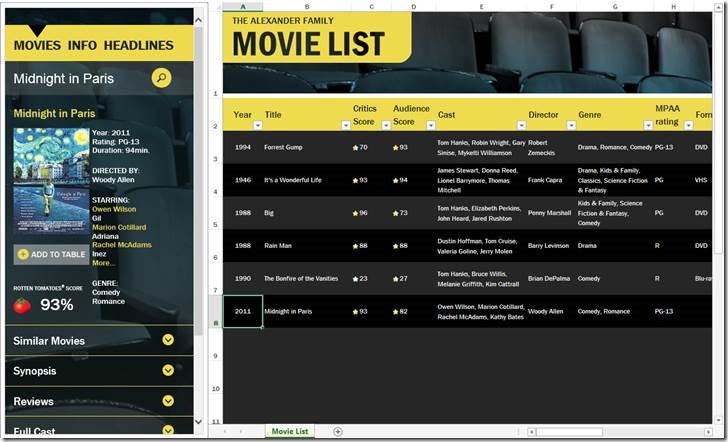
For example, in Excel, under File, New, you’ll see the very cool Movie List App that’s powered by Rotten Tomatoes. That app opens in a template that you can use to create and manage a list of movies you own—or a list of favorite movies—with information added for you automatically:
In Word, you can find apps in templates to simplify tasks such as buying and creating a customized gift certificate or gift card, or quickly finding the perfect legal document.
And you can find apps in the Office Store (and through the Featured Apps tab in the Apps for Office dialog box) for everything from finding images to go with your document content to creating cool and easy infographics.
Note: If you open an app—or a template containing an app—and it doesn’t appear to start, look for this icon in the top-left corner of the app. Depending on your network or security settings, you might need to enable an app the first time you use it.
Just click that icon for the option to start the app or more information.
Getting started with app development
If you’re an Office developer (or any type of developer), or you’re just feeling adventurous and want to learn about what’s involved in creating your own Apps for Office, there are tons of free resources available online to help you get started.
The Apps for Office and SharePoint Developer Center is the heart of resources for all things apps for Office.
Build Apps for Office is a great jumping-off point article on the Office Developer Center, which will help you get to many of their resources. If you’re not sure of where to start, I’d suggest starting here.
The Apps for Office and SharePoint Blog is a great place to learn about new resources and get additional expert tips and insights.
More apps for Office resources are being added on the Office Developer Center all the time. In fact, if you’re looking for more information about using Office Open XML in Apps for Word, keep an eye out for my upcoming paper on the subject.
And meanwhile, if you don’t find the information you’re looking for on either VBA or apps for Office, visit my (neglected and soon to be moving) website www.arouet.net and click the contact link at the bottom of the page to send me your question directly. Thanks for reading!
About Stephanie
Stephanie Krieger is a Microsoft Office MVP and the author of three books on advanced Microsoft Office content creation and extensibility. As a professional document consultant, she specializes in developing custom solutions for Microsoft Office content and teaches clients to build great content by helping them understand how Microsoft Office programs “think.”


