New book: Windows PowerShell 3.0 Step by Step
 We’re happy to announce the availability of Windows PowerShell 3.0 Step by Step (ISBN 9780735663398) by scripting expert Ed Wilson!
This book is a hands-on, step-by-step guide to automating Windows administration with Windows PowerShell 3.0. Teach yourself the fundamentals of Windows PowerShell 3.0 command line interface and scripting language—one step at a time. This practical tutorial delivers learn-by-doing exercises, timesaving tips, and hands-on sample scripts for performing administrative tasks on both local and remote Windows systems. Discover how to:
- Use built-in cmdlets to execute commands
- Write scripts to handle recurring tasks
- Use providers to access information beyond the shell environment
- Configure network components with Windows Management Instrumentation
- Manage users, groups, and computers with Active Directory services
- Execute scripts to administer and troubleshoot Microsoft Exchange Server 2010
Ed is a leading scripting expert who delivers popular scripting workshops to Microsoft customers and employees worldwide. He's written several books on Windows scripting, including Windows PowerShell 2.0 Best Practices, Microsoft Windows PowerShell Step By Step, and Microsoft VBScript Step by Step. Ed is a senior consultant at Microsoft and writes Hey, Scripting Guy!, one of the most popular TechNet blogs.
Order this book from The Microsoft Press Store, Amazon, Barnes & Noble, or an independent bookstore.
Today’s post features the Contents at a Glance and an excerpt from Chapter 17, “Deploying Active Directory.”
Contents at a Glance
Chapter 1 Overview of Windows PowerShell 3.0
Chapter 2 Using Windows PowerShell Cmdlets
Chapter 3 Understanding and Using PowerShell Providers
Chapter 4 Using PowerShell Remoting and Jobs
Chapter 5 Using PowerShell Scripts
Chapter 6 Working with Functions
Chapter 7 Creating Advanced Functions and Modules
Chapter 8 Using the Windows PowerShell ISE
Chapter 9 Working with Windows PowerShell Profiles
Chapter 10 Using WMI
Chapter 11 Querying WMI
Chapter 12 Remoting WMI
Chapter 13 Calling WMI Methods on WMI Classes
Chapter 14 Using the CIM Cmdlets
Chapter 15 Working with Active Directory
Chapter 16 Working with the AD DS Module
Chapter 17 Deploying Active Directory with Windows Server 2012
Chapter 18 Debugging Scripts
Chapter 19 Handling Errors
Chapter 20 Managing Exchange Server
Chapter 17
Deploying Active Directory
After completing this chapter, you will be able to:
- Use the Active Directory module to deploy a new forest and a new domain controller
- Use the Active Directory module to add a new domain controller to an existing domain
- Use the Active Directory module to deploy a read-only domain controller
Using the Active Directory module to deploy a new forest
Deploying Active Directory Domain Services is not a simple matter. There are pre-requisites that must be met, and multiple items that need to be configured. One of the first things that might need to be accomplished is setting the script execution policy. Whereas the easiest way to do this is to set it via Group Policy, if you are configuring the first domain controller in the first domain in a new forest, you do not have that luxury. To set the script execution policy, use the Set-ExecutionPolicy cmdlet and set it to something like remotesigned. The command appears here (the command must execute with admin rights, but more than likely you are logged on as administrator anyway as you are just beginning your configuration.
Set-ExecutionPolicy remotesigned -force
Some of the infrastructure pre-requisites are listed here.
- Ensure the Server has the correct name.
- Set a static Internet Protocol address configuration
- Ensure DNS is deployed and configured
In addition to infrastructure pre-requisites, there are role-based prerequisites that need to be deployed. These role-based prerequisites appear here.
- Active Directory module for Windows PowerShell
- Active Directory Administrative Center tools
- AD DS Snap-Ins and Command-Line Tools
Luckily, all of the above tools are installable via the ServerManager module and the Add-WindowsFeature cmdlet. In fact, from a Windows Feature stand point, the RSAT-AD-Tools feature group gets everything you need here. The AddADPrereqs.ps1 script sets a static Internet Protocol address by using the New-NetIPAddress cmdlet. To determine the interface index, the Get-NetAdapter cmdlet is used. This portion of the script appears here.
#set static IP address
$ipaddress = "192.168.0.225"
$ipprefix = "24"
$ipgw = "192.168.0.1"
$ipdns = "192.168.0.225"
$ipif = (Get-NetAdapter).ifIndex
New-NetIPAddress -IPAddress $ipaddress -PrefixLength $ipprefix `
-InterfaceIndex $ipif -DefaultGateway $ipgw
Once the new Internet Protocol address is assigned, the Rename-Computer cmdlet assigns a new name to the computer. The Rename-Computer cmdlet has a restart parameter, but the AddADPrereqs.ps1 script holds off rebooting the script until the end, and therefore the restart parameter is not used. This portion of the script appears here.
#rename the computer
$newname = "dc8508"
Rename-Computer -NewName $newname –force
Now that the computer has received a new Internet Protocol address and has been renamed, it is time to add the features. The first thing the script does is create a log file in a directory named poshlog. This log will hold details from adding the features. In addition, once the configuration completes, a Get-WindowsFeature command runs to gather the installed features. The result writes to a log file in the poshlog directory. The Add-WindowsFeature cmdlet appears to accept an array for the features to install, but when attempting to add multiple features with a single call, the secondary features get trampled. Therefore, it is best to add tools one at a time. This portion of the script installs the RSAT Active Directory Domain Services tools. The command appears here.
#install features
$featureLogPath = "c:\poshlog\featurelog.txt"
New-Item $featureLogPath -ItemType file -Force
$addsTools = "RSAT-AD-Tools"
Add-WindowsFeature $addsTools
Get-WindowsFeature | Where installed >>$featureLogPath
The last thing to accomplish here is to restart the computer. This is a simple call to the Restart-Computer cmdlet. This command appears here.
#restart the computer
Restart-Computer
The complete AddAdPrereqs.ps1 script appears here.
AddAdPrereqs.ps1
#set static IP address
$ipaddress = "192.168.0.225"
$ipprefix = "24"
$ipgw = "192.168.0.1"
$ipdns = "192.168.0.225"
$ipif = (Get-NetAdapter).ifIndex
New-NetIPAddress -IPAddress $ipaddress -PrefixLength $ipprefix `
-InterfaceIndex $ipif -DefaultGateway $ipgw
#rename the computer
$newname = "dc8508"
Rename-Computer -NewName $newname –force
#install features
$featureLogPath = "c:\poshlog\featurelog.txt"
New-Item $featureLogPath -ItemType file -Force
$addsTools = "RSAT-AD-Tools"
Add-WindowsFeature $addsTools
Get-WindowsFeature | Where installed >>$featureLogPath
#restart the computer
Restart-Computer
Once the computer reboots, log on and check things. Immediately, the Server Manager utility launches and provides feedback that the name change and the Internet Protocol address change completed successfully. Server Manager appears in Figure 17-1.
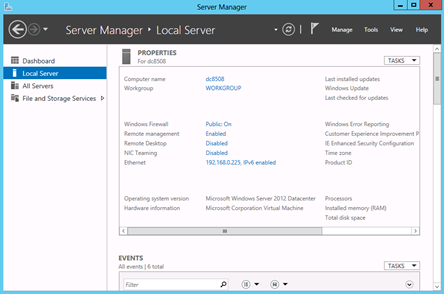
Figure 17-1 Following running the AddAdPrereqs.ps1 script Server Manager appears confirming the name change and the Internet Protocol address assignment took.
The next thing to check is to verify that the roles and features added properly. To do this, use the FeatureLog.txt log file that was created prior to the reboot. As seen in Figure 17-2 the feature and roles added properly.
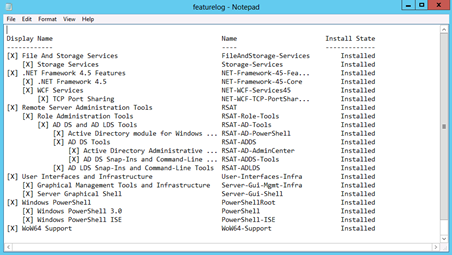
Figure 17-2 The featurelog file confirms that the roles and features added successfully to the computer.
Once you have your computer renamed, with a static Internet Protocol address and Active Directory Domain Services RSAT tools installed, it is time to add the Active Directory Domain Services Role, the DNS Server role and the Group Policy management feature. The first thing to do is to add the log path for the report at the end of the script. Once this is done, the script starts a job named addfeature. The use of a job allows the script to wait until the jobs complete prior to executing the next step of the script. Because the script adds the features in the background, no progress bars appear in the foreground. Each of the Add-WindowsFeature commands include all of the feature subfeatures and also include the management tools. This is a great way to ensure you obtain the bits your specific feature needs. You can always fine tune it at a later time. Once the job executes, the Wait-Job cmdlet pauses the script until the addfeature job completes. Then it returns the completed job object. At this time the final command is a Get-WindowsFeature cmdlet call that writes all installed features to the log file. The complete Add-ADFeatures.ps1 script appears here.
Add-ADFeatures.ps1
#Install AD DS, DNS and GPMC
$featureLogPath = "c:\poshlog\featurelog.txt"
start-job -Name addFeature -ScriptBlock {
Add-WindowsFeature -Name "ad-domain-services" -IncludeAllSubFeature -IncludeManagementTools
Add-WindowsFeature -Name "dns" -IncludeAllSubFeature -IncludeManagementTools
Add-WindowsFeature -Name "gpmc" -IncludeAllSubFeature -IncludeManagementTools }
Wait-Job -Name addFeature
Get-WindowsFeature | Where installed >>$featureLogPath
Once the script finishes running, the featurelog text file can be examined. The log appears in Figure 17-3.
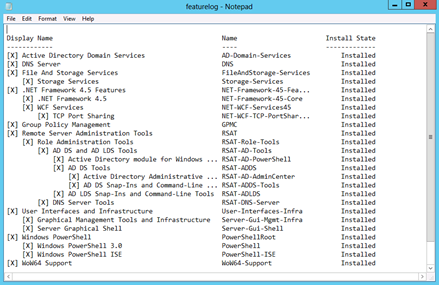
Figure 17-3 The feature log details all installed features and roles on the system.
Now it is time to create the new forest, and add the server as the first domain controller in the newly created forest. The tool required appears in the ADDSDeployment module. The InstallNewForest.ps1 script is essentially one cmdlet – the Install-ADDSForest. The domain name and the netbios domain name appear as variables. When the script first runs, it prompts for an Active Directory password. This password becomes the Administrator password for the new domain. Following the installation, the function automatically reboots the computer to complete configuration. The complete InstallNewForest.ps1 script appears here.
InstallNewForest.ps1
# Create New Forest, add Domain Controller
$domainname = "nwtraders.msft"
$netbiosName = "NWTRADERS"
Import-Module ADDSDeployment
Install-ADDSForest -CreateDnsDelegation:$false `
-DatabasePath "C:\Windows\NTDS" `
-DomainMode "Win2012" `
-DomainName $domainname `
-DomainNetbiosName $netbiosName `
-ForestMode "Win2012" `
-InstallDns:$true `
-LogPath "C:\Windows\NTDS" `
-NoRebootOnCompletion:$false `
-SysvolPath "C:\Windows\SYSVOL" `
-Force:$true
While the script is running, a progress bar appears. This is seen in Figure 17-4.
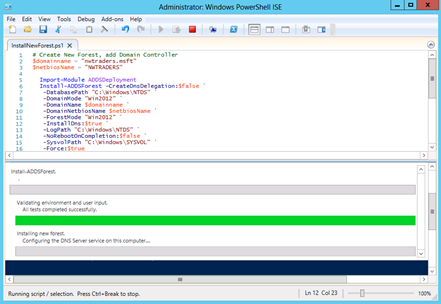
Figure 17-4 A progress bar displays while the script runs. This lets you know the progress of the operations.
A quick check of the DNS Manager tool reveals that DNS is setup properly. The nwtraders.msft forward lookup zone is configured properly, and an A record, NS record and even SOA record has been configured. This appears in Figure 17-5.
