New book: Microsoft Outlook 2013 Step by Step
 We are happy to announce that Microsoft Outlook 2013 Step by Step (ISBN 9780735669093), by Joan Lambert and Joyce Cox, is now available for purchase.
Experience learning made easy—and quickly teach yourself how to stay organized and stay connected using Outlook 2013. With Step by Step, you set the pace—building and practicing the skills you need, just when you them! Includes downloadable practice files and a companion eBook.
- Set up your email and social media accounts
- Send, search, filter, and organize messages
- Manage one or more calendars, and share your schedule
- Help protect your inbox and outbox
- Create and track tasks, to-do lists, and appointments
Order
| From amazon.com | click here |
| From the Microsoft Press Store | |
| From and independent book store | click here |
Excerpt from chapter 4: Store and access contact information
Displaying different views of contact records
You can view all your address books in the People module. You can also display a list of the contacts in an address book, including those in your organization’s Global Address List, in one of these ways:
▪ Click the Address Book button in the Find group on the Home tab of the program window in any module to open the Address Book window.
▪ Click the Address Book button in the Names group on the Contact tab of a contact record window to open the Select Name dialog box.
Expand the Address Book list, and then click the name of the address book whose contents you want to display.
In the People module, you can view an address book in many different formats. You can choose any standard view from the Current View gallery on the Home tab.
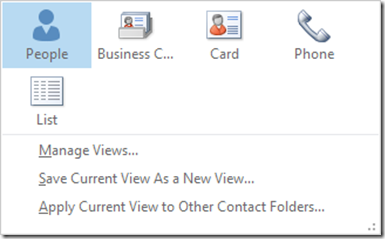
The standard view options for the People module.
Each view presents information from your contact records either as cards or in a list:
▪ People Displays only contact names in the contact list, and the available information for the selected contact in the Reading Pane. Contact names are displayed in alphabetical order by first or last name, depending on the File As selection. This view displays information about the contact from multiple sources. For example, if you have an Outlook contact record for a person you network with on LinkedIn and Facebook, the People card displays a compilation of the information from all three locations. This view, which is new in Outlook 2013, is the default view.
▪ Business Card Displays the business card associated with each contact record—either the default card created by Outlook or a custom card if you have one. Business cards are displayed in the alphabetical order specified by the File As selection.
▪ Card Displays contact information as truncated business cards that include limited information, such as job title and company name.
▪ Phone Displays a columnar list that includes each contact’s name, company, and contact numbers. You can choose the grouping you want from the Arrangements
gallery on the View tab.
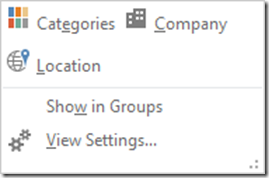
Buttons in the gallery on the Arrangements menu of the People module
are available only while contact records are displayed in a list view.
▪ List Displays a columnar list with contact records arranged in groups. You can choose the grouping you want from the Arrangements gallery on the View tab.
In any list view, you can expand and collapse the groups or select and take action on an entire group of contacts. You can also enter information directly into any contact record field displayed in the list.
You can search and filter your contact records in any view by using the Instant Search feature from the search box at the top of the content area. You can sort contact records by any displayed column in a list view by clicking the column header.
KEYBOARD SHORTCUT Press Ctrl+E to move to the search box in the active module. For more information about keyboard shortcuts, see “Keyboard shortcuts” at the end of this book.
You can change the fields displayed in each view; the way records are grouped, sorted, and filtered; the display font; the size of business cards; and other settings to suit your preferences. You can personalize a view from the Advanced View Settings dialog box, which you open by clicking View Settings in the Current View group on the View tab.
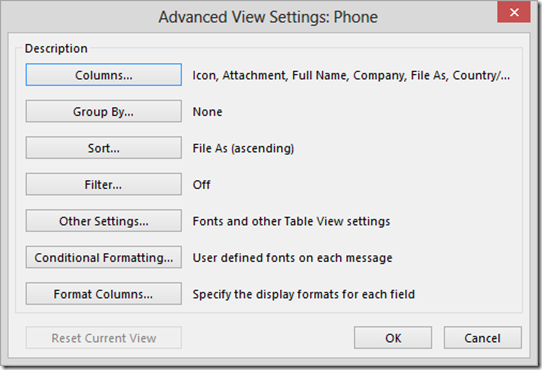
The options available in the Advanced View Settings dialog box vary
depending on the currently displayed view.
TIP From the Advanced View Settings dialog box, you can undo your changes to the currently displayed view by clicking the Reset Current View button, which is available only when the default settings for the view have been changed.
In this exercise, you’ll look at different views of contact records within the contact list, add and remove columns in a list view, and reset a customized view.
SET UP This exercise uses the contact records you created in the exercise “Saving and updating contact information,” earlier in this chapter. If you didn’t complete that exercise, you can do so at this time or use contact records of your own. Display the People module, and then follow the steps.
1. On the Home tab, in the Current View gallery, click the Business Card button to display standard business cards for each contact (in addition to any personalized business cards you may have created). The cards are organized by File as name.
2. On the contact index located to the right of the contact list, click the letter m to scroll the contact list to the business card for Ben Miller (or the first contact record in your People module that is filed under m).
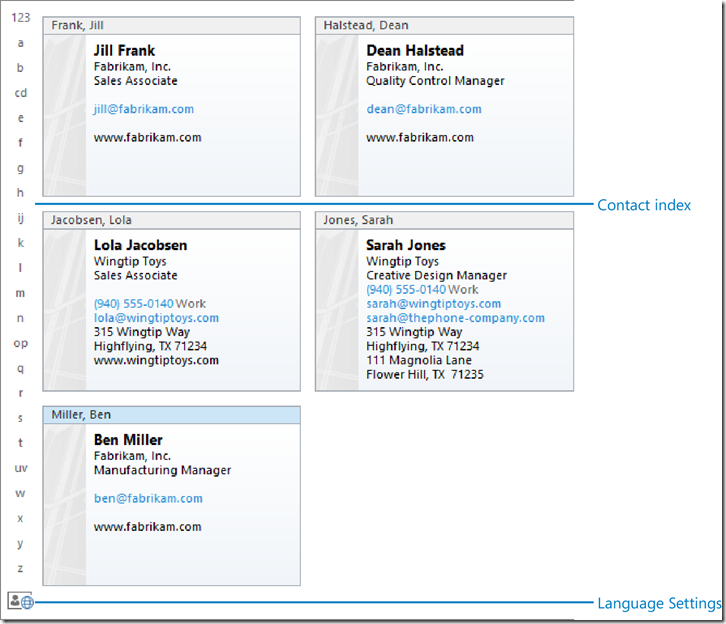
When you have many contact records, you can scroll them by using the contact index.
3. In the Current View gallery, click the Card button.
4. If the card columns are not wide enough to display the information saved with the contact records, click the Zoom In button at the right end of the status bar until the information is visible. Notice that Outlook displays the contact records in a compact card-like format that includes only text and no additional graphic elements.
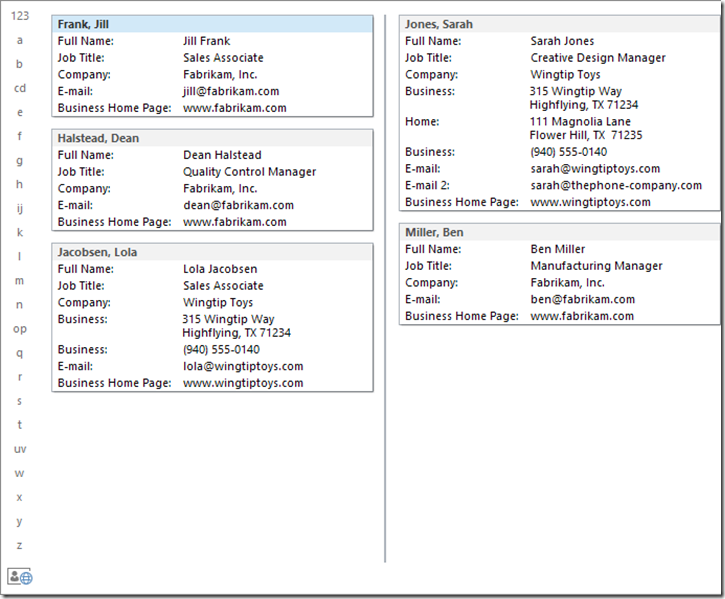
Card view displays all the available primary contact information.
5. In the Current View gallery, click the Phone button to display your contact records in a grid of columns and rows organized in ascending order based on the File as column.
6. Click the Full Name column heading to sort the contact records in ascending order based on the Full Name field, as indicated by the upward-pointing sort arrow to the right of the column heading. You can reverse the sort order by clicking the active heading again.

Click any column header to sort by that column or to reverse the sort order.
TIP You can add a contact to your address book in any list view by clicking the box under the Full Name header (labeled Click Here To Add A New Contact) and entering the contact’s information.
7. Click the Company column heading to sort the contact records in ascending order based on the Company field.
8. Right-click the Company column header, and then click Field Chooser to open the Field Chooser window.
9. Scroll down the field list until the Job Title field is visible. Drag the Job Title field from the Field Chooser window to the column heading area, and when the red arrows indicate that it will be inserted between the Company and File as fields, release the mouse button. Notice that the list view now includes a column that displays the Job Title for each contact.
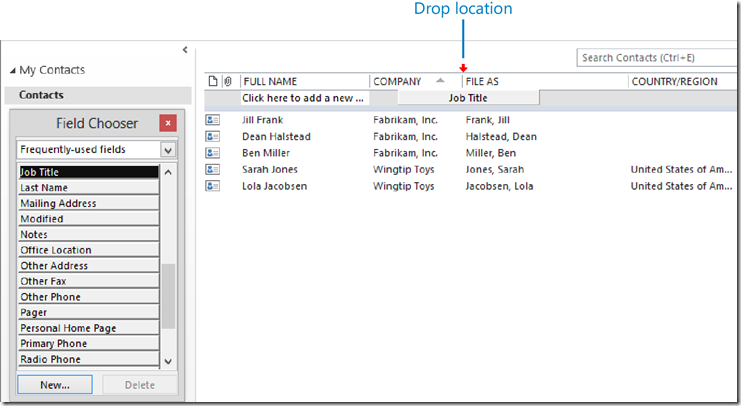
You can add any field to a list view from the Field Chooser
10. Point to the column separator between Job Title and File as. When the cursor changes to a double-headed arrow, double-click to change the column width to accommodate its contents.
11. Drag the Country/Region column header down from the column heading row until a black X appears. Then release the mouse button to remove the Country/Region column from the list view.

You can remove a column from a list view by dragging its column header away from the
column header row.
12. On the View tab, in the Current View group, click the Reset View button. Then in the Microsoft Outlook dialog box that asks whether you want to reset the view to its original settings, click Yes to return the Phone view to its original settings.
13. Close the Field Chooser window. Then in the Current View gallery, click the List button to display the final standard view of your contact records. Notice that the contact records are currently grouped by company.

List view displays contact records grouped by whatever field you choose.
CLEAN UP Return the People module to the default People view. Retain the Jill Frank, Dean Halstead, Lola Jacobsen, Sarah Jones, and Ben Miller contact records for use in later exercises.