From the MVPs: Installing Office Web Apps
This is the 23rd in our series of guest posts by Microsoft Most Valued Professionals (MVPs). (Click the “MVPs” tag in the right column to see all the articles.) Since the early 1990s, Microsoft has recognized technology champions around the world with the MVP Award. MVPs freely share their knowledge, real-world experience, and impartial and objective feedback to help people enhance the way they use technology. Of the millions of individuals who participate in technology communities, around 4,000 are recognized as Microsoft MVPs. You can read more original MVP-authored content on the Microsoft MVP Award Program Blog.
This post is by Alan Richards, a SharePoint Server MVP. Than ks, Alan!
New for SharePoint 2013 is the introduction of Office Web Apps as a separate server system that can’t coexist with a SharePoint 2013 installation. This post isn’t going to go into the installation of SharePoint 2013 farm, but, to lay the background, the development farm that all this is based on consists of three SharePoint 2013 servers, one central admin and two web front ends, and then one SQL 2012 server for all the databases. All the development farm servers are running Windows Server 2012 as their operating systems.
We now need to set up a separate server that we will use to install Office Web Apps to, this installation of Office Web Apps is then connected to SharePoint so that it can be used for opening and editing documents and also used by SharePoint 2013 to show previews of documents to users from within document libraries and also in search results
The Office Web Apps installation file can be downloaded from the Microsoft Download Center: https://www.microsoft.com/en-us/download/details.aspx?id=35489
Prerequisites
We are not going to go through the installation of Windows Server 2012, but suffice to say a normal install will do the job. Office Web Apps Server does require a number of prerequisites to be installed prior to running the installation file, and the simplest way to install them is to run a PowerShell script. The script below is for servers running Windows Server 2012 as its operating system. Other scripts for previous operating systems can be found on TechNet.
Add-WindowsFeature Web-Server,Web-Mgmt-Tools,Web-Mgmt-Console,Web-WebServer,Web-Common-Http,Web-Default-Doc,Web-Static-Content,Web-Performance,Web-Stat-Compression,Web-Dyn-Compression,Web-Security,Web-Filtering,Web-Windows-Auth,Web-App-Dev,Web-Net-Ext45,Web-Asp-Net45,Web-ISAPI-Ext,Web-ISAPI-Filter,Web-Includes,InkandHandwritingServices
You may need to restart after the installation of the prerequisites
Installation
Because we are using Windows Server 2012 as the operating system, the Office Web Apps disc image file can be opened directly from within Windows explorer, which I think is a really cool feature. If you are using another Windows operating system, you will need to write the image file to a DVD.
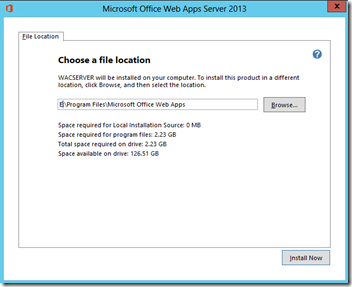
Run the Setup.exe file, select a location for the Office Web Apps server files, and click Install Now.
Certificates
Once installation is complete we need to create certificates that will be used by Office Web Apps Server to enable secure communication.
The use of certificates is recommended for production environments and a requirement if you want to use Office Web Apps as an external resource.
The certificates will need to be from a trusted source, which could be your internal certificate authority if you plan on using them internally only or an external certificate authority for external use
The certificates need to be installed to your IIS installation on the Office Web Apps Server
Configuration
Once the certificates are in place, a simple PowerShell command is used to create the Office Web Apps server farm:
New-OfficeWebAppsFarm -InternalUrl https://yourserver.local -ExternalUrl https://webapp.yourdomain.com –CertificateName "OfficeWebApps Certificate" –EditingEnabled
The certificate name is the friendly name of the certificate applied to the Office Web Apps server and the –EditingEnabled command allows the editing of documents by Office Web Apps.
You should only enable editing if you are licensed to do so. If you are not, simply leave that command off the end. and your users will just have read-only access to any documents opened in Office Web Apps.
To verify that the Office Web Apps server is functioning, navigate to https://yourserver.local/hosting/discovery where you should see a screen of xml if all is working:
Claims-Based Authentication
For SharePoint 2013 to access Office Web Apps the web application must use claims-based authentication. Just on the off chance that your web application is set up for classic mode authentication, running a PowerShell script will convert it to claims-based authentication:
Convert-SPWebApplication -Identity "https://yourwebapplication:port" -To Claims –RetainPermissions
Licensing
So the Office web apps farm is up and running and you have enabled editing. There is though another step before your users will be able to actually edit documents with Office Web Apps; you need to license the users for editing.
This is achieved by running a series of PowerShell commands on the SharePoint 2013 Central Administration server:
Get-SPUserLicense
$x = New-SPUserLicenseMapping -SecurityGroup <ADsecuritygroup> –License OfficeWebAppsEdit
$x | Add-SPUserLicenseMapping
Enable-SPUserLicensing
$x is a variable that holds the mapping object to input at the Add command.
<ADsecuritygroup> is the AD group you want to assign the license to.
Bind Office Web Apps
Nearly there: we now need to bind SharePoint 2013 to the Office Web Apps server. Again, this is achieved by running a PowerShell command on the SharePoint 2013 Central Administration server:
New-SPWOPIBinding -ServerName <WebAppServerName>
This will by default use HTTPS, so the FQDN of the Office Web Apps server needs to be used.
Office Web Apps in Action
So let’s see Office Web Apps in action. Below is a document library with a single document uploaded by a user:
Clicking the three dots next to the file name will bring up a preview of the file. The preview uses Office Web Apps to render the file to the user so that the user can check that it is actually the file he or she wants:
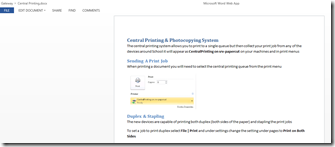
Opening the document will launch Office Web Apps, allowing the user to browse through the document:
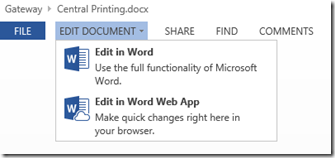
If your organisation is licensed for editing using Office Web Apps and you have run all the PowerShell commands to enable editing, you can click the Edit Document menu and select Edit In Word App:
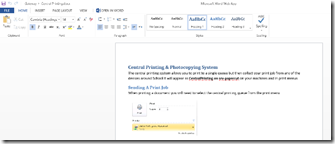
Office Web Apps will then open the document in edit mode. You can tell this by the addition of the all familiar office ribbon:
From here you can do some simple editing and then save the file back to SharePoint 2013.
One of the great additional features of Office Web Apps for me is the preview it now allows in SharePoint 2013 search.
Here is a typical search screen from SharePoint 2013:
All the great SharePoint 2013 features are there, but what gives it that wow factor is the preview you get with Office Web Apps:
In the screenshot above we now have the original search results but also a preview of the document using Office Web Apps, which makes it very easy to see if this is actually the document you were looking for. Another great feature of Office Web Apps is the way it goes through the document and presents you with a list of headings from the actual document; this way you can jump straight to the section you want without having to open the document and scroll through it to find the section you need.


![clip_image002[5] clip_image002[5]](https://msdntnarchive.blob.core.windows.net/media/MSDNBlogsFS/prod.evol.blogs.msdn.com/CommunityServer.Blogs.Components.WeblogFiles/00/00/01/17/44/metablogapi/0167.clip_image0025_thumb_388D214E.png)
![clip_image004[7] clip_image004[7]](https://msdntnarchive.blob.core.windows.net/media/MSDNBlogsFS/prod.evol.blogs.msdn.com/CommunityServer.Blogs.Components.WeblogFiles/00/00/01/17/44/metablogapi/8507.clip_image0047_thumb_645D753D.png)


![clip_image002[7] clip_image002[7]](https://msdntnarchive.blob.core.windows.net/media/MSDNBlogsFS/prod.evol.blogs.msdn.com/CommunityServer.Blogs.Components.WeblogFiles/00/00/01/17/44/metablogapi/8816.clip_image0027_thumb_53F1D7B7.png)
![clip_image004[9] clip_image004[9]](https://msdntnarchive.blob.core.windows.net/media/MSDNBlogsFS/prod.evol.blogs.msdn.com/CommunityServer.Blogs.Components.WeblogFiles/00/00/01/17/44/metablogapi/6765.clip_image0049_thumb_0EA95AC1.png)