New book: Microsoft PowerPoint 2013 Step by Step
We are happy to announce that Microsoft PowerPoint 2013 Step by Step (ISBN 9780735669109) by Joan Lambert and Joyce Cox is now available!
Purchase
| From Amazon | click here |
| From The Microsoft Press Store | |
| From an independent bookseller | click here |
Download Free Sample Chapters
| From the Microsoft.com Download Center | click here |
Below is an excerpt from Chapter 12, Create custom presentation elements.
Creating themes, theme colors, and theme fonts
As you learned in Chapter 3, “Work with slides,” a simple way to dress up a presentation is to apply a theme to make its colors, fonts, formatting, graphics, and other elements consistent from slide to slide. Understanding theme colors and theme fonts can help you create professional-looking presentations that use an appealing balance of color and text. You’re not limited to using a presentation’s theme colors and theme fonts, but because they have been selected by professional designers and are based on good design principles, using them ensures that your slides will be pleasing to the eye.
Every theme is assigned 12 complementary colors designed to be used for the following elements of a slide:
▪ Text/Background These four colors are for dark text on a light background or light text on a dark background.
▪ Accent 1 through Accent 6 These six colors are for objects other than text.
▪ Hyperlink This color is to draw attention to hyperlinks.
▪ Followed Hyperlink This color is to indicate visited hyperlinks.
When you click a color arrow, such as the Font Color arrow in the Font group on the Home tab, the Theme Colors palette displays 10 of the 12 theme colors, each with an additional five light to dark shades. (The two background colors are not represented in this palette.)
SEE ALSO For information about using non-theme colors, see the sidebar “Non-theme colors” in Chapter 3, “Work with slides.”
If you like all the elements of a theme except its color scheme, you can choose a different predefined set of theme colors without otherwise affecting the overall look of the theme. To view the theme colors you can apply to a presentation while in Normal view, display the Colors gallery from the Variants group on the Design tab. In Slide Master view, display this gallery from the Background group on the Slide Master tab. In either view, when you find a set of theme colors you like, simply click it to change the colors of all the slides in the presentation.
In addition to changing the set of theme colors, you can change the set of theme fonts. Displaying the Fonts gallery from either the Variants group on the Design tab or the Background group on the Slide Master tab shows a list of all the predefined combinations. In each combination, the first font (called the heading font) is used for slide titles, and the second font (called the body font) is used for other slide text.
TIP Also associated with each theme is a set of theme effects. Using theme effects ensures that the shapes in the presentation have a consistent look. Clicking the Effects button in either the Variants group on the Design tab or the Background group on the Slide Master tab displays a gallery of effect combinations to choose from.
If none of the sets of theme colors is exactly what you’re looking for, you can create your own by clicking Customize Colors at the bottom of the menu containing the Colors gallery and assembling colors in the Create New Theme Colors dialog box. You can also create a custom set of theme fonts by clicking Customize Fonts at the bottom of the menu containing the Fonts gallery and then specifying the font combination you want in the Create New Theme Fonts dialog box. After you save either type of custom combination, it is applied to all the slides or slide masters in the presentation.
TIP The simplest way to create a new theme color or theme font set is by altering an existing one.
When you apply a different theme color or theme font set to a presentation, your changes are stored with the presentation and do not affect the underlying theme. If you want to be able to use your custom theme color and theme font combination with other presentations, you can save the combination as a new theme that you can then apply to another presentation with a few clicks.
TIP You can set a custom theme, or any theme, as the default for all new presentations by right-clicking the theme’s thumbnail in the Themes gallery on the Design tab in Normal view, and then clicking Set As Default Theme.
In this exercise, you’ll apply a different theme color set and a different set of theme fonts to a presentation in Slide Master view. Next you’ll create theme colors and theme fonts for a photo album and make them available for reuse. Then you’ll save the color/font combination as a new theme that you can apply to any presentation.
1. Switch to Slide Master view, and then display the primary master.
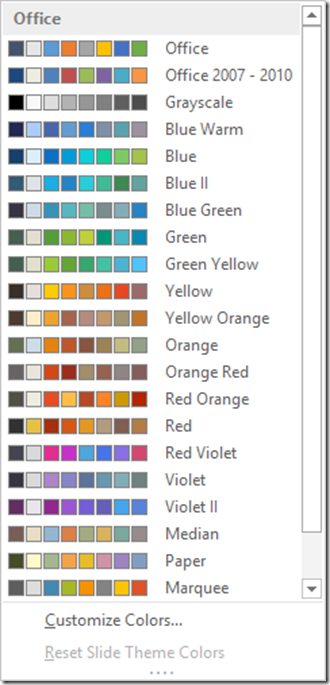
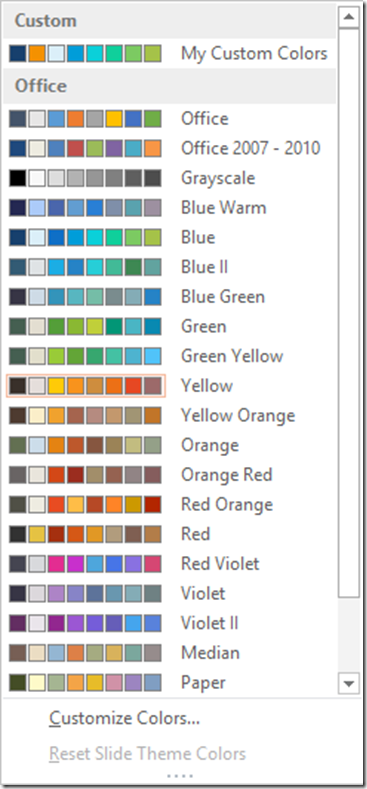
2. On the Slide Master tab, in the Background group, click the Colors button to display a menu containing the Colors gallery.
Each set of theme colors is represented in the
Colors gallery by 8 of its 12 available colors.
3. In the gallery, point to a few color sets to display live previews of their effects on the active slide.
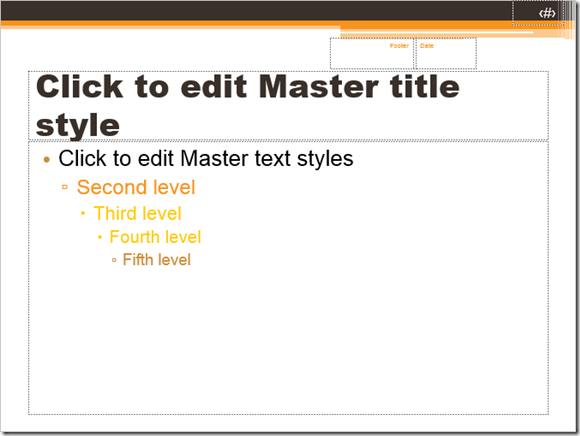
4. Click Yellow to apply that theme color set to the presentation.
TIP The theme retains all of its other characteristics, such as the fonts and background graphic; only the colors change.
Next let’s apply a different set of theme fonts.
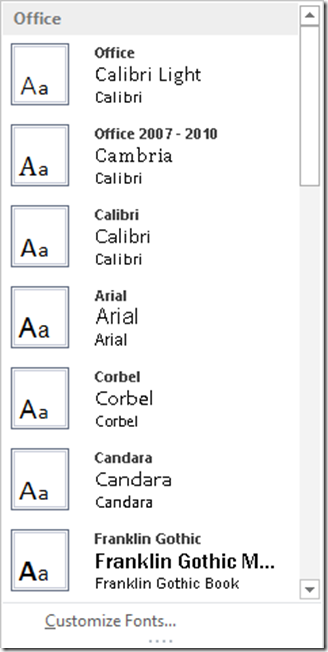
5. In the Background group, click the Fonts button to display a menu containing the Fonts gallery.
Each set of theme fonts includes two fonts or two
variations of the same font.
6. In the Fonts gallery, point to a few font sets to display live previews of their effects on the active slide.
7. In the gallery, click Arial Black-Arial to apply that theme font set to the presentation.
The theme colors and theme fonts applied to the primary master are also applied to all
the other masters in the presentation.
8. Save the AnnualMeeting presentation, but don’t close it.
Now let’s create custom theme colors and custom theme font sets for a different presentation.
9. Display the PhotoAlbum presentation in Slide Master view. Then display the Colors gallery, and click Blue.
The Blue theme color set has some interesting colors, but the presentation title is too sedate. Let’s change the color assigned to text.
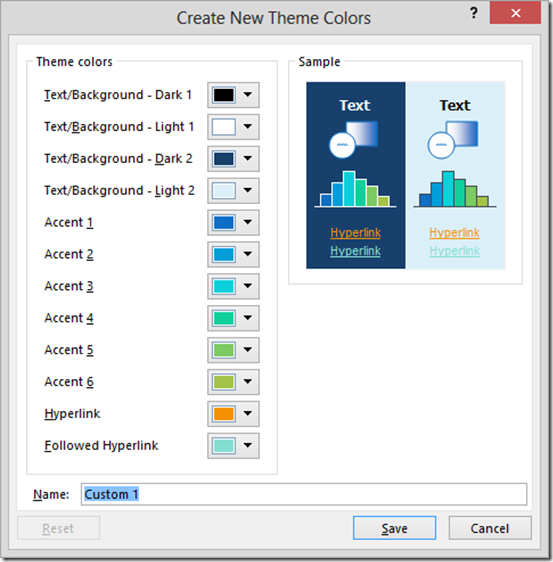
10. Display the Colors gallery, and then at the bottom of the gallery, click Customize Colors to open the Create New Theme Colors dialog box.
Each color scheme consists of 12 colors assigned to the 12 possible design elements
of a presentation.
11. Click the Text/Background - Light 2 button to display a menu containing the Theme Colors and Standard Colors palettes.
12. In the Theme Colors palette, click the second swatch from the right in the top row (Orange, Hyperlink). Notice that the Sample pane changes to show the new color combination.
13. Click the Accent 1 button, and in the Theme Colors palette, click the fourth swatch in the top row (Light Blue, Text 2).
14. Click the Text/Background - Light 1 button, and at the bottom of the menu, click More Colors to open the Colors dialog box.
15. If the Standard tab is not displayed, click it to display its color wheel.
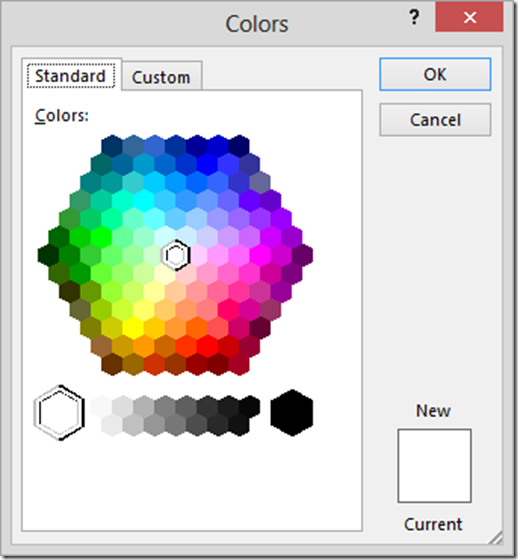
The color wheel has light and dark shades of three primary colors (blue, red,
and yellow), three secondary colors (violet, orange, and green), and tertiary colors
created by mixing a primary color with a secondary color.
16. In the color wheel, click a lime green color, and then click OK.
17. In the Name box at the bottom of the Create New Theme Colors dialog box, change the name of the new theme to My Custom Colors, and then click Save to apply the change to the slides.
18. Display the AnnualMeeting presentation in Slide Master view, and then display the Colors gallery. Notice that the custom set of theme colors is now available for use with other presentations.
The new set of theme colors is available in the Custom area at the top of
the Colors gallery so that it is easy to apply to any presentation.
Now let’s create a custom set of theme fonts.
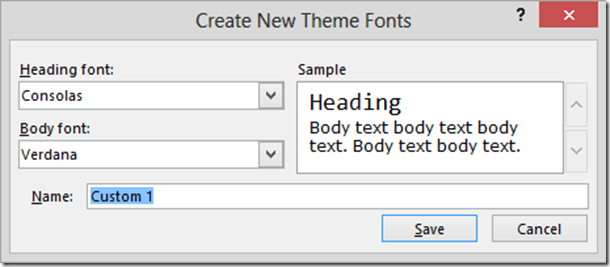
19. Switch back to the PhotoAlbum presentation. Then in the Background group, click the Fonts button, and in the Fonts gallery, click Consolas-Verdana as a starting point for a new font set.
20. Click the Fonts button again, and then at the bottom of the menu, click Customize Fonts to open the Create New Theme Fonts dialog box.
When choosing fonts, try to find a combination that reflects the tone of your presentation.
21. Click the Heading font arrow, and then in the list, click Arial Rounded MT Bold.
22. In the Name box at the bottom of the dialog box, change the name of the new font set to My Custom Fonts, and then click Save.
23. In the Background group, click the Fonts button, and verify that your combination is listed in the Custom area of the Fonts gallery.
24. Switch to Normal view, and view the slides of the presentation with the new colors and fonts in place.
TROUBLESHOOTING If you create a set of theme fonts and PowerPoint doesn’t update the slides to reflect the change, click each text placeholder, press Ctrl+A to select all its text, and then press Ctrl+Spacebar. This removes any local formatting and reapplies the formatting defined by the attached theme.
Let’s save the theme colors and theme fonts as a new theme.
25. Switch to Slide Master view. In the Edit Theme group, click the Themes button, and then at the bottom of the menu, click Save Current Theme to open the Save Current Theme dialog box.
TIP By default, the dialog box displays the contents of the Document Themes folder, which is located at C:\Users\<username>\AppData\Roaming\Microsoft\Templates\Document Themes. Custom theme colors and theme fonts are saved in subfolders of this folder so that they are available in their galleries for use in other presentations.
26. In the File name box at the bottom of the dialog box, change the name of the new theme to My Theme, and then click Save.
27. Close the PhotoAlbum presentation, saving your changes if you want to.
28. Display the AnnualMeeting presentation in Normal view. Then on the Design tab, in the Themes group, point to the second thumbnail in the gallery to display the ScreenTip My Theme.
29. Click the My Theme thumbnail to apply the custom theme to the presentation.
30. On slide 1, select the presentation title, and on the Home tab, in the Font group, click the Font Color arrow. Notice that the Theme Colors palette reflects the custom theme colors stored as part of the custom theme. Then click the lime green theme color to make the title stand out.
TIP To delete a custom theme, theme color set, or theme font set, display its gallery, right-click its thumbnail, and click Delete. Then click Yes to confirm the deletion.

