New book: Training Guide: Installing and Configuring Windows Server 2012
 NOTE: This book has been updated for R2. You can buy it here from The Microsoft Press Store.
We’re happy to announce the availability of Training Guide: Installing and Configuring Windows Server 2012 (ISBN 9780735673106)! Written by Mitch Tulloch, this book helps enterprise administrators build their skills in the area of deploying and managing Windows Server 2012 core services. Readers develop their real-world skills and maximize their on-the-job performance via the book’s many lessons, exercises, and suggested practices. In addition, readers can use this Training Guide as a learning resource, along with on-the-job experience, to help them prepare for the 70-410 exam.
In today’s post, please enjoy an excerpt from Chapter 6, “Network administration.”
Chapter 6
Network administration
The network is the foundation of an organization’s information system and allows computers and other devices to communicate with each other and with the Internet. Network services such as Dynamic Host Configuration Protocol (DHCP) servers and Domain Name System (DNS) servers simplify the configuration and management of IP address information and network names. To adequately fulfill these roles, such services must be available for clients that need them and secure from attack.
Microsoft Windows Server 2012 includes enhancements to the DHCP Server and DNS Server roles that can help increase DHCP availability and safeguard DNS name resolution from being compromised or misused. Windows Server 2012 also includes added support for managing different aspects of Windows Server–based networks using Windows PowerShell. This chapter demonstrates how to implement these new capabilities to ensure the availability and security of these critical network services and to manage Windows Server–based networks more efficiently. In addition, this lesson also describes how to configure Internet Protocol version 6 (IPv6) networking and interoperability between IPv6 and IPv4.
Lessons in this chapter:
■ Lesson 1: Ensuring DHCP availability
■ Lesson 2: Implementing DNSSEC
■ Lesson 3: Managing networking using Windows PowerShell
■ Lesson 4: Configuring IPv6/IPv4 interoperability
Before you begin
To complete the practice exercises in this chapter
■ You should be familiar with basic networking concepts and administration tasks, including TCP/IP addressing concepts, how DHCP and DNS work, and how to configure DHCP and DNS servers using the Microsoft Management Console (MMC)
snap-ins for these services.
■ You need to know how to deploy Windows Server 2012, create an Active Directory forest, and add roles and features using Windows PowerShell.
■ It will be helpful if you also have at least rudimentary knowledge of using Windows PowerShell on earlier versions of Windows Server.
Lesson 1: Ensuring DHCP availability
DHCP provides a way to dynamically assign IP addresses and other parameters to hosts on a TCP/IP network. DHCP is designed to work automatically and relieves much of the management overhead associated with manually assigning static addresses to network hosts. DHCP servers play a critical role in ensuring hosts such as servers, clients, and printers on a TCP/IP network can communicate with each other.
Because DHCP leases addresses only for a specified amount of time, these leases need to be periodically renewed if the hosts are to continue communicating on the network. Although the DHCP lease renewal process has some degree of tolerance for DHCP server downtime built into it, ensuring the availability of DHCP servers on your network is nevertheless essential so that they can respond in a timely manner to lease renewal requests from network hosts. Otherwise, the possibility exists that some hosts might not be able to renew their addresses and therefore won’t be able to participate on the network.
Previous approaches to implementing DHCP availability
Traditionally, DHCP server availability has been implemented on Windows Server–based networks using one or more of the following methods:
■ Split scopes This approach involves splitting the IP address pool of a scope between two DHCP servers, typically by assigning the primary server 80 percent of the addresses in the scope and the secondary server the remaining 20 percent of the addresses. That way, if the primary server goes offline for any reason, DHCP clients on the subnet can still respond to lease renewal requests from the secondary server.
■ Server cluster This approach involves using the Failover Clustering feature of Windows Server 2008 or Windows Server 2008 R2 to cluster DHCP servers so that if the primary DHCP server in a cluster fails, the secondary server can take up the slack and continue leasing addresses to clients.
■ Standby server This approach uses a hot standby DHCP server with scopes and options configured identically to your production DHCP server.
Each of the preceding approaches has the following disadvantages, which make them of limited usefulness in ensuring DHCP server availability:
■ The split-scope approach provides limited IP availability during outages. As a result, some clients might not receive addresses during a long-term DHCP server outage. In addition, if your DHCP server scope is currently running at high utilization—which is common for Internet Protocol version 4 (IPv4) networks—splitting the scope might not be feasible.
■ The DHCP server-cluster approach has only one DHCP database located on the cluster shared storage. That means there is a single point of failure for DHCP services on your network. In addition, implementing Failover Clustering requires relatively complex setup processes and maintenance tasks.
■ The hot-standby approach requires both careful configuration of the standby DHCP server and manual intervention on the part of the administrator to ensure the failover transition when your production DHCP server fails or goes offline. There is also additional complexity in this approach when DHCP is configured to automatically update DNS records, as is recommended in an Active Directory environment.
Understanding DHCP failover
DHCP failover is a new approach to ensuring DHCP availability that is included in Windows Server 2012. With this approach, two DHCP servers can be configured to provide leases from the same pool of addresses. The two servers then replicate lease information between them, which enables one server to assume responsibility for providing leases to all clients on the subnet when the other server is unavailable. The result of implementing this approach is to ensure DHCP service availability at all times, which is a key requirement for enterprise networks.
The current implementation of DHCP failover in Windows Server 2012 has the following limitations:
■ It only supports using a maximum of two DHCP servers.
■ The failover relationship is limited to IPv4 scopes and subnets.
DHCP server failover can be implemented in two different configurations:
■ Load-sharing mode Leases are issued from both servers equally, which ensures availability and provides load balancing for your DHCP services. (This is the default DHCP server failover configuration.)
■ Hot-standby mode Leases are issued from the primary server until it fails, whereupon the lease data is automatically replicated to the secondary server, which assumes the load.
Load-sharing mode
A typical scenario for implementing the load-sharing approach is when you want to have two DHCP servers at the same physical site. If the site has only a single subnet, all you need to do is enable DHCP failover in its default configuration. If there are multiple subnets, deploy both DHCP servers in the same subnet, configure your routers as DHCP relay agents (or deploy additional DHCP relay agents in subnets), and enable DHCP server failover in its default configuration.
Hot-standby mode
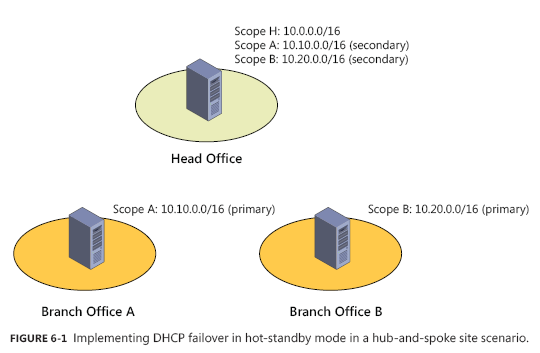
When implementing the hot-standby mode approach, you can configure a DHCP server so that it acts as the primary server for one subnet and as the secondary server for other subnets. One scenario where this approach might be implemented is in organizations that have a central hub site (typically, the data center at the head office) connected via wide area network (WAN) links to multiple remote branch-office sites. Figure 6-1 shows an example of an organization that has DHCP servers deployed at each branch office and at the head office. Branch-office servers are configured to lease addresses to clients at their branch offices, while the central server leases addresses to clients at the head office. Each branch-office server has a failover relationship with the central server, with the branch office assuming the role as primary and the central server as secondary. That way, if a DHCP server fails at a branch office, the central server can take up the slack for the remote site. For example, the DHCP server at Branch Office A is the primary server for the scope 10.10.0.0/16, while the DHCP server at the Head Office is the secondary for that scope.
Implementing DHCP failover
To enable DHCP failover, begin by installing two DHCP servers running Windows Server 2012, designating one of them as the primary server and the other as the secondary server. If the DHCP servers are domain members, they must be authorized in Active Directory. However, you can also implement DHCP failover on standalone DHCP servers in a workgroup.
After deploying your two DHCP servers, create and configure scopes on the primary DHCP server for the DHCP clients in your environment. Then perform the following steps:
1. Open the DHCP console and add the primary server. Then right-click on a scope and select Configure Failover:
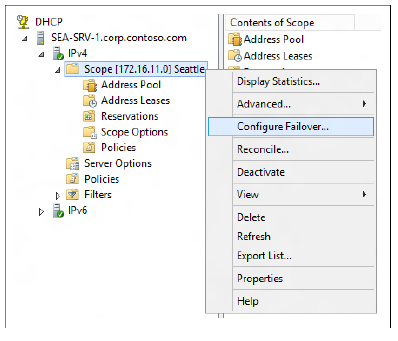
2. In the Configure Failover Wizard, select an available scope.
3. Add the partner server that will be used as the secondary server for the host server (the primary server).
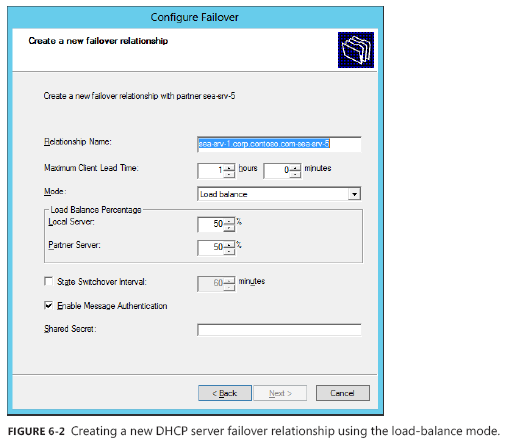
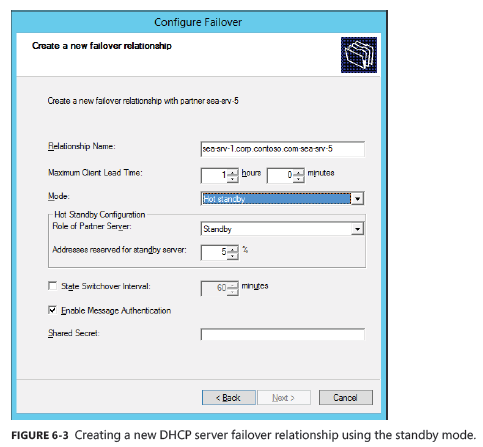
4. Configure the new failover relationship for either load-balance mode (shown in Figure 6-2) or standby mode (shown in Figure 6-3). Adjust the mode settings to meet the needs of your environment.
5. Complete the wizard and make sure the progress dialog indicates success for all operations.
The preceding steps should perform these actions:
1. Add scopes on the partner server.
2. Disable scopes on the partner server.
3. Create a failover configuration on the partner server.
4. Create a failover configuration on the host server.
5. Activate the scopes on the partner server.

Managing DHCP failover
After DHCP failover is enabled and configured, you can manage your DHCP failover solution using the DHCP console. Examples of management tasks you can perform for DHCP server failover include the following:
■ Configuring a new failover relationship by right-clicking on either another scope or on the IPv4 node for the server and selecting Configure Failover
■ Removing a failover relationship for a scope that has previously been configured for failover by right-clicking on the scope and selecting Deconfigure Failover
■ Viewing the failover configuration for a scope by right-clicking on the scope, selecting Properties, and selecting the Failover tab
■ Viewing the failover status, failover mode, and partner server by right-clicking the IPv4 node for a server, selecting Properties, and selecting the Failover tab
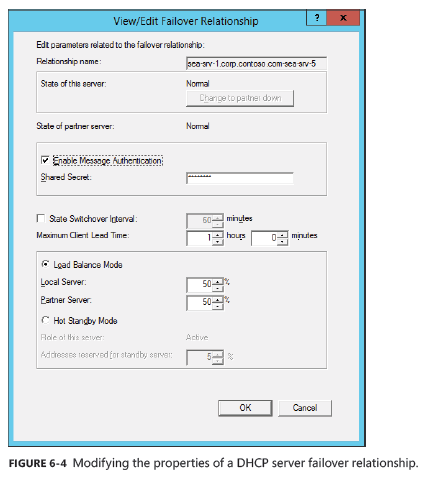
■ Editing the failover relationship for the server by right-clicking the IPv4 node for a server, selecting Properties, selecting the Failover tab, and clicking Edit to open the View/Edit Failover Relationship properties (as shown in Figure 6-4)
■ Forcing the replication of a scope in a failover relationship to the partner server for that relationship by right-clicking on the scope and selecting Replicate Scope
■ Forcing the replication of all scopes in a failover relationship to the partner server for that relationship by right-clicking on the scope and selecting Replicate Relationship
■ Forcing the replication of all scopes in all failover relationship to the partner servers for those relationships by right-clicking on the IPv4 node for the server and selecting Replicate Failover Scopes