New book: MOS Study Guide for Microsoft Office 365
We’re excited to announce that John Pierce’s MOS Study Guide for Microsoft Office 365 (ISBN: 9780735669031; 224 pages) is now available for purchase!
You can find an excerpt from the introduction in this previous post. Here is an excerpt from Chapter 1:
1.2 Navigate Office 365 Applications
Two of the applications you’ll use in Office 365 are Outlook Web App and SharePoint, which provides the foundation for your team site. In this section, you’ll learn the basics of how to find your way around these applications. We’ll look at Outlook first and then cover the SharePoint team site.
Using the Outlook Navigation Pane
The navigation pane appears along the left side of the Outlook Web App window. At the bottom of the navigation pane are links to your inbox, the calendar, the tasks list, and your list of contacts. To switch views, you need only to click the link for the view you
want to work with. The navigation pane then shows items for that specific feature. For example, when you are looking at the Mail view, you’ll see a list of favorite folders along with standards such as Inbox, Drafts, and Sent Items. At the top of the navigation pane for tasks and contacts, you’ll see a set of options that let you filter the items that Outlook displays.
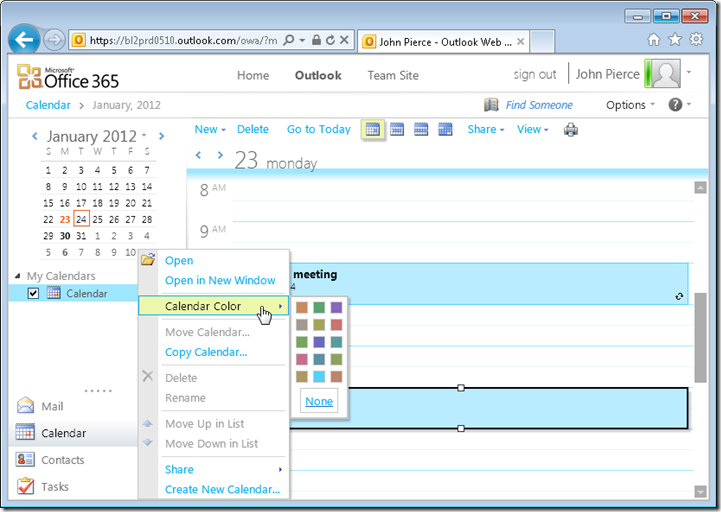
Use the navigation pane in Outlook Web App to organize and access items. Right-click
an item in the navigation pane to display a menu with commands similar to what you
see here for Calendar view.
The following sections explain navigational features in each of the Outlook Web App views.
See Also See Chapter 2 for details about working with email, calendars, tasks, and contacts.
Navigating in Mail View
For email, the navigation pane includes a set of default folders you will be familiar with if you use the desktop version of Outlook. Above the list of default folders is a set of favorites. The initial group of favorites are Inbox, Unread Mail, and Sent Items.
Tip Click the arrow beside Favorites or the name of your account to collapse and expand
the list of folders shown in the navigation pane.
To manage the Favorites list, you can use the Add To Favorites and Remove From Favorites commands. The relevant command appears on a menu that appears when 28 Exam 77-891 Microsoft Office 365 Specialist you right-click a folder in the navigation pane. This menu also lets you work with email folders and modify the view of the navigation pane in other ways. Use the menu to perform the following operations:
● Open a folder
● Open a folder in a new window
● Move or copy a folder
● Delete a folder
● Rename a folder
● Create a folder
● Mark items as read
● Empty the folder
You’ll see a list of similar commands when you work in the Calendar, Contacts, or Tasks
views.
➤ To add a folder to the Favorites list
➜ In the navigation pane, right-click the folder you want to add, and then choose
Add to Favorites.
➤ To remove a folder from the Favorites list
➜ In the Favorites list, right-click the folder you want to delete from the list, and then
choose Remove from Favorites.
➤ To create a new folder in the navigation pane
1. In the navigation pane, right-click your account name (or right-click a folder for
which you want to create a subfolder).
2. From the menu, choose Create New Folder.
3. In the box that appears on the navigation pane, type a name for the folder.
Navigating in Calendar View
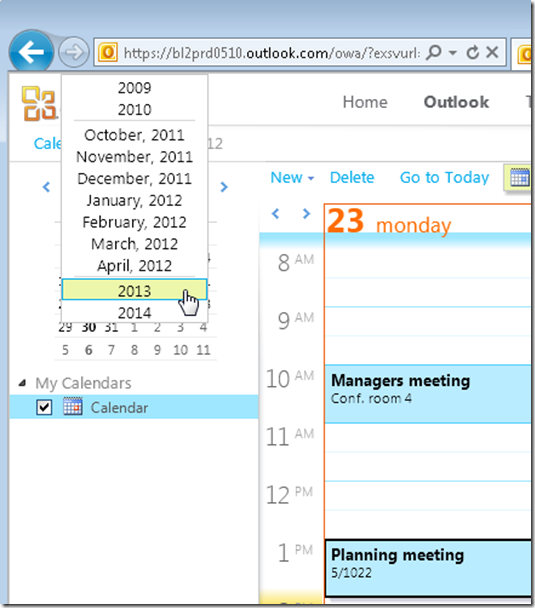
When you view the calendar, the navigation pane shows a thumbnail view of a monthly calendar at the top. You see the current month by default and can use the arrows at the right and left of the month’s name to move ahead or back in time. You can also click the
name of the month to pop up a menu that lets you choose an upcoming month or year or a month or year in the recent past.
Use the calendar control in the navigation pane to display an upcoming date or one in the recent past.

Under My Calendars, Outlook displays the default calendar and any other calendars you set up. Right-click My Calendars to display a menu that lets you rename, remove, or define a new calendar group. If you define at least one other calendar group (you can
define more), the Move Up In List and Move Down In List commands become active on this menu. You can use these commands to change the order in which calendar groups are displayed in the navigation pane.
Right-clicking a specific calendar displays a menu with a number of other commands, including Open and Open In New Window and Move Up In List and Move Down In List. On this menu, the Move Up and Move Down commands apply to specific calendars,
letting you reorder the calendars within a group. The Calendar Color command lets you assign the background color for a calendar.
See Also You’ll see how to work with other commands on this menu, including Share and Create New Calendar, in Chapter 2.
Navigating in Contacts View
In Contacts view, the navigation pane includes a set of filtering options in addition to a list of contact groups and folders. The filtering options are All, People, and Groups. These options let you see a specific list of contacts so that you can more easily locate and work
with contacts you need.
By default, the contact folder list has a single group (My Contacts) that includes a folder named Contacts. Right-click My Contacts to display a menu with commands for renaming, removing, and creating groups; changing the order of contact groups in the list; and creating a new contacts folder.
Tip If you create a contacts group of your own, these commands are also available when you right-click that group.
Right-click a contacts folder, and you gain access to commands like those you see for
email and calendars (and for tasks).
➤ To filter the contacts list in the navigation pane
1. Click Contacts at the bottom of the Outlook Web App window.
2. In the navigation pane’s Show area, select the filtering option you want to apply:
All, People, or Groups.
3. Double-click a contact item to display its details.
Navigating in Tasks View
As with contacts, the navigation pane in the Tasks view includes a set of filtering options above the list of task groups and task folders. The default configuration includes one task group, named My Tasks, and two task folders—Flagged Items And Tasks and Tasks.
The Show options let you view all tasks (active and complete) or filter the view to see only active tasks, overdue tasks, or completed tasks.
As you can in other Outlook Web App views, you can right-click a task group or task folder to open a menu with commands that let you create groups and folders and change the order in which folders appear in the navigation pane.
➤ To filter the task list in the navigation pane
1. Click Tasks at the bottom of the Outlook Web App window.
2. In the navigation pane’s Show area, select the filtering option you want to apply: All, Active, Overdue, or Complete.
3. Double-click a task item to display its details.
Navigating on Your Team Site
In Chapter 4, you’ll learn the details of how to extend and add features to your team site. This section describes two basic navigational aids you’ll use on the team site—the Quick Launch, which is displayed along the left side of the team site window, and the breadcrumb
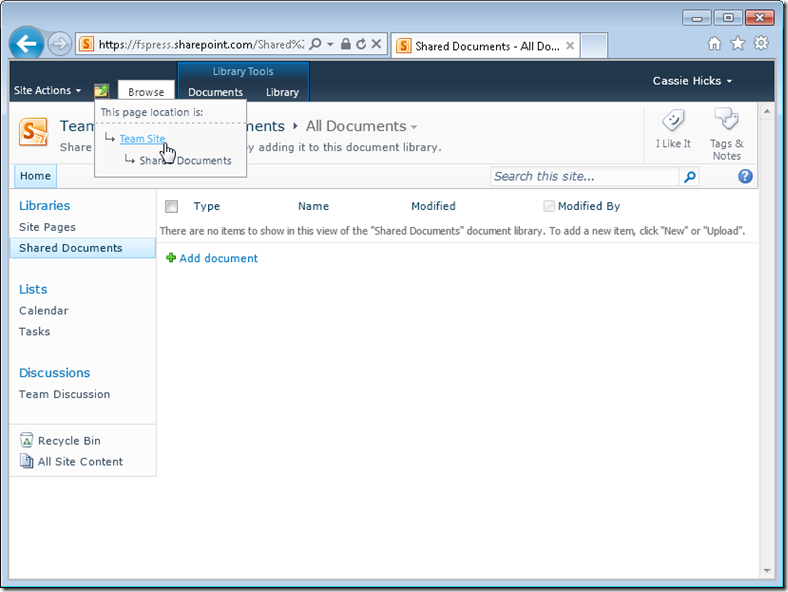
navigation, which you access by clicking the folder icon that appears next to Site Actions at the top of the window.
Use links in the Quick Launch at the left to open lists and libraries. Use the breadcrumbs, shown at the top, to navigate up to the home page or another location.
Using the Quick Launch
The links included on the Quick Launch let you display subsites, pages, lists, and libraries on your site with a single click. By default, links to the team site’s pages, the Shared Documents library, the Calendar and Task lists, and the default Team Discussion appear on the Quick Launch. The Quick Launch also includes the links Recycle Bin and All Site Content.
You can retrieve pages or other items you delete from the Recycle Bin for up to 30 days. The All Site Content link takes you to a page that shows each element of your team site (lists and libraries, for example). You can open an item by clicking its link. If you have
permission, you can click the Create link at the top of the page to initiate the steps you follow to add an element to your site.
When you click Site Pages on the Quick Launch, SharePoint displays a page from which you can edit the pages already on your site or add a page. In the list of current pages, move the pointer to the left end of a row, and SharePoint displays a check box. Select this check box to display commands on the ribbon. You use these commands to (among other operations) upload a document, edit properties, and configure settings for a list or library.
Clicking the Shared Documents link under Libraries leads you to a page you can use to upload a document to this library or create or edit a document already stored there.
When you build your team site by adding other lists and libraries, links to these items can be added to the Quick Launch to facilitate navigation.
Navigating Up with the Breadcrumbs
As you add elements to your default team site (such as lists, libraries, pages, and subsites), you can use the breadcrumbs tool to retrace your steps to a page higher in the site’s hierarchy.
The breadcrumbs icon sits just to the right of the Site Actions menu. (The ScreenTip that you see when you point to this icon is Navigate Up.) When you click it, you’ll see a simple depiction of the relationship of the page you are viewing to the site at large. To move up the site hierarchy—for example, to return to the team site home page—click the entry for the page you want to view.
➤ To navigate using breadcrumbs
1. Click the breadcrumbs icon.
2. Click the page you want to view.
Practice Tasks
Practice the skills you learned in this section by performing the following tasks on your installation of Office 365:
● Open your Outlook Web App inbox.
● Using the navigation pane, add folders for current projects, frequent email correspondents, or other categories you use to organize your email.
● Open the team site, and then open the Shared Documents library from the Quick Launch.
● Use the breadcrumbs to return to the team site’s home page.

