New book: Integrating PHP with Windows
We’re pleased to announce that the new Microsoft Press book Integrating PHP with Windows (ISBN: 978-0-7356-4791-6; 664 pages) is now available for purchase!
Millions of developers use the popular PHP web development language to create web sites and web applications. But PHP runs on servers, so all that code has to be hosted and executed on some type of server—and increasingly, that is a Windows Server running Internet Information Server (IIS). The hosting OS and ecosystem is extremely important to PHP developers and IT staff, because it includes such tasks as authentication, security, caching, error handling, performance, notifications, and maintenance.
You’ll see how to build PHP applications that run efficiently and effectively with an array of Windows technologies. Packed with practical step-by-step exercises, this in-depth guide teaches you how to use PHP modules and functions to interact with Active Directory, with SQL Server databases, and integrate with applications such as Microsoft Office, Microsoft Exchange, and Microsoft SharePoint.
Here’s the “Contents at a Glance” section so you can see the overall coverage in the book. In addition, you can read the complete Chapter 6, “Caching,” to get a good feel for the level of detail in the book.
Contents at a Glance
Part I Internet Information Services (IIS)
1 Setting Up the Work Environment
2 IIS Architecture
3 Configuring IIS
4 Configuring PHP
5 Security
6 Caching
7 URL Rewrite
8 Error Messages and Error Search
Part II SQL Server
9 Setting Up SQL Server
10 Databases and Tables
11 Working with SQL Server
12 PHP and SQL Server
13 Advanced Database Functions
14 Users and Permissions
Part III Active Directory
15 Setting Up Active Directory
16 LDAP Basics
17 Searching in Active Directory
18 Writing in Active Directory
Part IV Exchange Server
19 Setting Up Exchange Server
20 Exchange Web Services
21 Email and Exchange Web Services Basics
22 Contacts and Search
23 Calendar and Impersonation
Chapter 6 - Caching
Caching is an important technique for improving the performance of PHP applications and simultaneously reducing the amount of resources used on the server side.
Three caching options are available to you:
· With the HTTP headers, you can control whether and how long requesting clients or intermediate proxies can cache. The advantage of this option is that during later access, no new requests are sent to the server, and therefore, no server resources or bandwidth is required.
· With the Internet Information Services (IIS) Output Cache, frequently requested files are kept directly in the working memory and are issued upon request. Access to the file system is no longer necessary; PHP scripts and database access are no longer performed. The result is a correspondingly large increase in performance.
· The WinCache PHP Extension speeds up the execution of PHP scripts. WinCache caches the Opcodes of the compiled PHP scripts and reduces execution time as well as the number of accesses to the file system.
You’ll explore all three options in the sections that follow.
1) Caching in the Web
A webpage is composed of many individual elements: the HTML of the page itself, embedded graphics, formatting statements in cascading style sheets (CSS) format, script files (such as JScript and JavaScript), and other active content, (for example Microsoft Silverlight and ActiveX). Each one of these files is transferred in its own HTTP request/reply cycle from the server to the client.
Even though HTML changes within a website from one page to the next, other embedded content stays the same: for example, the logo or CSS formatting statements. Many elements (including the HTML pages themselves) are relatively static. Their content seldom changes, or doesn’t change at all. For a news portal, for example https://msn.com/ , the start page might change quite frequently. However, the logo hardly ever changes, and it’s likely that individual articles will not be rewritten.
It therefore makes sense to cache replies to HTTP requests locally on the client and thus save bandwidth and transfer time, to increase performance and improve the user experience. This becomes especially obvious when using the Back function of a web browser: If the previous page wasn’t cached locally, it would need to be requested again by the server, which would result in a noticeable delay.
HTTP provides mechanisms and headers for caching, with which the server can control which contents may be cached, under which conditions, and for how long. For example, on https://uk.msn.com/ , the logo can be cached for several months, individual articles for several minutes, but the start page only for the purposes of the Back function, otherwise it must be reloaded.
The HTTP protocol provides various techniques for caching, which target time, content changes, and conditions. In the following, you will look at them in more detail.
a) Caching for a Limited Time
HTTP provides two techniques to limit the caching duration: the Expires header and the max-age cache statement.
i) The Expires Header
To allow a resource to be cached for a certain amount of time, use the HTTP reply header Expires. The Expires header contains a specific time, after which cached content must no longer be used (neither by the browser nor by a proxy), but must be requested again from the source. Listing 6-1 shows this header in an HTTP reply.
Listing 6-1 Using the Expires header to limit the caching duration.
HTTP/1.1 200 OK
Content-Type: image/jpeg
Date: Wed, 07 Apr 2010 07:31:07 GMT
Expires: Thu, 07 Apr 2011 07:25:03 GMT
The date format is specified in HTTP-RFC; it must have the following format (the numbers in parenthesis represent the number of required characters):
Day(3), date(2) month(3) year(4) time(8) GMT
,You specify them using the Greenwich Mean Time (GMT) time zone.
Note GMT, in HTTP is identical to Coordinated Universal Time (UTC).
In PHP, this format can be generated by using the following statement:
$dateString = gmdate('D, d M Y H:i:s', $timeStamp) . ' GMT';
Note The date/time you specify in the Expires header should not be more than a year in the future.
If you want to ensure that the content of pages that change frequently is always freshly requested, you should set the Expires header to the same date/time as the Date header:
Date: Wed, 07 Apr 2010 07:31:07 GMT Expires: Wed, 07 Apr 2010 07:31:07 GMT
Note Many browsers also accept the value –1 in the Expires header. It also specifies that the resource must be requested again.
ii) Max-Age Statement
The Expire header specifies an absolute point in time. With the max-age statement, however, you can set a relative time in the Cache-Control header. The max-age value is specified in seconds: the content can be cached for the specified number of seconds. For example, to allow the caching of a resource for two days, the header would look as shown Listing 6-2.
Listing 6-2 The max-age statement is another way to limit the caching duration.
HTTP/1.1 200 OK
Content-Type: image/jpeg
Date: Wed, 07 Apr 2010 07:31:07 GMT
Cache-Control: max-age=172800
If both the Expires header and the max-age statement are used, the max-age statement takes precedence. To ensure that the content is always requested again, you need to set max-age=0, as follows:
Cache-Control: max-age=0
b) Mutable Contents
HTTP provides two options to determine whether the content of a web resource has changed: a last-modified change date and an entity tag that denotes versions of a resource that are distinctly different.
i) Change Date
The change date is specified with the Last-Modified header. This way, clients can find out later whether the content of the resource has changed since the last time. If the content hasn’t changed, the server responds with a corresponding message (HTTP code 304). This option does not prevent the HTTP request from the client to the server, but it reduces the amount of data that’s transferred.
Listing 6-3 demonstrates what happens: the server replies to the first client request with the content of the resource and the header Last-Modified, which gives you the date of the latest change. If the client calls up the resource again at a later time, it also sends the header If-Modified-Since. This way, the PHP script can check whether the data has changed since. If not, an HTTP-304 reply is sent without supplying the resource content with it (see the Listing): The client retrieves the content from its cache. If the content has changed, it is transferred as usual with a HTTP-200 reply.
Listing 6-3 Course of requests and replies when the Last-Modified header is specified.
First client request
GET /lastmodified.php HTTP/1.1
Host: phpdemo.site
Server reply
HTTP/1.1 200 OK
Last-Modified: Wed, 07 Apr 2010 07:31:07 GMT
Date: Wed, 07 Apr 2010 08:57:04 GMT
Second client request
GET /lastmodified.php HTTP/1.1
Host:phpdemo.site
If-Modified-Since: Wed, 07 Apr 2010 07:31:07 GMT
Server reply
HTTP/1.1 304 Not Modified
Date: Wed, 07 Apr 2010 08:57:13 GMT
The server or the PHP script must therefore evaluate the HTTP request header If-Modified-Since explicitly.
ii) Entity Tag
It’s not always possible to specify a change date; it simply might not be easy to find out what it is. For such situations, you can use the ETag header, which assigns an Entity tag to the content—a unique string for this version of the content—for example, a number or a hash value. It works the same as Last-Modified: If requests follow, the client sends an If-None-Match header, which is evaluated by the server or the PHP script.
Listing 6-4 shows both client requests. After the first request, the server replies with an ETag header: You must place the value between quotes, but you are free to choose any value you like. At the second client request (at a later time) it sends the ETag of the version in its cache as part of the header If-None-Match. The server or the PHP script can evaluate this information and answer either with an HTTP-304 code (if the content hasn’t changed yet) or with an HTTP-200 code and the data of the new version.
Listing 6-4 Course of requests and replies when the ETag header is specified.
First client request
GET /etag.php HTTP/1.1
Host: phpdemo.site
Server reply
HTTP/1.1 200 OK
ETag: "387060f9402aca1:5fff-35" Date: Wed, 07 Apr 2010 08:57:04 GMT
Second client request
GET /etag.php HTTP/1.1
Host:phpdemo.site
If-None-Match: "387060f9402aca1:5fff-35"
Note The If-None-Match header can also contain multiple comma-separated ETag values:
If-None-Match: "387060f9402aca1:5fff-35", W/"3653412", "38:5fff:35aca1"
Entity tags can be classified as either strong or weak tags:
Strong tags must differ from one other as soon as the resource version has changed by at least one byte.
Weak tags, represented by the syntax W/"..." , should change only if the semantic meaning has changed.
For example, a strong tag for a visitor counter changes with each visitor, a weak tag might only change once a day, if the exact number of visitors is not important for the application. You should use strong tags whenever possible.
You can use ETag headers and Last-Modified headers together. If both the If-None-Match and If-Modified-Since headers are set in subsequent requests, the server should typically reply only with an HTTP-304 message when both conditions are met.
c) Caching Conditions
Using the Cache-Control HTTP header you can set additional conditions for caching. Table 6-1 shows the most important Cache-Control statements. The max-age statement has already been introduced in the section “Max-age Statement,” earlier in this chapter.
Table 6-1 Statements in the Cache-ControlHeader
Statement |
Description |
public |
The resource can be stored in a cache, which is used for several users, typically a proxy cache. This is the default behavior when there is no authentication on the HTTP level. |
private |
The resource can only be stored in a private cache for the individual user who has sent the request. |
no-cache |
The resource must never be cached, but instead must always be requested from the server. |
no-store |
The resource must not be cached or locally saved in a file (for example, in the Temporary Internet Files folder). This option is designed mainly for websites with sensitive content. |
must-revalidate |
The resource can be cached, but the client must contact the server before using it again, to check whether the resource has changed. |
max-age=seconds |
Maximum age of the version in the cache, at which the client must request the content again from the server. |
You can combine and link statements in the header with commas, as demonstrated in the following:
Cache-Control: public, max-age=86400, must-revalidate
Different browsers interpret no-cache and no-store differently: For the Back and Forward functions, all browsers reload the page when no-store is specified. If no-cache is specified, the cached version is displayed, or (depending on the browser) the resource is reloaded.
Older browsers still have the (slightly repurposed) Pragma header:
Pragma: no-cache
You can use it to prohibit caching for these browsers.
d) Specifying the Headers with IIS
You can specify HTTP headers that have an impact on caching from PHP by using the header() method. For other contents, such as graphics, you can specify headers from IIS.
Entity tags (ETag headers) and Last-Modified headers are automatically added to content supplied via the StaticFile handler. For this type of content, IIS takes over management of the change headers by monitoring the file and adjusting both headers accordingly when there are changes.
You can specify other headers via IIS Manager or with appcmd.
i) Specifying the Headers by Using IIS Manager
To set a cache time limit by using IIS Manager, perform the following steps:
1. Open IIS Manager.
2. In the Connections pane, select the desired site, application, or directory.
3. On the start page, open the HTTP Reply Response Headers module.
4. Click Actions | Specify Set Common Headers.
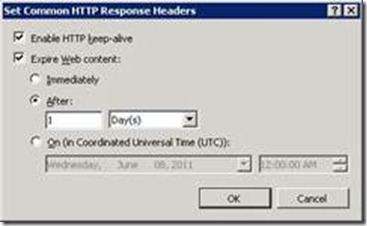
The Set Common HTTP Response Headers dialog box opens, as shown in Figure 6-1.
5. Select the Expire Web Content check box and choose one of three options:
o Immediately Content must not be cached (sets the header Cache-Control to no-cache)
o After Enter a duration for the caching (sets the header Cache-Control to max-age=<value> )
o At Specifies that content can only be cached up until a certain defined point in time (sets the reply header Expires to the desired time)
Figure 6-1 Specifying the HTTP reply header for expiring web content
6. Click OK to apply the settings.
You can specify additional headers, especially the Cache-Control header, in the same module by doing the following:
7. Click Actions | Add.
6. In the dialog box that opens, enter the name of the HTTP header in the Name text box (for example, Cache-Control) and the desired header content in the Value text box (for example, must-revalidate, public).
9. Click O, to add the header for new requests.
Note IIS automatically connects set Cache-Control statements of the Common Headers function to the manually added reply headers so that both can be used at the same time.
ii) Specifying Headers from the Command Line
To set the desired headers from the command line, run the following commands with appcmd:
· Prohibiting the caching of static content:
appcmd.exe set config "<PATH>"
-section:system.webServer/staticContent /clientCache.cacheControlMode:"DisableCache"
· Permitting the caching of static content for a certain amount of time (which is entered as days.hours:minutes:seconds):
appcmd.exe set config "<PATH>" -section:system.webServer/staticContent
/clientCache.cacheControlMode:"UserMaxAge" /clientCache.cacheControlMaxAge:"1.12:30:00"
· Permitting the caching of static content up to a defined point in time:
appcmd.exe set config "<PATH>"
-section:system.webServer/staticContent /clientCache.cacheControlMode:"UseExpires"
/clientCache.cacheControlMaxAge:"Thu, 07 Apr 2011 07:25:03 GMT"
To manage your own headers (no matter whether the content is supplied by the StaticFile handler), run the following appcmd commands:
· Adding a new header:
appcmd set config "<PATH>"
-section:system.webServer/httpProtocol /+customHeaders.[name='<Header Name>',value='<Header Value>']
· Removing a header:
appcmd set config "<PATH>"
-section:system.webServer/httpProtocol /-customHeaders.[name='<Header Name>']
iii) Configuration Elements
Two different configuration elements are used to specify the cache settings directly in the configuration file: staticContent/clientCache and httpProtocol/customHeaders.
Table 6-2 shows the content caching attributes supplied via the StaticFile handler.
Table 6-2 Attributes for the staticContent/clientCache Configuration Element
Attribute |
Description |
cacheControlMaxAge |
Specifies the allowed duration for the caching in the format · DisableCache Caching is not allowed. · UseMaxAge Caching is only allowed for the defined duration. · UseExpires Caching is allowed up to the defined point in time. |
cacheControlMode |
Specifies the mode for the cache: days.hours:minutes:seconds, for example _fi; only works in connection with cacheControlMode=UseMaxAge |
httpExpires |
Specifies the date/time up to which caching is permitted, for example Thu, 07 Apr 2011 07:25:03 GMT; only works in connection with cacheControlMode=UseExpires |
Listing 6-5 shows how to set caching for a period of one day, 12 hours, and 30 minutes.
Listing 6-5 Specifying the cache settings for static content.
<system.webServer>
<staticContent>
<clientCache cacheControlMode="UseMaxAge: cacheControlMaxAge="1.12:30:00" />
</staticContent>
</system.webServer>
You can specify other headers with the help of the configuration collection httpProtocol/customHeaders. Listing 6-6 shows how you can add the Cache-Control statement must-revalidate.
Listing 6-6 Configuring the addition of reply headers.
<system.webServer>
<httpProtocol>
<customHeaders>
<add name="Cache-Control: value="must-revalidate" />
</customHeaders>
</httpProtocol>
</system.webServer>
2) Output Cache
For faster HTTP request processing, IIS provides an output cache. Files and content in this cache are kept directly in the main storage. File access to the drives is not required. The output cache can also be used for PHP scripts and can thus increase performance significantly (because PHP execution and database access no longer take place).
IIS provides two options for configuring the output cache: user mode and kernel mode. Caching in kernel mode is extremely powerful, because the entire request is handled directly in the HTTP protocol stack (http.sys), and request data does not need to be passed on to the IIS modules in user mode. However, caching in kernel mode has certain limits. Not all requests can be saved.
Note You can find descriptions of the conditions which need to be met for the kernel mode to work on https://support.microsoft.com/kb/817445/ and https://msdn.microsoft.com/en-us/library/aa364670%28VS.85%29.aspx.
Logging the request errors also helps (see Chapter 8, “Error Messages and Error Search”), assuming the cache area feature is logged. You can find more information in the log entry under HTTPSYS_CACHEABLE.
a) Configuring by Using IIS Manager
To configure the output cache in IIS Manager, perform the following steps:
1. Start IIS Manager.
2. In the Connections pane, select the desired item.
3. On the item’s start page, open the Output Caching module.
4. Click Actions | Edit Feature Settings, ensure that the desired cache (kernel cache or user mode cache) is enabled, and then click OK.
Note The maximum size of the HTTP replies and the cache size limit can only be set on the server level.
5. Click Actions | Add.
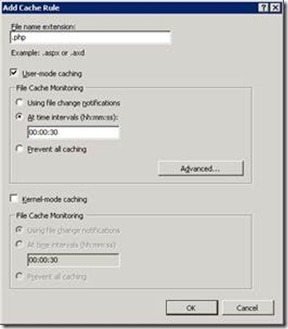
The Add Cache Rule dialog box opens, as shown in Figure 6-2.
6. Enter the file name extension for which you would like to enable caching. Select one of the two caching types and set the file cache monitoring for PHP scripts to At Time Intervals.
Figure 6-2 Adding a caching rule.
The two images labeled 06_02a and 06_02b are combined (with overlays) in the file 06_02_combined_add_cache_rule.vsd.
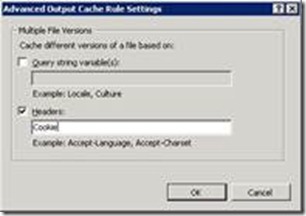
7. For caching in user mode, you can specify additional settings by clicking the Advanced button. For example, to make the caching dependent on the cookie content, select the Headers check box, and then enter Cookie into the corresponding text box. Click OK to apply the advanced settings.
8. Click OK to add the cache rule.
You have now enabled caching. You can check the function by writing a simple test script, such as that in Listing 6-7, and copy it to the corresponding location on your website. If you run the script a few times you should see, that the time does not change for 30 seconds.
Listing 6-7 cachetest.php—a script for testing cache.
<html>
<head><title>Cache Test</title></head>
<body>
<p>Time <?php echo date('d.m.Y H:i:s'); ?></p>
</body>
</html>
You can specify from which time forward IIS caches a file by using frequentHitThreshold (number of required hits) and frequentHitTimePeriod (time period in which the hits must happen) of the system.webServer/ServerRuntime configuration element. In IIS Manager, these values can only be set in the configurations editor (see Chapter 3, “Configuring IIS”). By default, two hits must happen within 10 seconds for a file to be saved.
b) Configuring from the Command Line
To enable caching in user mode, use the following appcmd command:
appcmd set config "<PATH>" -section:caching
/+profiles.[extension='.php',duration='00:00:30',policy='CacheForTimePeriod',varyByHeaders='Cookie']
If you want the file version to be dependent on the query string, you need to set the attribute varyByQuerystring.
To enable caching in kernel mode, you need to set the attribute kernelCachePolicy instead of or in addition to the attribute policy.
To remove a cache rule, use appcmd as follows:
appcmd set config "<PATH>" -section:caching /-profiles.[extension='.php']
To control from what time forward a file should be cached, use the following command:
appcmd set config -section:system.webServer/ServerRuntime /frequentHitThreshold:5
/frequentHitTimePeriod:00:00:15
Both attributes can only be set server-wide, not for individual sites.
Once you have enabled the kernel mode cache you can use the command netsh to retrieve the current state of the cache, as shown in the following:
netsh http show cache
c) Configuration Elements
The cache is configured with the configuration collection caching/profiles. Table 6-3 shows the attributes for caching content.
Table 6-3 The Attributes for the Configuration Collection Caching/Profiles
Attribute |
Description |
extension |
File name extension |
policy |
Type of the user mode cache: · CacheUntilChange Cache until the file changes · CacheForTimePeriod Cache for a certain amount of time · DontCache Never cache |
kernelCachePolicy |
Type of the kernel mode cache; same options as for the user mode cache |
duration |
Specifies the cache duration; works only with the CacheForTimePeriod policy |
varyByHeaders |
Specifies the parameters of the query strings which impact the caching (only for user mode cache) |
varyByQueryString |
Specifies the HTTP request headers that impact the caching (only for user mode cache) |
Listing 6-8 shows how to permit caching for a period of 30 seconds.
Listing 6-8 Configuration for the cache profile.
<system.webServer>
<caching>
<profiles>
<add extension=".php: policy="CacheForTimePeriod: duration="00:00:30" varyByHeaders="Cookie" />
<add extension=".png: kernelCachePolicy="CacheUntilChange" />
<profiles>
</caching>
</system.webServer>
3) The WinCache Extension for PHP
The WinCache extension for PHP does not target caching at HTTP level, but instead improves the performance when PHP scripts are executed. The extension provides the following functions:
· Opcode Cache PHP scripts are processed in two steps: the script is parsed and compiled into Opcode statements, which are then run in the next step. The PHP Opcodes of a script are cached in the Opcode cache, and the compilation step is no longer needed for additional statements.
· File Cache WinCache can also cache PHP script files to further reduce file access operations.
· Session Handler PHP sessions let you save data (whose values are cached in a file by default) in the $_SESSION variable. WinCache provides a session handler that keeps this data in the main storage and thus makes slower file or database access unnecessary.
· Cache for User Data The WinCache functions can also be addressed directly from the user script to save custom data in the cache and to address them from any PHP processes within the application pool.
The installation of WinCache and some of the functions are described in more detail in the following section.
a) Setting Up the WinCache Extension
You can either install the WinCache extension manually or with the help of the Web Platform Installer (Web PI).
Note At the time of this book's printing, the current version of the WinCache extension and the version for PHP 5.3 required a manual install.
i) Manual Installing the WinCache Extension
How to manually install the WinCache extension:
1. Download the current version of the extension’s installation program that works for your PHP version (5.2 or 5.3) from https://www.iis.net/expand/WinCacheForPhp, and then save the file. This book uses and describes version 1.1 Beta 2 of the WinCache extension.
2. Start the installation program and confirm the licensing information by selecting Yes.
3. Select the directory into which you want to extract the files.
4. Go to the selected directory and copy the file php_wincache.dll into the PHP extension directory C:\PHP\ext.
5. Open the file php.ini (C:\PHP\php.ini) in a text editor, and then add the following line:
extension = php_wincache.dll
6. Ensure that the extension directory in php.ini is set to ext, as shown in the following;
extension_dir = "ext"
If extension directory is not set this way, the extension will not be loaded.
7. Restart the corresponding IIS application pool.
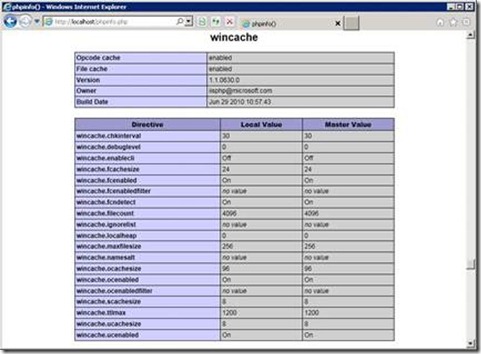
8. Run a phpinfo() script. You should see the WinCache extension, as shown in Figure 6-3.
Figure 6-3 The WinCache extension for PHP.
ii) Installing the WinCache Extension by Using the Web PI
To install the WinCache extension with the Web PI, perform the following steps:
1. Start the Microsoft Web PI with administrator rights.
2. Click Web Platform | Frameworks And Runtimes | Customize.
3. Select the Windows Cache Extension For PHP option, and then click the Install button.
Important Ensure that the WinCache extension matches your PHP version. If it does not, you need to avoid manual installation.
4. Click the I Agree To Start The Installation button. After a successful installation, click the Finish button.
5. Click Exit to close the Web PI.
b) The PHP Opcode and File Cache
The PHP Opcode cache and the file cache help you run PHP scripts faster because they minimize file access. This feature also minimizes the need for the compilation step during script execution, because the Opcodes are cached.
i) Configuration
You can use configuration options to control both caches. Table 6-4 lists the most important properties.
Table 6-4 Configuration Statements for the File Cache and the Opcode Cache
Configuration options |
Description |
wincache.fcenabled, wincache.ocenabled |
Turns the file cache (fc) or Opcode cache (oc) on (1) or off (0) |
wincache.fcachesize, wincache.ocachesize |
Maximum size of the file cache (f, file) and the Opcode cache (0) in megabytes |
wincache.chkinterval |
Specifies in seconds how long WinCache waits before checking whether a file has changed—the longer the interval, the fewer file accesses take place, but the longer it takes for file changes to take effect. |
wincache.ignorelist |
List of files (without path specification) that must not be cached (separated by a pipe) |
As of Beta 2, WinCache 1.1 detects changes to PHP files automatically. The check interval (chkinterval) has no impact in this case, unless the file system does not support change notifications (for example a UNC share). In this case WinCache checks these files at the specified interval.
Note If necessary you can use the function wincache_refresh_if_changed() to renew entries in the cache before the time specified in wincache.chkinterval has run out.
ii) Status Information
The WinCache installation also includes a PHP script that can inform you about the current state of WinCache. To be able to use this script, perform the following steps:
1. Copy the file wincache.php from the installation directory into a directory on your website (for example C:\inetpup\wwwroot\wincache\wincache.php).
2. Open the file with an editor, go to the section CONFIGURATION SETTINGS, and then enter a new password.
If you have saved the script in an area that uses IIS authentication, enter the permitted users in the variable $user_allowed.
2. Save the file, and then open it in the browser.
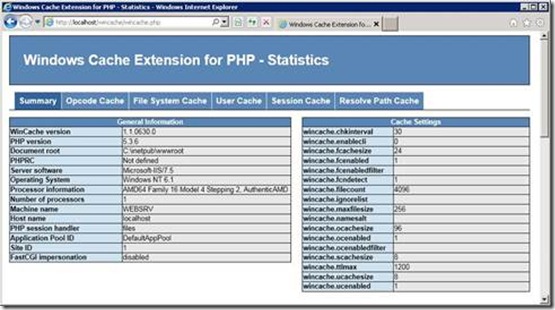
You are now receiving information about the current memory and cache status of WinCache, as shown in Figure 6-4.
Figure 6-4 Status information of the WinCache extension for PHP.
c) Session Handler
As of version 1.1, WinCache provides a PHP session handler.
To use the WinCache session handler, perform the following steps:
1. Open the file php.ini (C:\PHP\php.ini).
2. Look for the line that contains the statement session.save_handler, and then replace it with:
session.save_handler = wincache
3. The session data is also saved in the Windows folder for temporary files. If you want to change the folder, set the configuration variable session.save_path to the desired folder path. Don’t forget to grant the IIS application pool users (IIS_IUSRS) the required access rights to the folder.
4. Save the file and restart the associated IIS application pool.
PHP now uses WinCache to store the session data and keeps them in main storage memory for quick access.
You can specify the size of the available session cache together with the user cache by using the configuration option wincache.ucachesize. Its value is specified in megabytes.
d) User Cache
The user cache of the PHP WinCache extension has been available since version 1.1 of the extension. With it, you can save your own data in the cache. The data in the cache can be accessed from all PHP processes within the same application pool. Typically, it is used for saving global status information, global counters, or as cache for the result of frequent calculations or database operations.
You should use the cache for saving global data for the entire PHP application. The variable $_SESSION is better suited for user-related data.
Caution When multiple PHP applications are using the same application pool, the PHP applications can access the data of the other applications in the user cache. This can pose a security risk.
Listing 6-9 shows a simple application of the user cache: a chat script which uses all of the following essential functions of the user cache:
· wincache_ucache_clear() Deletes all entries in the user cache.
· wincache_ucache_exists($key) Checks whether a certain entry exists.
· wincache_ucache_add ($key, $value, $ttl) Adds a new entry, but only if it doesn’t exist yet. $ttl specifies after how many seconds the entry must be deleted, 0 (the default) means that the value must not be deleted.
· wincache_ucache_inc($key, $inc_by) Increases an entry by $inc_by or by 1, if $inc_by is not specified. If an error occurs (for example because the entry doesn’t exist or is not a number) the function returns false.
· wincache_ucache_get($key, &$success) Reads an entry and returns false if it doesn’t exist. If you want to check Boolean variables for success, you can set the status in the optional variable $success.
· wincache_ucache_set($key, $value, $ttl) Adds a new entry or overrides an existing entry. $ttl states the duration of the entry.
Listing 6-9 wincache-chat.php—a short chat script with WinCache.
<html>
<head>
<title>Chatroom</title>
</head>
<body>
<h1>Chatroom</h1>
<?php
if (isset($_POST['clear'])) {
wincache_ucache_clear();
echo '<p>Messages deleted, counter reset.</p>';
}
if (!wincache_ucache_exists('counter')) {
wincache_ucache_add('counter', 0);
}
$cnt = wincache_ucache_inc('counter');
echo "$cnt page hits since the last restart.\n";
?>
<form action=": method="post">
Message: <input name="msg" />
<input type="submit: value="Send!" />
<input type="submit: name="clear: value="Delete all" />
</form>
<hr />
<h2>The 5 latest messages</h2>
<p><?php
if (!wincache_ucache_exists('chat')) {
wincache_ucache_add('chat', array());
}
$chat = wincache_ucache_get('chat');
if (isset($_POST['msg'])) {
$chat[] = $_POST['msg'];
if (count($chat) > 5) {
array_shift($chat);
}
wincache_ucache_set('chat', $chat);
}
foreach (array_reverse($chat) as $msg) {
echo htmlspecialchars($msg), "<br />\n";
}
?></p>
</body>
</html>
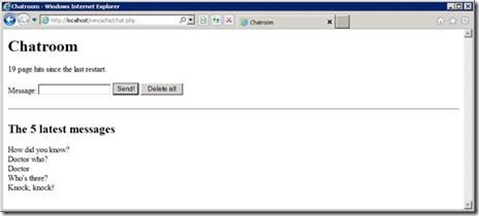
Figure 6-5 shows the chat script output after a few passes. The output is the same for all users. The value and content of the WinCache user cache are global.
Figure 6-5 Chat script output.
4) Summary
With the techniques described in this chapter, you can increase the performance of your PHP applications significantly. Especially for popular pages, you should try to use all three options: caching based on HTTP headers, IIS output cache, and PHP caches such as WinCache.
You should pay special attention to the difference between anonymous and logged-in users: Normally, anonymous users generate a lot more requests than logged-in users. Also, the pages for logged-in users are usually personalized; therefore, the IIS output caching for PHP scripts is not very efficient in this case. A simple differentiation between user types can be achieved via different URLs for the anonymous area and the area for logged-in users. You should already take this into account when you are designing your PHP application.
During configuration, it’s helpful to set up files with different caching requirements (for example, graphics and style sheets) in their own folders and not mix them with PHP scripts.
In special cases, the caching can be configured at file level (with the Location element; see Chapter 3) instead of on folder level. This might become necessary for index.php files.
Fine-tuning depends on your application and your users. Analyzing the log files can provide you with important information.
