New book: Microsoft OneNote 2010 Plain & Simple
We’re excited to announce that Peter Weverka’s Microsoft OneNote 2010 Plain & Simple (ISBN 9780735660540; 256 pages) is now available for purchase!
You can find the book’s chapter-level table of contents and some colorful examples of this easy-to-use, beginner-focused guide to Microsoft OneNote 2010 in this previous post.
In today’s post, please enjoy a closer look at section 5, “Writing Basic Notes.”
Chapter 5
Writing Basic Notes
In this section:
· Writing a Note with the Keyboard
· Selecting, Moving, and Deleting Notes
· Entering Symbols and Unusual Letters
· Selecting Text
· Copying and Moving Text
· Formatting Text
· Applying Styles to Text
· Creating Numbered and Bulleted Lists
The simplest type of note is a typewritten note―one you enter with the keyboard. Entering this kind of note is simple because all you have to do is click in a page and start typing.
Pages tend to get crowded with notes. To prevent overcrowding, you can move notes and delete the ones you no longer need.
The standard techniques for copying and moving text in Microsoft Office 2010 also apply in Microsoft OneNote 2010, in which you’ll find the Cut, Copy, and Paste buttons on the Home tab. You’ll also find standard commands for formatting text on the Home tab. For example, the Font menu, Bold button, and Italic button are located on the Home tab. OneNote 2010, like Microsoft Word 2010 and Microsoft PowerPoint 2010, has a Style menu for quickly formatting text.
Want to create a numbered or bulleted list? You can do that as well in OneNote 2010 with the Bullets and Numbering buttons on the Home tab.
Writing a Note with the Keyboard
All you have to do to write a note is click in a OneNote page and start typing. OneNote creates a note container for each note you write. As you write, the note container changes size to accommodate the text. A note can be as short or long as you want it to be.
A note is similar to a page in a Word 2010 document in that you can add paragraphs and align paragraphs in different ways. You can also control how much space appears between paragraphs.
The following two tables describe paragraph-alignment and paragraph-spacing options.
Paragraph Alignment Options
Align Left |
Aligns the paragraph with the left side of the note container |
Center |
Centers the paragraph across the note container |
Align Right |
Aligns the paragraph with the right side of the note container |
Paragraph Spacing Options
Before |
Determines the amount of blank space above the paragraph (you enter the amount of space in points) |
After |
Determines the amount of blank space below the paragraph (in points) |
Line Spacing at Least |
Enters enough space above the paragraph to accommodate the largest-size letter |
Write a Note
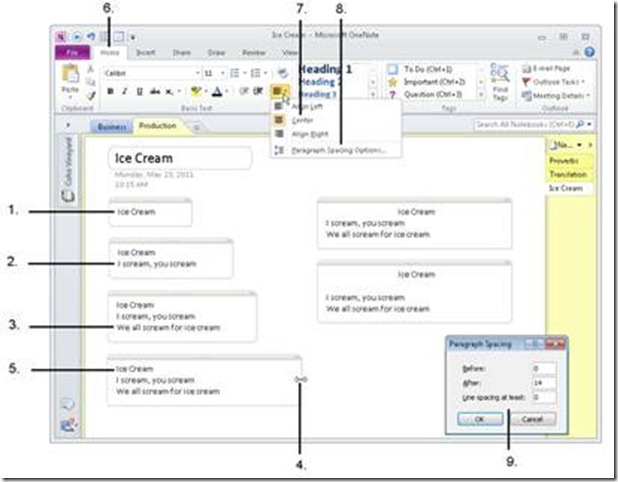
1 Click in a page and type Ice Cream to create a note.
2 Press Enter to start a new paragraph and type I scream, you scream (and notice how the note container widens to accommodate the text).
3 Press Enter to start a third paragraph and type We all scream for ice cream.
4 Move the pointer over the right side of the note container; when the pointer changes to a double arrow, click and drag to the right to widen the note.
5 Click anywhere in the first paragraph.
6 Click the Home tab (if necessary).
7 Click Paragraph Alignment and choose Center to center the first paragraph.
8 Click Paragraph Alignment and choose Paragraph Spacing Options.
9 In the Paragraph Spacing dialog box, enter 14 in the After box and click OK to put 14 points of spacing between the first and second paragraph.
Tip To format more than one paragraph at a time, select all or part of the paragraphs before choosing a formatting command. You can select more than one paragraph by dragging.
Tip Press Ctrl+L to left-align a paragraph; press Ctrl+R to right-align a paragraph.
Selecting, Moving, and Deleting Notes
As a page starts to get crowded with notes, you have to move the notes around in order to read them. Sometimes you have to delete them as well. However, before you can move or delete a note, you have to select it.
The trick to selecting a note is to click the bar along its top. You can tell when the pointer is over this bar because it turns into the four-headed arrow pointer.
OneNote offers a quick way to move several notes lower on a page: the Insert Space button. You can also move several notes by selecting them and dragging.
Select, Move, and Delete Notes
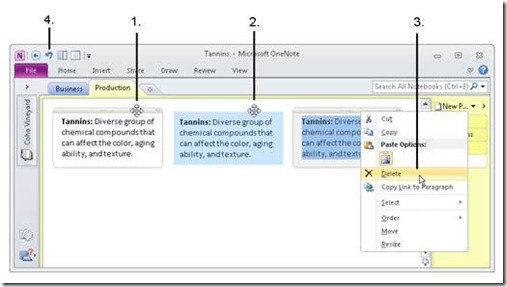
1 Move the pointer over the bar along the top of a note; to select the note, click when you see the four-headed pointer.
2 Drag the note to move it to a different location.
3 Right-click the bar along the top of a note and choose Delete (or press the Delete key).
4 Click Undo to restore the note you deleted.
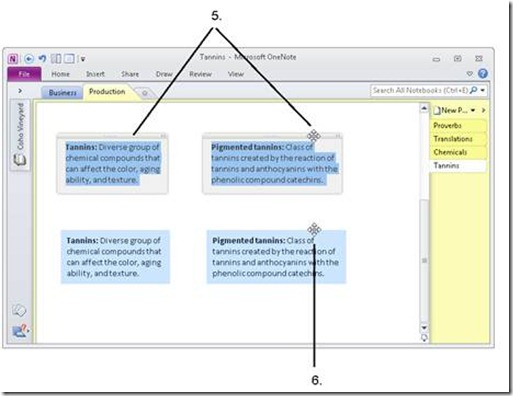
5 Ctrl+click the note bars on more than one note to select all the notes.
6 Drag one of the notes you selected to move all the notes.
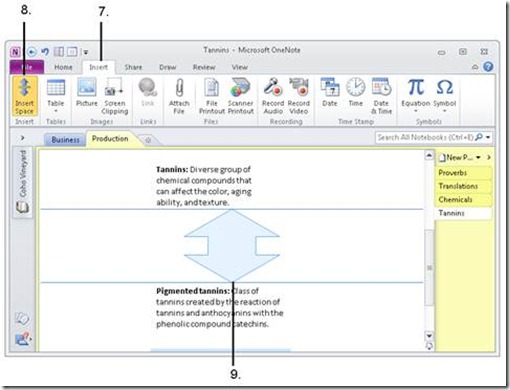
7 Click the Insert tab.
8 Click Insert Space.
9 Drag downward on the page to insert space and move notes downward.
Tip To select all the notes on a page, press Ctrl+A.
Tip You can also use the Insert Space button to put horizontal space between notes. After clicking the Insert Space button, drag sideways.


