RTM’d today: Microsoft Visio 2010 Step by Step
We’re very pleased to announce that Scott Helmer’s book, Microsoft Visio 2010 Step by Step has shipped to the printer!
With Microsoft Visio 2010 Step by Step, experience learning made easy—and quickly teach yourself how to create professional business and technical diagrams with the new version of Visio . You set the pace—building and practicing the skills you need, just when you need them! Learn how to navigate the new user interface—the Ribbon and Backstage view—in Visio 2010; build network diagrams, organization charts, office spaces, floor plans, and other diagrams; connect and align shapes in process diagrams, and create effective flowcharts and workflow diagrams; link Visio diagrams to a data source to visualize the diagram’s data, and analyze business data in PivotDiagrams; insert and modify diagrams in Microsoft Office documents, and collaborate on diagrams in Microsoft SharePoint® 2010; and create your own shapes and templates and build custom diagrams
Your online learning resources include practice exercises, diagram samples, companion content, and unlimited access to a fully searchable online edition of the book on the Web.
Scott’s book will be available via online retailers around March 15. In the meantime, here’s more information about the book:
Contents at a Glance
Chapter 1: A Visual Orientation to a Visual Product
Chapter 2: Creating a New Drawing
Chapter 3: Adding Sophistication to Your Drawings
Chapter 4: Drawing the Real World: Flowcharts and Organization Charts
Chapter 5: Adding Style, Color, and Themes
Chapter 6: Entering, Linking to, and Reporting on Data
Chapter 7: Adding and Using Hyperlinks
Chapter 8: Sharing and Publishing Diagrams – Part 1
Chapter 9: Drawing the Real World: Network and Data Center Diagrams
Chapter 10: Visualizing Your Data
Chapter 11: Adding Structure to Your Diagrams
Chapter 12: Creating and Validating Process Diagrams
Chapter 13: Sharing and Publishing Diagrams – Part 2
Glossary
Introduction
Visio 2010 looks different. Very different. That’s because it’s the first version of Visio to employ what Microsoft calls the fluent user interface (UI), otherwise known as the ribbon UI or just the ribbon. Most products in the Microsoft Office suite adopted the ribbon in their 2007 versions, but Visio and a few others did not.
The good news for Visio users is that the Visio 2010 ribbon benefits from several additional years of development experience and millions of person-hours of user experience with the 2007 ribbons in other products. In addition, because the goal of a ribbon-style interface is a visual presentation of a related group of functions, the ribbon is very appropriate for Visio because Visio is, first and foremost, a visual product.
Consequently, the Visio ribbon is well-designed, logical and quite easy to use. This doesn’t mean you won’t spend a few moments on occasion trying to figure out how to accomplish a particular task or hunting for a familiar tool. However, the vast majority of Visio functions are right where you would expect them to be once you’ve spent a few minutes exploring the ribbon layout and structure.
Before you do that, though, you need to see how Visio looks when you start it, because that, too, is different in Visio 2010. And in case you’ve never used Visio before, this chapter also provides a getting started guide to Visio windows and operation.
Getting Started
Like other Office programs that use the ribbon, Visio opens in the so-called backstage view. The backstage view contains many of the items that were previously located on Visio’s File menu, and in fact, you’ll notice that the blue tab at the top of the backstage view is labeled File.
NOTE Visio templates are provided in two different sets of measurement units. You may be offered a choice between the two when you select a template or you may not see a choice, as is the case for the screen shots below. The two sets of measurement units are listed below.
· US Units Diagrams created with US Units use the 8½ by 11 inch, letter-sized paper that is common in the United States and parts of Canada and Mexico. Templates created for US Units also include additional drawing and paper sizes that are common in the US. The default measurement units are inches and feet.
· Metric Metric drawings are sized using International Standards Organization (ISO) specified paper sizes; the default size is usually A4. Metric templates also include other ISO drawing and paper sizes. All measurements are in millimeters or other metric measurement units.
Visio Standard
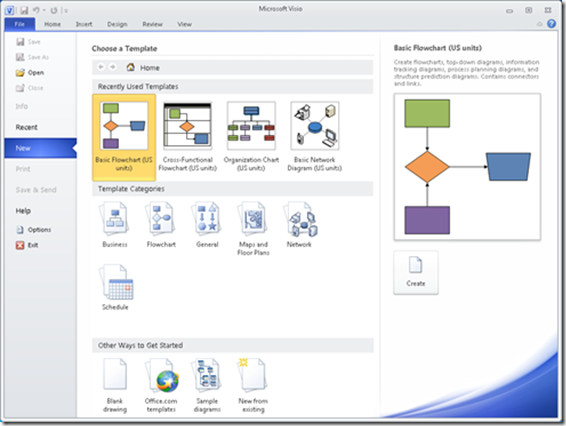
When you start Visio Standard 2010, the backstage view opens to the New page and the screen looks like the following figure:
Key functions of the New page including the following:
· In the upper part of the screen you’ll see one or more Recently Used Templates.
· In the center of the screen you’ll see icons representing Template Categories, each of which contains one or more templates.
· In the lower part of the screen, you’ll see Other Ways to Get Started, which contains links to online template collections and lets you create new drawings from a blank template, a sample diagram or an existing Visio drawing.
· The right side of the backstage view displays details about whichever item or collection you have selected in the center of the screen.
Visio Professional
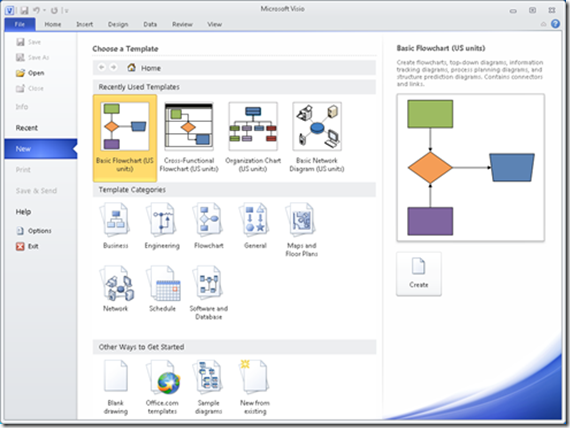
When you start Visio Professional 2010, the backstage view looks like the figure below. The key difference from Standard is the inclusion of additional template groups in the Template Categories section, as well as additional templates in several of the existing categories.
The Professional edition also includes one more tab that is visible at the top of the image below. The Data tab (situated between Design and Review) adds powerful data linking and data management features.
Visio Premium
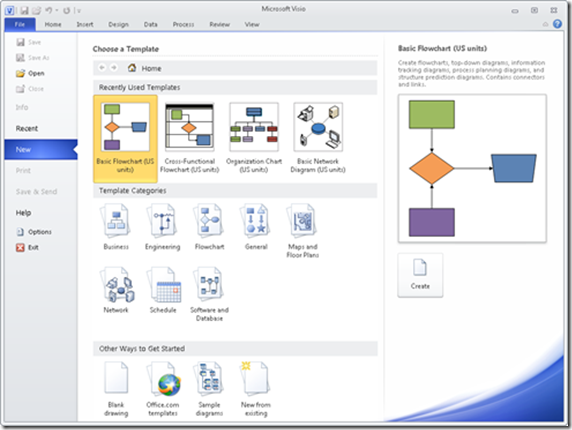
When you start Visio Premium 2010, the main parts of the backstage view look identical to Professional. However, there is one subtle visible difference and one difference that is not visible on this screen.
· The visible difference is the addition of a tab called Process, which you can see between Data and Review at the top of the image below. Business process functions are a key focus area for the Premium edition of Visio 2010.
· The invisible difference is the inclusion of additional templates in the Business and Flowchart categories.
Regardless of your Visio edition, you can begin a new document by clicking on a template category, then double-clicking a template name.
TIP If you have opened a template category but choose not to utilize a template in that category, you can return to the New page by clicking either the back arrow or the Home button at the top of the template area of the screen. Both buttons are shown below.
SEE ALSO The Visio Toolbox web site, which is run by Microsoft, contains dozens of additional templates that you can use with Visio. Some are supplied by Microsoft, others by third-party vendors, most are free: visiotoolbox.com/2010/templates.aspx
NOTE Most of the screen shots in this book were made utilizing the Premium edition ribbon. Consequently, you may see tabs, buttons or options in the book that don’t apply to your edition of Visio. In general you can ignore any buttons or tabs that do not appear on your computer screen. Where necessary, the text will distinguish those exercises or functions that can only be performed with a specific Visio 2010 edition.


