Excerpt from upcoming title: Microsoft SharePoint Foundation 2010 Step by Step
 Today we’d like to share an excerpt from one of our upcoming books: Microsoft SharePoint Foundation 2010 Step by Step, by Olga Londer and Penelope Coventry. We’ll publish this book in February 2011. You can learn more about the book here: https://oreilly.com/catalog/9780735627260/.
In this excerpt from Chapter 5, Working with Libraries, the authors describe how to create a picture library and add pictures:
Creating a Picture Library and Adding Pictures
A picture library is used to share a collection of pictures. Although picture files can be stored in other types of SharePoint libraries (such as document libraries), picture libraries are designed especially for storing image file types and therefore have several advantages. For example, from a picture library, you can view pictures in a slideshow, download pictures to your computer, and edit pictures with graphics programs that are compatible with SharePoint.
Picture libraries work in the same way as document libraries, except that they are geared to storing the image file types. The picture library provides special views for looking at all the pictures in the library as a slideshow. It also provides enhanced features for editing and downloading pictures by integrating with Microsoft Picture Manager.
In this exercise, you will create a picture library for storing photographs of employees.
SET UP Open the SharePoint site where you’d like to create a picture library. If prompted, type your user name and password, and then click OK.
BE SURE TO verify that you have sufficient rights to create a library in this site. If in doubt, see the Appendix at the back of this book.
1. On the Site Actions menu; click More Options.
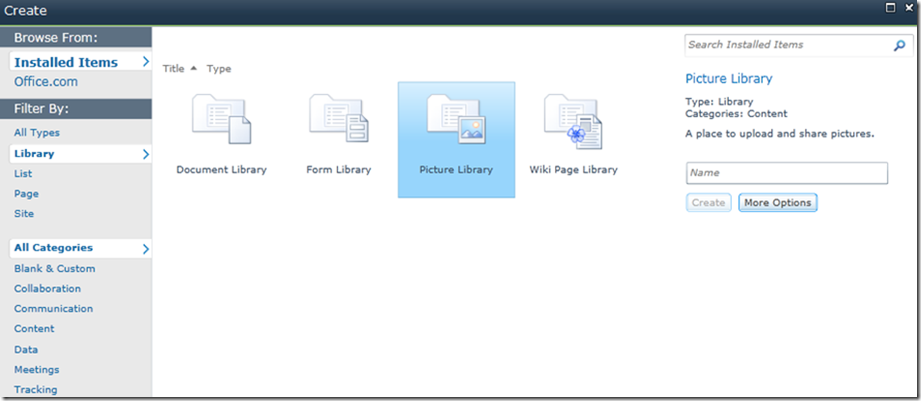
2. In the Create dialog, in the left pane, under Filter By, click Library.
3. Select Picture Library, and then click More Options.
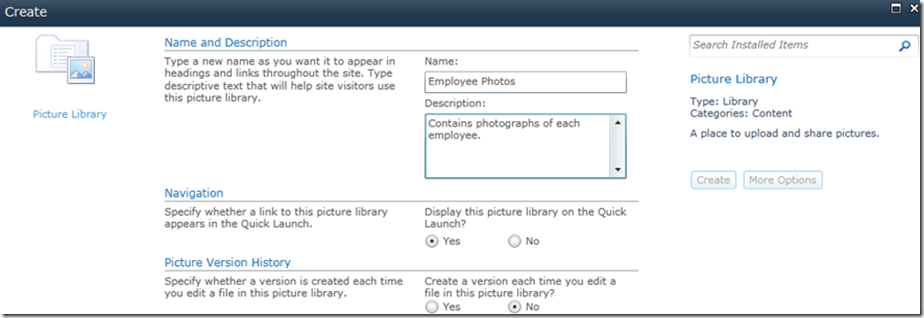
4. In the Create dialog, in the Name box, type Employee Photos.
5. In the Description box, type Contains photographs of each employee.
Leave all other options on the page at their default settings. You have entered all the necessary information to create a picture library.
6. Click Create.
The picture library is created, and a new Employee Photos picture library is displayed in the browser.
After the new library has been created, you can add pictures to it. Adding pictures to a picture library is like adding documents to a document library. In the following exercise, you will add an employee picture to the Employee Photos document library using the browser.
Practice Files You will use the practice file pjcov.jpg, located in the Documents\Microsoft Press\SBS_SPF\Chapter05 folder.
SET UP Open the SharePoint site where you’d like to upload a picture to a picture library. If prompted, type your user name and password, and then click OK.
BE SURE TO verify that you have sufficient rights to add a picture to this library. If in doubt, see the Appendix at the back of this book.
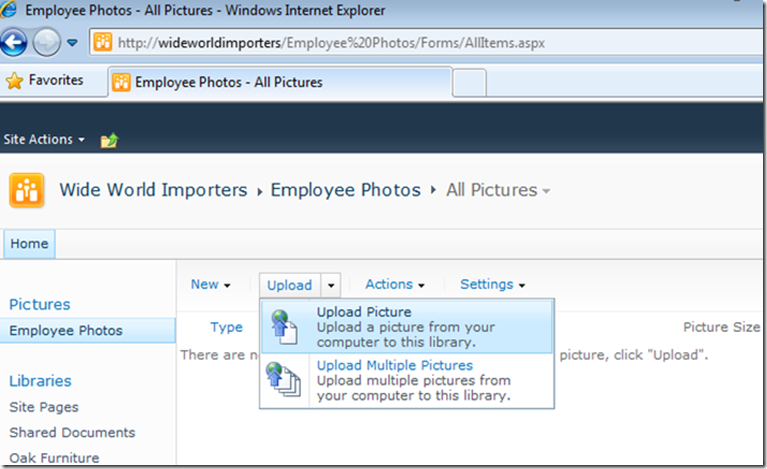
1. On the Quick Launch, click the Employees Photos picture library. The Employee Photos picture library is displayed.
2. On the menu bar, click Upload, and then select Upload Picture.
3. The Employee Photos - Select Pictures: dialog appears. Click Browse.
4. In the Choose File to Upload dialog, browse to the file that you would like to upload, such as pjcov.jpg, and then click Open.
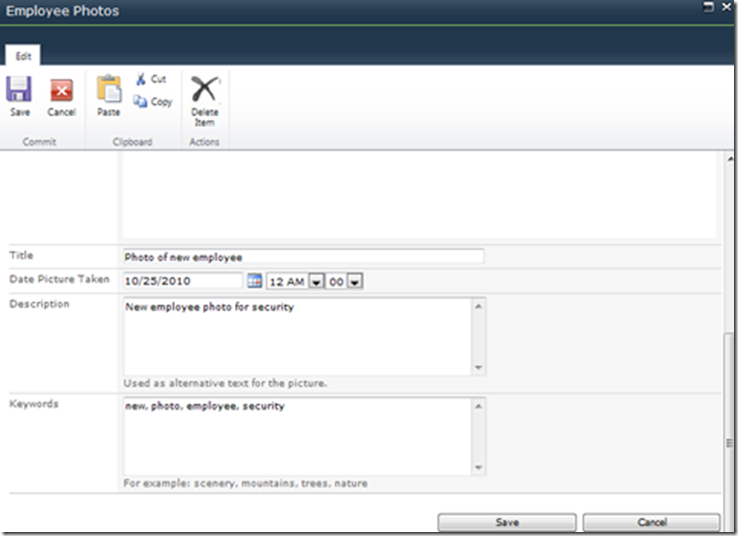
5. Click OK to confirm the selection and upload of the picture. The Employee Photos: pjcov dialog appears.
This page is used to provide metadata for the picture, including Name, Title, Date Picture Taken, Description, and Keywords.
6. Fill in the metadata if needed (Title, Date Picture Taken, Description, and Keywords), and then click Save.
The picture has been uploaded, and you are taken back to the Employee Photos picture library.
CLEAN UP Close the browser.


