New book: Inside the Microsoft Build Engine: Using MSBuild and Team Foundation Build, Second Edition
We’re excited to announce that Inside the Microsoft Build Engine: Using MSBuild and Team Foundation Build, Second Edition written by Sayed Ibrahim Hashimi and William Bartholomew (ISBN 9780735645240; 624 pages) is now available for purchase!
In today’s post, please enjoy an excerpt from Chapter 17, “Web Deployment Tool, Part 1,” which describes what MSDeploy is, and how it can be used for “online deployment” in which you deploy your application to the target in real time and “offline deployments” in which you create a package which gets handed off to someone else for the actual deployment.
Build has historically been kind of like a black art, in the sense that there are a few guys who know and understand build, and are passionate about it. But in today’s evolving environment that is changing. Now more and more people are becoming interested in build, and making it a part of their routine development activities. Today’s applications are different from those that we were building five to ten years ago. Along with that the process by which we write software is different as well. Nowadays it is not uncommon for a project to have sophisticated build processes which include such things as; code generation, code analysis, unit testing, automated deployment, etc. To deal with these changes developers are no longer shielded from the build process. Developers have to understand the build process so that they can leverage it to meet their needs.
Team Foundation Build (or Team Build as it’s more commonly known) is now in its third version. Team Build 2005 and 2008 were entirely based on MSBuild using it for both build orchestration as well as the build process itself. While this had the advantage of just needing to learn one technology MSBuild wasn’t suited for tasks such as distributing builds across multiple machines and performing complex branching logic. Team Build 2010 leverages the formidable combination of Workflow Foundation (for build orchestration) and MSBuild (for build processes) to provide a powerful, enterprise-capable, build automation tool. Team Build 2010 provides a custom Workflow Foundation service host that runs on the build servers that allows the build process to be distributed across multiple machines. The Workflow Foundation based process template can perform any complex branching and custom logic that is supported by Workflow Foundation, including the ability to call MSBuild based project files.
A common companion to build is deployment. In many cases the same script which builds your application is used to deploy it. This is why in this updated book we have a section, Part VII Web Deployment Tool, in which we dedicate three chapters to the topic. MSDeploy is a tool which was first released in 2009. It can be used to deploy websites, and other applications, to local and remote servers. You can use it to leverage MSDeploy and the Web Publishing Pipeline (WPP) in order to deploy your web applications. Also available is the theory of both MSDeploy and the WPP and a cookbook chapter which shows real world examples of how to use these new technologies. Once you’ve automated your build and deployment process for the first time you will wonder why you didn’t do that for all of your projects!
Chapter 17 – Web Deployment Tool, Part 1
Deployment of ASP.NET web applications has historically been very challenging and widely varied across different teams. In fact, if you put 10 different ASP.NET developers in a room and ask them how they deploy their applications today, you may hear a slew of different answers, some of which are outlined in the list that follows.
■ Manual FTP transfer
■ RoboCopy
■ psexec.exe
■ MSBuild
■ Microsoft System Center
■ .msi fi les that are manually installed
And the list goes on—you probably have a few others as well. There are several reasons that different groups use different tools, including the fact that there is no single recommended practice today, and that many tools that exist today don’t cover the broad spectrum of scenarios that exist. For instance, web deployments can be categorized into three different high-level scenarios, which include the following.
■ Deployment to web servers hosted with third parties
■ Deployment to web servers hosted in an organization’s network
■ Deployment to the local web server on the same machine
Most tools are optimized to perform a deployment to one of the scenarios listed, but not all three. That is where the Web Deployment Tool, also known as MSDeploy, comes in. MSDeploy handles deployment for all three scenarios, and in a consistent manner. In this chapter, we will introduce the Web Deployment Tool, show you how it integrates into Microsoft Visual Studio 2010, show its integration into IIS 7 and later, and show how to perform deployments.
Note Since we are dealing with deploying to the local IIS server in this chapter you will need administrator rights for many of the examples in this chapter. For example you will have to open Visual Studio as an administrator as well as opening the command prompt as an administrator.
Web Deployment Tool Overview
The Web Deployment Tool (MSDeploy) is a tool that is provided by Microsoft to assist in the following areas:
■ Deployment of web applications and sites
■ Migration of web applications and sites
■ Synchronization of web applications and sites from one location to another
MSDeploy consists of two major components; the tool itself and the Remote Agent Service. There are a few different ways that you can interact with MSDeploy; one is through the IIS 7 extension and the other is through the msdeploy.exe command-line utility. The Remote Agent Service is a Windows service that you can install on machines that you would like to deploy applications to. We will discuss the Remote Agent Service later in this chapter.
Synchronization is the heart of MSDeploy. With MSDeploy, we can synchronize a “source” with a “destination.” The concepts of source and destination are intentionally abstract and extensible. Source and destination targets are accessed via providers. There are many different providers built into MSDeploy, but you can create your own as well. We cover more providers later in this chapter in detail, but to give you an idea now, the providers include web applications, websites, web packages, and folders. You may be wondering what web packages are. Web packages are a new concept introduced with MSDeploy and Visual Studio 2010. We will now move on to discuss web packages in detail.
Working with Web Packages
When you are developing web applications using Visual Studio, there comes a time to deploy that application to different environments. Previous versions of Visual Studio did not have any built-in support for creating a self-contained artifact for the entire web application. Many times, people would take the contents of the website, throw them into a .zip fi le, and use that file to deploy from one environment to another. We are happy to say that with Visual Studio 2010, there now exists a way to create that much-needed artifact, which is known as a web package or deployment package. A web package is a self-contained .zip file that can be used to set up the application, along with its required fi les and related resources.
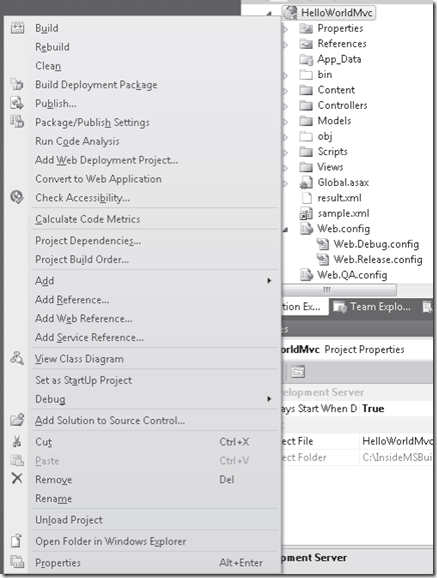
Inside Visual Studio 2010, you can right-click a web application and select Build Deployment Package to create this package. That menu option is shown in Figure 17-1.
If you click the Build Deployment Package option shown in this figure, then you should find a .zip file under the obj\CONFIGURATION\Package folder, where CONFIGURATION is the name of the current configuration that Visual Studio is using. In this case, the configuration was set to Debug, and the name of the project is HelloWorldMvc, so the package is located at obj\Debug\Package\HelloWorldMvc.zip. A web package can include the following:
FIGURE 17-1 Web Project context menu showing package option
■ Files
■ Access control lists (ACLs)
■ Certifi cates
■ Registry settings
■ Database scripts to be executed
■ Parameters (the user will be prompted for values upon sync)
■ Assemblies to be installed in the GAC
Now that we have discussed what packages are, and we’ve even shown how to create a package using all the default options, we will cover the different options when creating packages, and after that, we will show how you can take the created package and directly import it into an IIS 7 web server.
Note There are some limitations to the number of fi les and the total size of the packages that you should be familiar with. Those include the fact that the maximum fi le size that can be placed in a package is 2,147,483,647 bytes (Int.MaxValue) and the maximum number of fi les is 65,536. If you need to support more fi les, then you will have to use archiveDir instead of a package.
Package Creation
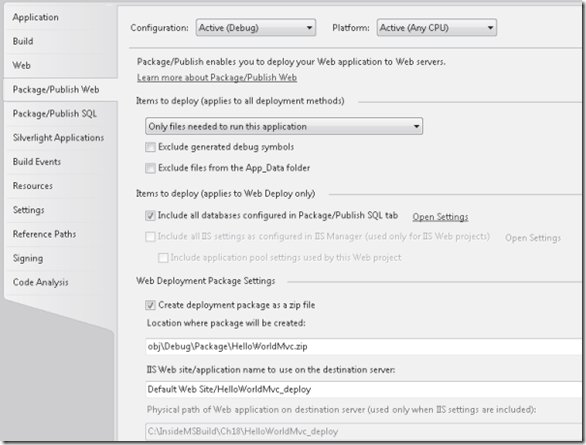
In the previous section, we showed how you can create a package using the Build Deployment Package context menu option in Visual Studio. We will now take a look at some of the different ways that you can customize the package that gets created. There are a few options inside Visual Studio that you can use to customize package creation. You can get to these options from the project’s Properties page. To get there, you can right-click the project, select Properties, and then click the Package/Publish Web tab. Figure 17-2 shows this tab.
FIGURE 17-2 Web Deployment Package options page
From this tab, we can set a few options, including which fi les to include in the package, whether a database should be included, where the package should be written to, and a few IIS Settings that will be used when the package is imported. We will go over these options here, but you should keep in mind that you can have much more control over the package creation process by editing the project fi le. We will thoroughly cover this in the next chapter, “Web Deployment Tool, Part 2”.
You can specify what fi le should be included in the package by selecting one of the options in the Items To Deploy drop-down list. These options are covered in Table 17-1.
Table 17-1 Items To Deploy Options
| Option | Description |
| Only Files Needed To Run This Application | MSDeploy will attempt to determine all the files that are required by your web application. It will include only those files. |
| All Files In This Project | Selecting this option will include all the files needed to run the application, plus all the other files that are a part of the project. |
| All Files In This Project Folder | This will include all the files needed to run the web application, as well as other files located in, or under, the projects directory. Some files are excluded, when it’s known that they are not needed. For instance, all files under obj\, as well as any file with an extension including .scc, . vssscc and vspscc, which are common extensions for files containing version control information. |
Underneath the Items To Deploy option, there are two check boxes that you can select:
■ Exclude Generated Debug Symbols
■ Exclude Files From The App_Data Folder
By default, your debug symbols will be included in the created package. This is true even for builds using Release confi guration. It is a good idea to keep your .pdb (program debug database) fi les in case you need to debug that particular build at some time in the future. Also, you may want to exclude the fi les from App_Data if your deployed applications will not be using a data source contained in that folder.
When you are creating a package, you can include database deployment with it. In order to do that, you will have to click the Include All Databases Confi gured In Package/Publish SQL Tab and set the database options on that tab. We will not cover database deployment in this chapter but we do discuss it in the next chapter “Web Deployment Tool, Part 2” in the “Database” section.
Only a couple other options allow you to specify inside Visual Studio. By default, the Create Deployment Package As A Zip File option is selected. When this is selected and the Build Deployment Package operation is executed, then your fi les are placed into a .zip fi le package. If this option is cleared, then the package is created to an archive directory. The archive directory contains all the fi les that the .zip fi le would.
Earlier, we stated that the package would be located in the obj folder. This is the default, but you can specify another location using the Location Where Package Will Be Created option.
Note that if you have specifi ed that the package be created as a .zip fi le, then you should specify a fi le name ending in .zip. Otherwise, you will receive an error when building the package.
The other three options are IIS settings that can be included in the deployment package. The fi rst is the default value for the website name and application name that should be used. The default value for that will follow this pattern: Default Web Site/WEB-PROJNAME_deploy, where WEB-PROJ-NAME is the name of the web project being packaged. If the package is imported using IIS 7, the user will be given the option to change those values. We will discuss that later in this chapter. If you are developing your web application or website using IIS instead of the ASP.NET Development Server (“Cassini”), then you will be allowed to specify the physical path. Otherwise, you will not be able to do that, and the default path (under inetpub) will be used when the application is imported. In the case of the sample application, IIS was not used, so the option is dimmed. If you have any deployment settings marked as secure, then you can enter the encryption password in the text box shown. You should know that those values are stored in plain text and not safely guarded, so use them with caution. Now that we have discussed how to create packages, we will move on to the topic of how packages can be installed.


