New book: Windows Communication Foundation 4 Step by Step
 We’re excited to announce that John Sharp’s Windows Communication Foundation 4 Step by Step is available! Please enjoy this sample section from Chapter 1.
Building a WCF Service
Visual Studio 2010 provides the ideal environment for building WCF services and applications. Visual Studio includes several project templates that you can use to build WCF services. You will use the WCF Service template to create a simple WCF service that exposes methods for querying and maintaining information stored in a database. The database used by the exercises in this book is the sample AdventureWorks OLTP database.
Note The script for creating the AdventureWorks OLTP database is provided with the downloadable samples for this book. The Introduction contains instructions on how to install and configure this database for use with the exercises in this book. You can also download the database from the CodePlex site; search for Sample Databases for Microsoft SQL Server 2008 (December 2009) Samples Refresh 4 and download the file AdventureWorks2008_SR4.exe. Note that there might be later versions of this database available, but the examples in this book have only been tested against the December 2009 release.
The AdventureWorks company manufactures bicycles and accessories. The database contains details of the products that the company sells, sales information, details of customers, and employee data. In the exercises in this chapter, you will build a WCF service that provides these operations:
· List the products sold by AdventureWorks
· Obtain the details of a specific product
· Query the current stock level for a product
· Modify the stock level of a product
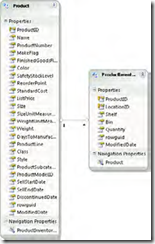
The data required by these exercises is stored in the Product and ProductInventory tables in the AdventureWorks database.
Figure 1-1 shows these tables. There is a one-to-many relationship between them; one Product record can be related to many ProductInventory records. This is because products are stored in one or more numbered bins in the warehouse, and each bin is on a named shelf. The tables are joined across the ProductID column.
Tables holding product information in the AdventureWorks database.
To simplify the code that you need to write to access the database, but also to ensure that the exercises are as realistic as possible, you will make use of the ADO.NET Entity Framework. This is part of the .NET Framework 4.0 and is provided with Visual Studio 2010. The purpose of the Entity Framework is to provide an object mapping between tables in a database and a set of objects that you can use in your applications and services. Using the Entity Framework, you can build an entity model that specifies the database and tables that you want to use and generate an object model that you can use to query these tables, as well as insert, update, and delete data. A major advantage of using the Entity Framework is that you can build applications that are independent of the underlying database management system, and you can access data without having to understand how the database management system works (you do not need to know SQL).
More Info The exercises in this book only scratch the surface of the Entity Framework. If you want more information about the Entity Framework, please visit the ADO.NET Entity Framework page at https://msdn.microsoft.com/en-us/data/aa937723.aspx.
Build the Entity Model for the WCF Service
1. Start Visual Studio 2010 and create a new project using the Class Library template in the Visual C# folder in the Installed Templates pane. Specify the following properties for the solution:
Property |
Value |
Name |
ProductsEntityModel |
Location |
C:\Users\YourName\Documents\Microsoft Press\WCF Step By Step\Chapter 1 (Replace YourName with your Windows user name.) |
Solution name |
ProductsService |
Note To save space throughout the rest of this book, I will simply refer to the path C:\Users\<YourName>\Documents\ as your Documents folder.
2. In Solution Explorer, in the ProductsEntityModel project, delete the Class1.cs file by using the following procedure:
a. Right-click the Class1.cs file, and then click Delete.
b. In the dialog box, click OK to confirm the deletion.
3. Add a new item to the ProductsEntityModel project:
❏ In Solution Explorer, right-click the ProductsEntityModel project, point to Add, and then click New Item.
4. In the Add New Item—ProductsEntityModel dialog box, in the Installed Templates pane click the Data folder under Visual C# Items. In the middle pane, click the ADO.NET Entity Data Model template. In the Name field, type ProductsModel.edmx, and then click Add.
The Entity Data Model Wizard appears.
5. In the Entity Data Model Wizard, on the Choose Model Contents page, click Generate From Database, and then click Next.
6. On the Choose Your Data Connection page, click New Connection.
The Choose Data Source dialog box appears.
Note If you have previously created database connections, the Choose Data Source dialog box might not appear, and the Connection Properties dialog box might be displayed instead. If this happens, click Change, and the Choose Data Source dialog box will appear.
7. In the Choose Data Source dialog box, click Microsoft SQL Server, and then click Continue or OK.
The Connection Properties dialog box appears.
8. In the Connection Properties dialog box, in the Server name field, type .\SQLExpress. In the Select or enter a database name field, type AdventureWorks, and then click OK.
The Entity Data Model Wizard resumes.
Note Specifying the server name as .\SQLExpress causes Visual Studio to connect to the local instance of SQL Server Express running on your computer.
9. On the Choose Your Data Connection page, verify that the Save Entity Connection Settings In App.Config As: check box is selected. Change the name to AdventureWorksEntities if necessary.
The connection settings used by the entity model will be stored in the application configuration file using this name as the key.
10. Click Next.
The Choose Your Database Objects page appears.
11. On the Choose Your Database Objects page, expand Tables and select (check) the Product (Production) and ProductInventory (Production) tables. Verify or specify the following values for the other items on this page, and then click Finish.
Item |
Value |
Pluralize or singularize generated object names |
Selected |
Include foreign key columns in the model |
Selected |
Model Namespace |
AdventureWorksModel |
Visual Studio generates the entity model and it is displayed. It should contain the two entities, Product and ProductInventory, and it should resemble the model shown earlier in Figure 1-1.
The Entity Framework generates classes for each entity defined by the entity model. In this case, the classes are called Product and ProductInventory. The classes contain properties for each field in the corresponding tables in the database.
The Entity Framework also generates a class called AdventureWorksEntities that provides methods that you can use to connect to the AdventureWorks database and populate a pair of collection properties called Products and ProductInventories with instances of the Product and ProductInventory classes. To retrieve data from the AdventureWorks database, you simply create an instance of the AdventureWorksEntities class and access the data through the Products and ProductInventories collection properties.
Notice that the ProductsEntityModel project contains an application configuration file. This file was generated by the Entity Data Model Wizard; it contains the information that the AdventureWorksEntities class requires to connect to the AdventureWorks database.
12. Build the project:
❏ In Solution Explorer, right-click the ProductsEntityModel project, and then click Build.
