New book: Microsoft Word 2010 Inside Out
 We’re excited to announce that Katherine Murray’s Microsoft Word 2010 Inside Out (ISBN 9780735627291; 912 pages) is now available for purchase!
You can find the book’s chapter-level table of contents and some colorful examples of this easy-to-use, beginner-focused guide to Microsoft Word in this previous post.
In today’s post, please enjoy an excerpt from Chapter 21, “Sharing Your Documents.”
Setting Up and Using Windows Live SkyDrive
If you are using an Office 2010 suite that doesn’t include SharePoint Workspace 2010,
another method of sharing files online is available to you. Using Windows Live SkyDrive,
you can post and share folders and files from Word, Excel, PowerPoint, and more. All you
need to log in to your SkyDrive account is your Windows Live ID. Here are the steps for
logging in and displaying your SkyDrive account:
- Open your Web browser and go to www.windowslive.com.
- Log in with your Windows Live ID and password.
- In the window that opens, click Office at the top of the screen.
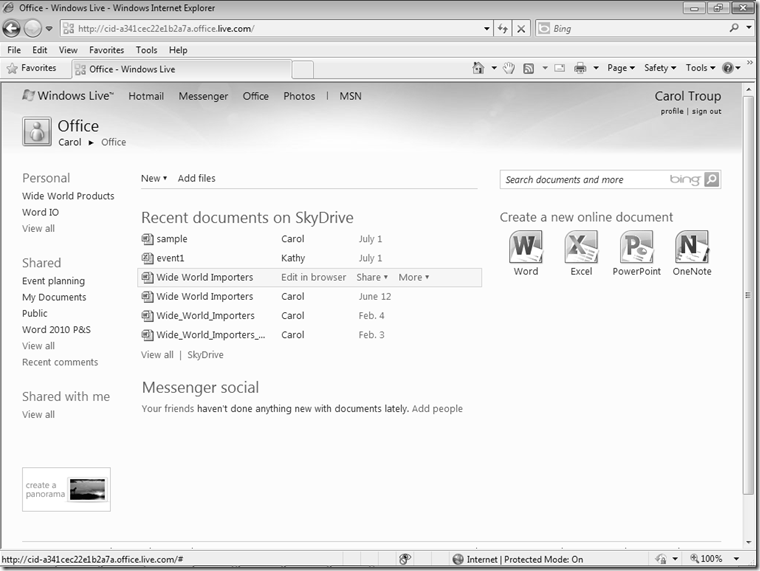
- A list of files (if any) you’ve previously posted to the site are displayed (see Figure 21-12).
- Add files by clicking the Add Files link.
Figure 21-12 You can easily add and share files in Windows Live SkyDrive.
Sharing a File
In order to share the files you post in Windows Live SkyDrive with others, you need to give
permissions to the individuals with whom you want to work so they can access the account
and the files. To set the necessary permissions and share the file, display your Windows Live
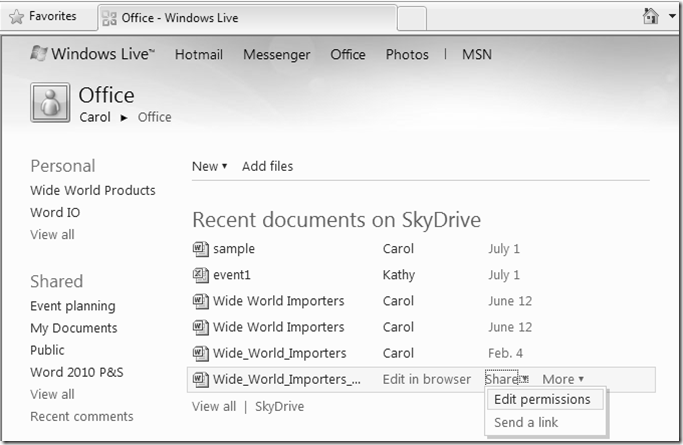
SkyDrive account and hover the mouse over the file you want to share. Links will appear at
the mouse position. Click Share then choose Edit Permissions (see Figure 21-13).
Figure 21-13 Edit permissions to give others access to your files.
In the Permissions window, click the Documents link, and in the Information area, click
People I Selected. Next, click Edit Permissions and, in the Add Specific People line, type the
e-mail addresses of those with whom you want to share the files in your My Documents
folder. Windows Live adds each person to the list at the bottom of the window.
Set the permissions level for each person by clicking the permissions arrow for each contact
and choosing one of the following options:
- Can View Files This option limits the recipient to read-only permissions; they won’t
be able to change the content of the file. - Can Add, Edit Details, And Delete Files This option assigns the necessary permission
to edit, reformat, and even delete the files in the folder.
After you set permissions, click Save. In the Send A Notification window, you can add a
message explaining what the link is for, and then click Send to send the message.
Save Your Document to a Shared Space
Word 2010 makes the process of saving files to your Windows Live SkyDrive as seamless as
possible. In fact, you can create an account and post files to SkyDrive in one smooth step
from within Word. Here’s how to do it:
- Open the document you want to save online.
- Click the File tab to display Backstage view.
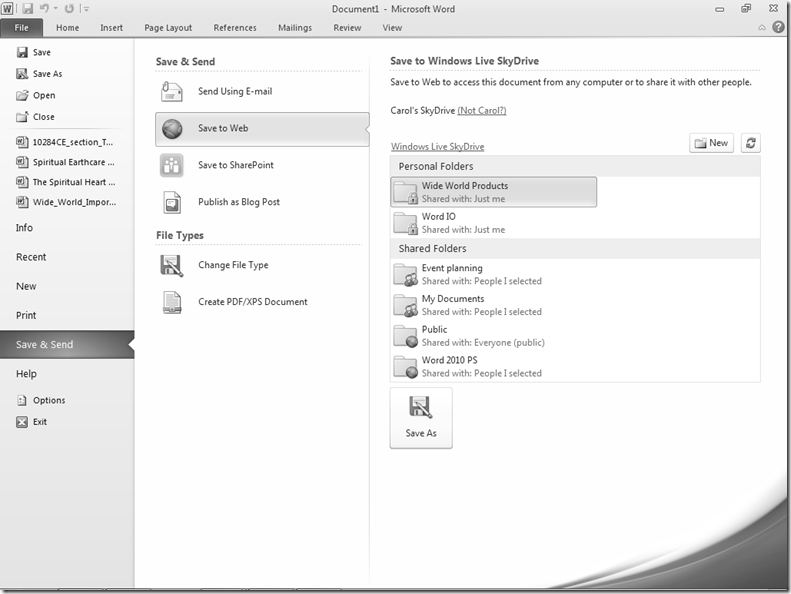
- On the Save & Send tab, click Save to Web; the options in the right panel change to
reflect your choice. - Click one of the folders shown or click New to sign in and create a new folder.
Word 2010 also gives you the option of switching users (in Figure 21-14, notice that the
option is “Not Carol?”). Word 2010 also gives you the option of signing in, if you haven’t
already done that. And if you haven’t previously created a Windows Live account, a button
will appear so you can do that from within Word.
To complete the save, simply click the folder you want to use or click New and follow the
on-screen prompts to save the file.
Figure 21-14 You can save a file directly to Windows Live SkyDrive from within Word.
Working with Network Locations
In the true spirit of Web and desktop integration, you can use Word to create, copy, save,
and manage folders and files that reside on a network, the Web, File Transfer Protocol (FTP)
servers, or in a shared workspace. After you create shortcuts to online folders (and if you
have the proper permissions), you can work with online files and folders as though they
were on your local computer. Of course, taking advantage of working with networks and
the Web implies that you are connected to a network or have a connection to the Internet.
The first order of business when you’re working with online documents involves configuring
your system so that you can access network places and FTP sites.
Creating a Network Location
Your first step involves mapping the network drive to specify to Windows the location of
the folder that will store the files. Although you can access documents and folders in existing
Network Places from within Word, you need to set up links to new network places by
using the Add Network Location Wizard.
To create a network place in Windows Vista or Windows 7, follow these steps:
- Click the Start button then click Computer.
- Right-click in the Computer window and then click Add A Network Location.
- Follow the steps on the Add Network Location Wizard pages to create a link to the
network place.
After you add a network location, you can access documents and folders on the network
place from within Word.
Linking to FTP Sites
In the same way that you access other network places, you can add FTP sites to your list of
Internet sites, if you have access to a network or the Internet. You can also add FTP sites to
your list of network places while you’re working in Word. To create shortcuts to FTP sites,
follow these steps:
- Click the Start button then click Computer.
- Right-click in the window and choose Add A Network Location to start the wizard.
- Click Next, then click Choose A Custom Network Location. Click Next again.
- Enter the FTP address in the form ftp://ftp.address.com. Click Next.
- Enter your login information for the FTP site or leave Log On Anonymously checked.
Click Next. - Type a name for the connection, click Next, and then click Finish.
The FTP site will be available in the Computer area of the Open and Save As dialog boxes.
You can now choose that location as needed for opening and saving your files.
Accessing Resources Stored in Network Locations
You access network locations in the same way that you access local files and folders—simply
navigate to the online file and folder locations in the Open dialog box and then create
a local shortcut to the document, if desired. To open an online folder or file by using the
Open dialog box, follow these steps:
- On the File tab, click Open.
- In the Open dialog box, scroll down the list on the left. Click the FTP site or network
folder you added. - Navigate to the file you want to open, select it, and click Open to begin working with
the file.
Saving Documents to a Network Location
In addition to opening files from network locations, you’ll probably want to save files to
online locations. The process of saving files to online locations is similar to saving files
locally. To save a newly-created file to an online location, follow these steps:
- On the File tab, click Save As.
- In the Save As dialog box, click the name of the network location or FTP site you
added. (Double-click any subfolders you want to access as well.) - In the File Name box, type a name for the file (or retain the current name) then click
Save.


