New book: Microsoft Office 2010 Inside Out
 We’re eager to announce that Microsoft Office 2010 Inside Out, by Ed Bott and Carl Siechert is available for purchase. For a glimpse of the Table of Contents, please visit this previous post.
This 960 page, 26 chapter book is the ultimate, in-depth reference for conquering Office 2010—from the inside out! This supremely organized book packs hundreds of timesaving solutions, troubleshooting tips, and workarounds—so you can really put Office 2010 to work.
Here is an excerpt from Chapter 15.
Chapter 15
Inside OneNote 2010
Microsoft’s OneNote is more than seven years old, and yet for many (if not most)
Office users it’s a complete unknown. That’s understandable: After all, in Office
2003 and Office 2007, OneNote was included only in a couple of Office editions,
but in Office 2010, OneNote is elevated to marquee status and is part of every edition.
So what is OneNote exactly? In this case, the program’s metaphor is absolutely accurate.
OneNote really is a digital replacement for a traditional loose-leaf notebook in which you
can save class notes, academic research, meeting minutes, or just about anything else you
might be tempted to put on a piece of paper. You can type, write, paste, print, snip, clip,
and send just about anything to OneNote, which saves each item on a page in a section of
a notebook. You can move the pieces around on the page, format text and resize pictures,
and arrange text into tidy outlines and lists.
Did we mention that OneNote notebooks are infinitely expandable? You can add new pages and sections, organize pages and subpages, and create as many new notebooks as
you can fit in your default storage location. Personal notebooks are stored on your hard drive; you can share and sync notebooks using Windows Live SkyDrive (or, on a home or business network, in a shared folder or SharePoint site).
Even if you already know OneNote well from an earlier version, you’ll want to read this chapter carefully. Office 2010 includes some significant new features and capabilities, as
well as a new file format.
For more details on the Office 2010 file format and potential issues, see “Choosing the Right
OneNote File Format” on page 494.
What’s in a OneNote Notebook?
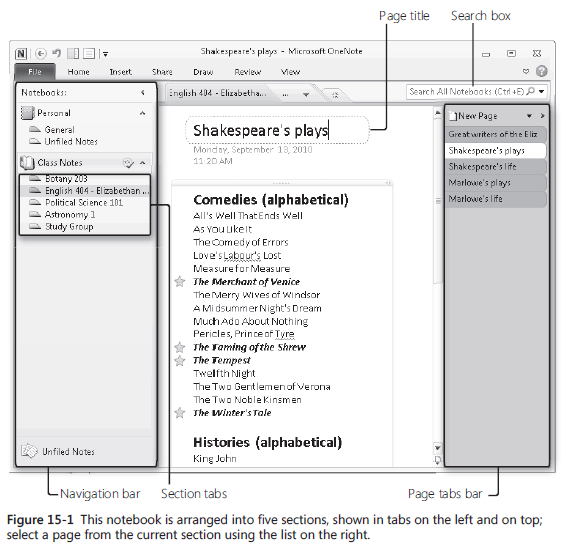
The basic organizational unit of OneNote is the notebook. When you create a new notebook or open a saved one, its icon and name appear in the Navigation bar on the left of the OneNote window, with the hierarchy of sections (and, optionally, section groups) shown in an indented list below the notebook icon and in tabs along the top of the contents pane. Selecting a section displays its contents in the page tabs bar on the right. Selecting a page from that list displays it in the contents pane. To begin adding your own notes, pictures, and web clippings, you can rename the default section and page or start adding new sections and pages of your own.
Figure 15-1 shows an open notebook containing five sections, with five pages in the open section.
You can organize your notes in ways that are much more sophisticated than the simple Class Notes notebook shown here. For example, as your collection of notes grows in size
and complexity, you can combine sections into section groups and gather a group of related pages together as subpages; although the previous OneNote version also allowed
you to create subpages, OneNote 2010 is the first that allows you to collapse them under a parent page. You can also create clickable links that open other OneNote pages, Office documents, Outlook items, or web pages.
For more on how to manage section groups and subpages, see “Expert Organizational Techniques”
on page 542. You’ll find details on how to link pages to one another and to external content
in “Using Links for Quick Connections” on page 530.
OneNote notebooks are automatically included in the Windows Search index. As a notebook grows in size (and especially when you use multiple notebooks), search becomes not just handy but essential. For the best results, use the search box above the page tabs bar.
You’ll find full details on how to use the OneNote search box in “Smart Search Strategies” on
page 534.
There’s no limit on the type of information you can save in a notebook. A partial list of
common tasks and activities includes the following:
● Taking notes during classroom lectures and lab sessions
● Organizing online research
● Recording the minutes of a meeting
● Planning a family reunion or vacation
● Creating to-do lists for short-term tasks and long-term goals
● Organizing manuals and warranty information for household appliances
Or anything that strikes your fancy, really.
There’s no right or wrong way to build a notebook or to organize its parts. Your personal preferences dictate how you can manage and use notebooks.
Creating and Opening OneNote Files
One striking difference between OneNote and other Office programs is the absence of a
Save button or menu. OneNote does indeed store its work in files, but it handles virtually
all of the management tasks for those files in the background. Except in rare circumstances,
you should never need to directly manipulate OneNote files.
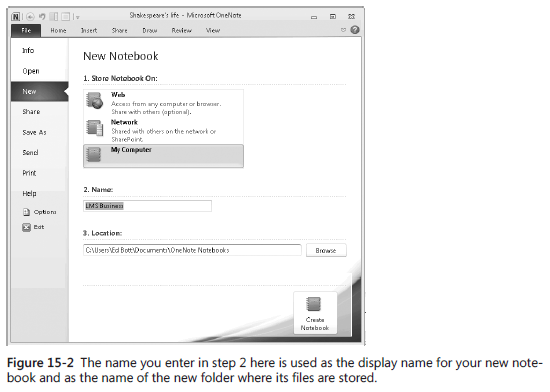
To create a new notebook, click File, and then click New. Follow the three-step process shown in Figure 15-2 to choose where you want the notebook files stored, and then click Create Notebook to create the new notebook files and begin working immediately.
In this chapter, we assume you’re creating and storing the new notebook locally (choose My Computer in step 1). The default location for all new notebooks is the OneNote Notebooks subfolder in the Documents folder of your user profile. You can specify an alternative location in the Location box.
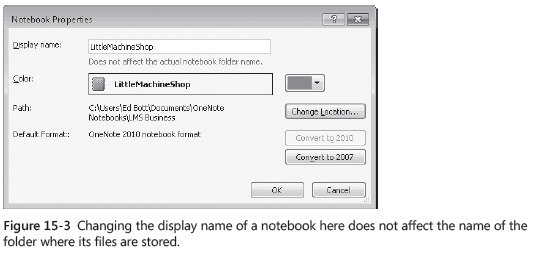
The text you enter in the Name box under New Notebook is used as both the folder name and the display name shown in the OneNote Navigation bar. After you create a notebook, you can change its display name at any time without affecting the original folder name. To do so, right-click the notebook name in the Navigation bar and click Rename. That opens a dialog box like the one shown in Figure 15-3, which also allows you to change the location or format of the notebook.
So what about the files themselves? Each notebook section is saved in its own file, using the default Microsoft OneNote Section format with a file name extension of .one. If you create a OneNote notebook by clicking File and then New in OneNote 2010, the program creates a tiny file with the name Open Notebook; this file is saved in Microsoft OneNote Table Of Contents format, with a file name extension of .onetoc2. Strictly speaking, the Open Notebook file isn’t needed. If you point OneNote to a folder filled with OneNote section files, it will ask you if you want to open the folder as a notebook, as shown here.
If you click Yes, OneNote creates a new OneNote Table of Contents file, using the folder name as the notebook display name and populating it with all section files contained within the folder.
Choosing the Right OneNote File Format
With OneNote 2010, Microsoft has changed the file format used for OneNote section files. When you create a new notebook in OneNote 2010, your files are automatically saved in the new file format. If you intend to share notebooks with people who are still using OneNote 2007, or if you want to preserve the ability to open those files on another computer using the earlier version of OneNote, you need to explicitly choose the alternative format.
To convert a notebook from OneNote 2007 format to OneNote 2010 format (or vice versa), right-click the notebook icon in the Navigation bar and then click Properties. Click Convert To 2010 or Convert To 2007 (the option for the current format will be unavailable). Note that this conversion can be made only on the entire contents of a notebook. When you make the conversion, the format you choose becomes the new default format for sections within that notebook.
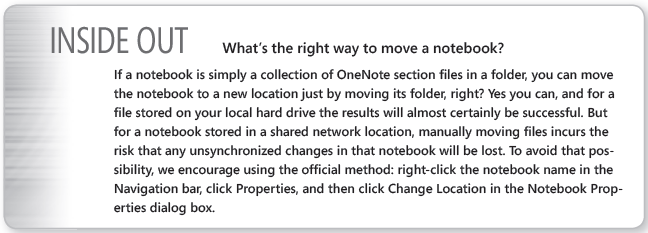
When you move a section from one notebook to another, OneNote automatically converts it to the default format of the destination notebook. If you use Windows Explorer to manually move a section file saved in OneNote 2007 format to a notebook whose default format is OneNote 2010, the older format is preserved, and you see an information bar warning you of potential incompatibilities when you open that section.
If you choose to save a notebook using the older OneNote 2007 file format, the following features are affected:
●The math equations feature is unavailable, and any existing equations are converted to static images.
●Context links (linked notes) and version information are permanently removed.
●Subpages are preserved but can no longer be collapsed in the pages tab list.
●The contents of the OneNote Recycle Bin for that notebook are permanently removed.
In addition, you must use OneNote 2010 format to save a notebook in a Windows Live SkyDrive folder or on a SharePoint site so that you can open and edit the notebook in a web browser using the OneNote Web App. OneNote 2010 allows you to open a notebook saved in OneNote 2003 format, but that notebook is opened in read-only mode. If you convert a notebook from OneNote 2003 format to either OneNote 2007 or 2010 format, the conversion is permanent and cannot be undone.
You don’t need to manually save OneNote files. OneNote automatically saves your work every 30 seconds and when you close a notebook or the program itself. If you’ve just made a large number of changes and you want to force a save instead of waiting for the next automatic save, press Ctrl+S.
Filling a Notebook with Text, Pictures, Clippings, and More
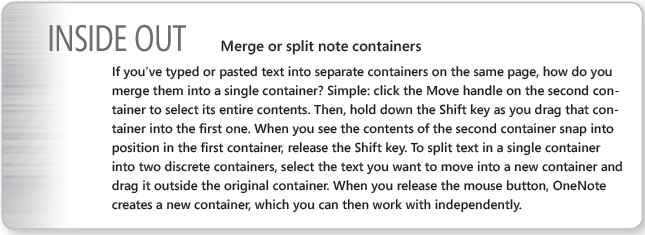
Every time you type, paste, or otherwise insert a new item on a notebook page, OneNote creates a note container for that item. Note containers can hold text, pictures, audio and video clips, handwriting, and clippings from a web page or from the screen. The initial size of the container matches the size of the object you’re creating or inserting; if you click and begin typing, a new note container is created immediately and expands in width and depth to accommodate your input.
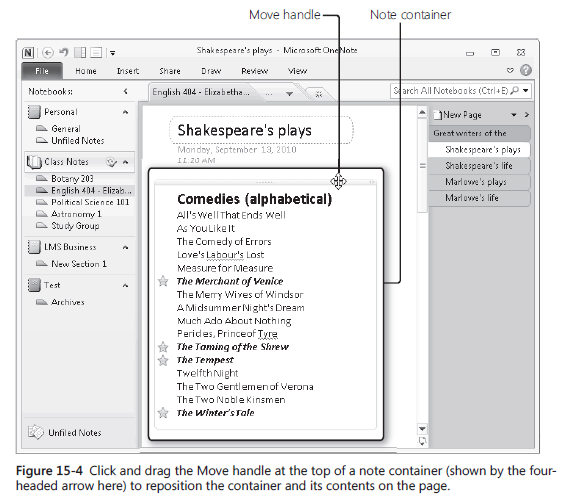
Note containers are normally invisible. To see the container, move the mouse pointer over its contents, click to select the contents, or position the insertion point within the container. Figure 15-4 shows a note container, with the pointer positioned over the Move handle at the top. Click and drag the handle to move the container and its contents to a new position on the page. Click the Move handle to select the entire container so that you can cut, copy, or delete it and its contents. Click the sizing handle in the upper right corner to make the container wider.
We can’t understand why anyone would want to hide note containers permanently, but if you do, there’s an option for that: click File, and then click Options. On the Display tab,
clear Show Note Containers On Pages.
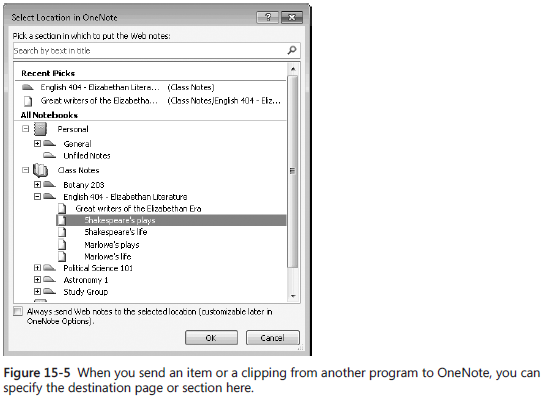
In the remainder of this section, we discuss the specifics of how to work with different types of content that you enter directly or paste from the Clipboard—text, pictures, equations, and ink, for example. But you can also send items directly to OneNote by using the Screen Clipping tool and Send To options in Outlook and Internet Explorer. When you send a web clipping, a screen clipping, or an Outlook item to OneNote, you see a dialog box like the one shown in Figure 15-5. If you choose a section from any open notebook, the item is sent to a new page in that notebook; you can also choose a specific page within a notebook and send the item to that page, where it’s placed at the bottom of the page, below any existing content.
Text
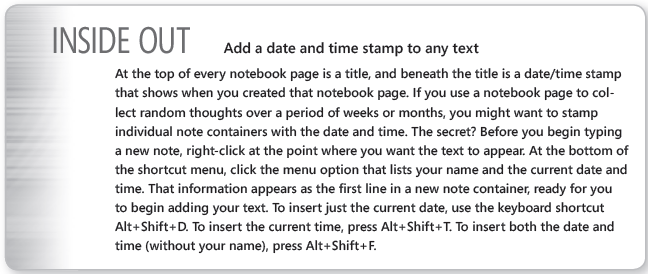
Entering text from the keyboard is the simplest (and probably the most common) way to fill a notebook. Click to position the insertion point on the page, and start typing. (You can also paste text into a page, with or without formatting.) The text you enter or paste appears in a single note container.
OneNote supports basic outlining functions for text. Press Enter to create a new paragraph, and then change the outline level for that paragraph by pressing Tab (or Shift+Tab to promote a paragraph to a higher level.)
You can move any paragraph up or down or adjust its outline level by dragging it. You can also use keyboard shortcuts: press Alt+Shift and then use the Up or Down Arrow key to move the paragraph up or down in the outline; use Alt+Shift and the Right or Left Arrow key to demote or promote a paragraph in the outline. When you move the mouse pointer over a paragraph, a Move button appears to its left. Move the mouse pointer over the button, and the pointer turns to a four-headed arrow; click to select the entire paragraph and move it up, down, left, or right. In the example shown here, the mouse pointer is to the right of “Christopher Marlowe,” so the Move button appears to the left of that line.
