New book: Microsoft SharePoint 2010 Administrator's Companion
 Finally, Microsoft SharePoint 2010 Administrator's Companion (Microsoft Press 2011, 1184 pages), by Bill English, Brian Alderman, and Mark Ferraz, is available for purchase.
The book’s chapter-level Table of Contents can be found from this earlier post.
Here is an excerpt from Chapter 5, “Using Windows PowerShell to Perform and Automate Farm Administrative Tasks.”
C H A P T E R 5
Using Windows PowerShell to Perform and Automate Farm Administrative Tasks
■ Using Windows PowerShell: The Basics 195
■ Working with SharePoint 2010 Management Shell 210
■ Examples of SharePoint Administrative Tasks 234
Over the last couple of years, some SharePoint administrators have recognized the power of Windows PowerShell and have tried to use it, but with no built-in support,
most administrators have found it too difficult. Microsoft SharePoint Foundation 2010 and Microsoft SharePoint 2010 now contain native support for Windows PowerShell
with the SharePoint 2010 Management Shell. This chapter explores the SharePoint 2010 Management Shell and how to use Windows PowerShell to accomplish some basic
administrative tasks. Chapter 12, “Using Windows PowerShell to Manage Search Services and FAST Search,” builds on the information in this chapter, using search administrative tasks and scenarios.
There is an enormous amount of information available about Windows PowerShell on the Internet and published in books. The aim of this chapter is not to teach you Windows PowerShell, but to show you how to become familiar with the new Windows PowerShell cmdlets, pronounced command-lets, introduced in SharePoint 2010. However, for those who are relatively new to Windows PowerShell, this chapter begins by reviewing the basics.
Using Windows PowerShell: The Basics
Traditionally, administrating a server on which Microsoft products are installed has involved learning a number of administrator tools, such as graphical interfaces based on
the Microsoft Management Console (MMC), known as MMC snap-ins; many commandline utilities; and perhaps a Windows Management Instrumentation (WMI) provider or
Component Object Model (COM) objects that administrators can interface with using VBScript. Until the release of SharePoint 2010, SharePoint Products and Technologies were no different than other Microsoft products in the number of available administrator tools. Administrators needed to rely on the Central Administration website, the SharePoint Products Configuration Wizard, and the command-line tools stsadm and psconfig. No one tool could do everything.
Each Microsoft product also had its own community, which created or extended the built-in tools to make an administrator’s life easier. The tools an administrator needed were available, but they were scattered among many sources. This is all changing now that every administrative task can potentially be scripted or automated using Windows PowerShell.
The concept for Windows PowerShell is based on a study commissioned by Microsoft in the early 2000s. Originally based on the POSIX shell as specified in IEEE 1003.2 and influenced by Perl and UNIX shell, Windows PowerShell is a command shell and scripting language that is far more powerful than using the Windows command prompt (cmd.exe). Administrators love command-line tools because they can be batched together to automate repetitive tasks or to ensure that a set of tasks are completed again exactly as they were the last time they were executed. Windows PowerShell cmdlets offer administrators these same benefits. You can still use the traditional tools, but Windows PowerShell adds flexibility and breadth that the traditional tools do not provide.
NOTE Community-led initiatives for previous versions of SharePoint include extensions to stsadm, published at https://stsadm.codeplex.com/ ; Windows PowerShell scripts for Windows SharePoint Services 3.0 and Microsoft Office SharePoint Server 2007 that can be found at https://sharepointpsscripts.codeplex.com/ ; and the CodePlex project “PowerShell SharePoint Provider” for Windows SharePoint Services 2.0 and Microsoft SharePoint Portal Server 2003, available at https://www.codeplex.com/PSSharePoint.
This section covers the following Windows PowerShell topics.
■ What’s new in the Windows PowerShell 2.0 release
■ Architecture
■ Installing Windows PowerShell
■ Remote management
What’s New in Windows PowerShell 2.0
Windows PowerShell 2.0 offers a number of new features and improvements from Windows PowerShell 1.0, including
■ New cmdlets
■ Remote Management and background jobs
■ Windows PowerShell Integrated Scripting Environment (ISE)
■ Windows PowerShell debugger
■ Modules
■ Advanced functions
■ Transactions
■ Steppable pipelines
■ Events
■ Script internationalization
■ Online Help
As an IT professional, many of these new features will interest you. For example, you can remotely manage all the servers in your farm from your desktop, and when you become competent in Windows PowerShell, you will be able to create your own advanced functions using the Windows PowerShell scripting language that you can then use as cmdlets. In Windows PowerShell 1.0, the only way to do this was with a developer, using code and deploying files onto your farm.
MORE INFO For more information about what’s new in Windows PowerShell 2.0, see https://technet.microsoft.com/en-us/library/dd378784.aspx and https://en.wikipedia.org/wiki/Windows\_PowerShell. Other resources can be found by using your favorite Internet search engine and entering the keywords What’s New in Windows PowerShell 2.0 or the feature names listed previously.
Windows PowerShell Architecture
Why is Windows PowerShell so important? Windows PowerShell scripting language is object orientated, built on top of the .NET Framework—.NET Framework 3.5 for Windows PowerShell 2.0—and based on the C# (pronounced C-sharp) programming language. This allows Windows PowerShell to access the underlying object models, to pass objects and their values (properties) from one Windows PowerShell command to another. This means you have almost the power of a developer without having to write, compile, and deploy code. The disadvantage is that it can be all too easy to cause havoc in your installation.
When the Microsoft product teams consider the tools they want to provide to administrators, they build them first on Windows PowerShell. Hence, with the installation of SharePoint 2010, a large number of administrative tasks can be completed natively with Windows PowerShell cmdlets, with no need to install software from community-led initiatives. If any additional cmdlets are required, you can create them using Windows PowerShell scripts and the Advanced Functions feature in Windows PowerShell 2.0, and developers within your organization can create new cmdlets. Using Windows PowerShell to help administer SharePoint is the way of the future, so it’s important to start learning to use the built-in cmdlets as soon as possible.
At first, using Windows PowerShell may seem daunting, but if you have used the command prompt (cmd.exe) or have created batch files, you will soon be comfortable with the Windows PowerShell console. In fact, you can even use the Windows PowerShell console instead of the command prompt, because all the commands you currently use, such as dir, cd, and ping, work equally well in the Windows PowerShell console as they do in the command prompt.
You may need to enclose command-line parameters in quotation marks to use the commands from within Windows PowerShell, but that is about the only modification you need to make. So there is no need to use two different windows to complete your administrative tasks.
NOTE By default, the command prompt has a black background, but this can be changed.
Right-click the title bar and then select Properties. A Properties dialog box appears with
four tabs: Options, Font, Layout, and Colors. You can change the font, background color,
window size, and more. See the sidebar titled “Command-line Shortcuts” later in this chapter
for more information about similarities between the two command-line interfaces.
There are two ways of using Windows PowerShell: either through a command-line interface, known as the Windows PowerShell console (powershell.exe), or through the Windows PowerShell Interactive Scripting Environment (ISE) graphical interface (Powershell_ise.exe). This chapter concentrates on using the Windows PowerShell console.
MORE INFO Following are some resources for more information on Windows PowerShell.
■ Windows PowerShell 2.0 Administrator’s Pocket Consultant, by William R. Stanek
(Microsoft Press, 2009)
■ “Scripting with Windows PowerShell” on the Microsoft TechNet Script Center at
https://technet.microsoft.com/en-us/scriptcenter/dd742419.aspx.
■ An aggregation of Windows PowerShell bloggers at https://pipes.yahoo.com/powershell/englishbloggers.
■ A short introduction to Windows PowerShell in a free eBook at
https://blogs.msdn.com/mapo/archive/2007/07/17/windows-powershell-freeebook-at-microsoft.aspx.
■ Mastering PowerShell, by Dr. Tobias Weltner, a free eBook at
https://blogs.msdn.com/powershell/archive/2009/07/17/free-powershell-v1-bookfrom-
the-makers-of-powershell-plus.aspx.
Command-line Shortcuts
All the same shortcuts that you use at the command prompt work in the Windows PowerShell console.
■ To pause the display temporarily when a command is writing output, press Ctrl+S, and then press Ctrl+S to resume or press Ctrl+C to terminate execution.
■ By default, up to 50 commands are stored in a buffer. You can move through the buffer by using the up arrow and down arrow keys to scroll through the commands so you can easily execute the next or a previous command.
■ The buffered commands can be displayed from a pop-up window by pressing F7. Select the command you want to execute using the arrow keys, press Enter or F9, type the number of the command you want to execute, and then press Enter.
■ The buffered commands can be displayed from the command line by typing the first few characters of the command you want and then pressing F8. The command-line interface searches though the history buffer for the first command that begins with the characters you typed.
■ Using the auto completion capabilities of the Windows PowerShell command shell, you never need to type the complete name of a command. Type in the first few characters of the command you want and press Tab to cycle through all commands and available file names and folders in alphabetic order, or click Shift+Tab to cycle through the commands in reverse order.
■ To copy and paste text, right-click the command-line interface title, click Mark, highlight the text you want to copy, and then right-click the window title again to copy the selected text automatically into the Clipboard.
■ Commands are case insensitive and can be batched together and placed in a text file. By calling that file in the command-line window, the commands in the file are executed. These text files have an extension of .bat, .cmd, .vbs, or in the case of Windows PowerShell, .ps1. Commands in these files can be executed outside the command window by calling the file from the Run line or by double-clicking the file in Windows Explorer.
■ Arguments can be sent to the command file being called. The arguments passed to your command file are stored in memory and accessed using variables. You can also create variables to store values needed as you complete a task. In Windows PowerShell, you reference variables by preceding the variable name by a dollar sign ($).
■ Output from a command can be directed to a file named to the right of >. This will overwrite the file if it already exists. To redirect the output but append it to the file, use >>. Error messages that result from running a command can be redirected to a file named to the right of 2>, or they can
be appended to a file by using 2>> or sent to the same destination as the
standard output by using 2>&1.
■ You can execute many commands on the same line. In Windows PowerShell, you separate commands using the semicolon character (;).
■ Redirect the output of one command as input to another command by separating both command with a ‘|’, known as a pipe. For example, dir | sort | more
will display a sorted list of files in the current directory one page at a time. The pipe is the symbol located above the backslash on most keyboards.
■ Aliases and shortcuts can be substituted for commonly used commands. For example, the ForEach-Object cmdlet can be replaced with ForEach or even
with the percentage character, %. The question mark character, ?, can be used in place of Where or Where-Object. You can also use Get-Alias to return a list
of aliases. Note that the use of aliases in scripts can make them difficult to understand.
Examples of these shortcuts can be found throughout this book.
Installing Windows PowerShell
Computers running Windows 7 or Windows 2008 R2 or later include Windows PowerShell 2.0 and Windows Remote Management (WinRM) 2.0. If you want to manage computers using earlier operating systems locally or remotely using Windows PowerShell, you will need to install both Windows PowerShell 2.0 and WinRM 2.0.
Installing Windows PowerShell 2.0 and WinRM 2.0
A copy of Windows PowerShell 2.0, together with WinRM 2.0, can be downloaded from https://support.microsoft.com/default.aspx/kb/968929. Ensure that you obtain the correct version; for example, if you install SharePoint on the 64-bit version of Windows Server 2008, you need to download and install the Windows 2008 x64 version of Windows PowerShell 2.0 and WinRM 2.0. After they are installed, you will find the executable for the Windows PowerShell
ISE in the folder %SystemRoot%\System32\WindowsPowerShell\v1.0.
NOTE If you going to be a heavy user of ISE, consider placing a shortcut for this program
on your taskbar. On the Start menu, right-click Powershell_ise.exe and then select either
Pin To Taskbar or Pin To Start Menu.
To use Windows PowerShell ISE on Windows 2008 R2, you need to add the Windows PowerShell ISE feature. This feature can be added using Windows PowerShell commands or the Server Manager. After you have installed SharePoint 2010 or SharePoint Foundation 2010, perform the following steps.
Using Windows PowerShell: The Basics
■ Using Windows PowerShell, enter the following commands.
Import-Module Servermanager; Add-WindowsFeature "PowerShell-ISE"
■ Using Server Manager, complete the following procedure.
1. Start the Server Manager, click Features, and then select Add Features.
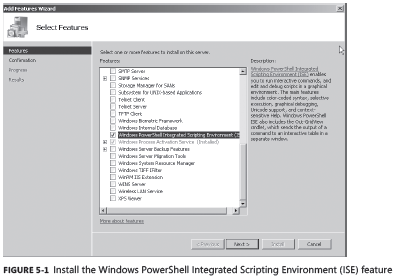
2. In the middle pane of the Add Features Wizard, select the check box for Windows PowerShell Integrated Scripting Environment (ISE) as shown in Figure 5-1 and then click Next.
3. On the Confirmation Installation Selection screen, click Install.
4. On the Installation Results screen, click Close.
NOTE You may need to restart your server after the installation completes.
Managing Systems Remotely with WinRM
Windows PowerShell 2.0 introduces a new capability to manage your systems remotely from your desktop by using either WinRM or Internet Information Server (IIS). WinRM is often the mechanism used by administrators and the subject of this section. Remote Management involves not just the ability to run Windows PowerShell locally on your machine using the few commands that allow you to specify a computer name as an optional parameter; it also includes methods known as fan-in and fan-out remoting and background jobs.
■ Fan-in remoting This allows many administrators to connect to an instance of Windows PowerShell running on the same remote servers—this is not supported out of the box in SharePoint 2010.
■ Fan-out remoting This allows you to send a single Windows PowerShell command to run multiple remote instances of Windows PowerShell in parallel, and the results of those commands will be returned to your desktop. You would use this if you need to complete the same task on multiple servers. You no longer need to establish a Remote Desktop connection to each server in turn and then execute the commands locally on that server. You can create a set of Windows PowerShell commands and pass the server names to those commands, which then completes the same commands sequentially for each server whose name you provide.
■ Background jobs Windows PowerShell 2.0 supports both local and remote background jobs. These are commands that execute asynchronously in the background with no interaction. When you execute a command in the background, the command prompt is returned immediately so that you can continue to execute other commands.
Configuring for WinRM
The WinRM Windows service must be started and configured for remoting on both your local computer and the server on which you want to remotely run commands. To find out if your server is running WinRM, type Get-service winrm To check if it is running on a remote server, type Get-service winrm –computername $server_name.
On your SharePoint server, this service should be running; however, if your local computer is running Windows 7 (or Windows Vista with Windows PowerShell 2.0 and WinRM 2.0 installed), you may need to start this service and enable remoting. You can do this by typing one command, Enable-PSRemoting, which executes two additional commands, Set-WSManQuickConfig and Start-Service WinRM.
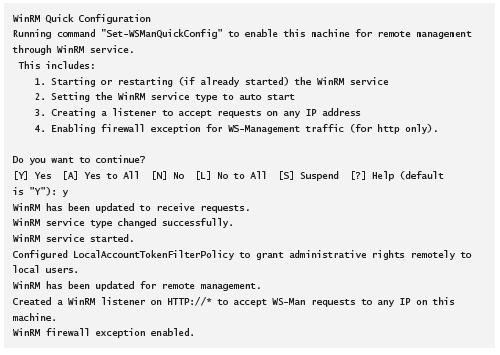
The output to the Enable-PSRemoting command will look similar to the following example.
On a computer running a 64-bit version of Windows, you may see an additional confirmation
message.
What do you think of this book? We want to hear from you! Microsoft is interested in hearing your feedback so we can continually improve our books and learning resources for you. To participate in a brief online survey, please visit:


