New book: Microsoft Outlook 2010 Inside Out
 Kenyon Brown here. We’re excited to announce that Jim Boyce’s Microsoft Outlook 2010 Inside Out (ISBN: 9780735626867; 1120 pages) is now available for purchase!
You can find the book’s chapter-level table of contents and an introduction to this in-depth guide to Microsoft Outlook in this previous post.
In today’s post, please enjoy a deeper look at Chapter 19, “Scheduling Appointments.”
Chapter 19
Scheduling Appointments
For most of us, a calendar is a basic tool for organizing our lives, both at work and
at home. With the calendar in Microsoft Outlook 2010, you can schedule regular
appointments, all-day and multiday events, and meetings. You can view your schedule
almost any way you want. In addition, you can share your calendar with others, which is
a big help when scheduling organizational activities.
This chapter first describes the calendar and explains how to work with the basic Calendar
folder view. Then you’ll learn how to schedule and work with appointments and events.
You’ll also learn about the more advanced view options for the calendar and about how to
share your calendar and free/busy information and view different time zones.
Both this chapter and the next focus on the features available in the Office Outlook 2010
Calendar folder. This chapter covers appointments and events; Chapter 20, “Scheduling
Meetings and Resources,” discusses how to handle meetings and resources.
Calendar Basics
The Outlook 2010 Calendar folder provides a central location for storing vast amounts of
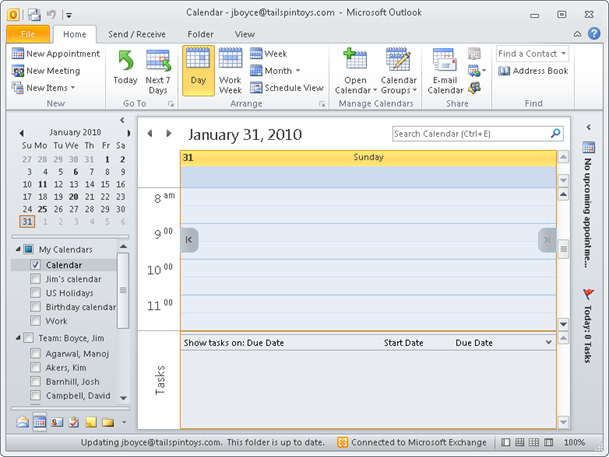
information about your schedule. Figure 19-1 shows a basic one-day view of a calendar.
You see this view when you click the Calendar icon in the Navigation pane to open the
folder and then click Day on the Home tab of the ribbon. This example calendar contains
no appointments yet, and no tasks are listed in the Daily Task List.
Figure 19-1 The Day view of the Outlook 2010 calendar.
Understanding Calendar Items
The Outlook 2010 calendar can contain three types of items: appointments, events, and
meetings.
An appointment, which is the default calendar item, involves only your schedule
and time and does not require other attendees or resources. The calendar shows
appointments in the time slots corresponding to their start and end times.When an appointment lasts longer than 24 hours, it becomes an event. An event is
not marked on the calendar in a time slot, but rather in a banner at the top of the
day on which it occurs.An appointment becomes a meeting when you invite other people, which requires
coordinating their schedules, or when you must schedule resources. Meetings can
be in-person meetings established through Outlook 2010 meeting requests. (Meetings
can also be set up online using Microsoft Office Live Meeting, which is a separate
application.) In this chapter and in Chapter 20, we’ll look at meeting requests in
Outlook 2010.For in-depth information about meetings initiated in Outlook 2010, see Chapter 20, “Scheduling
Meetings and Resources.”You can create an appointment in any of these ways:
Click New Appointment on the Home tab.
When any other Outlook 2010 folder is open, click the arrow next to New Items on
the toolbar, and then choose Appointment.Click a time slot on the calendar (or drag to select a time range), and simply type the
subject of the appointment in the time slot.For detailed information about creating appointments and using the appointment form, see
the section “Working with One-Time Appointments,” on page 483.Using the Time Bar
When you choose a calendar display of 7 or fewer days, the Time Bar appears, displaying
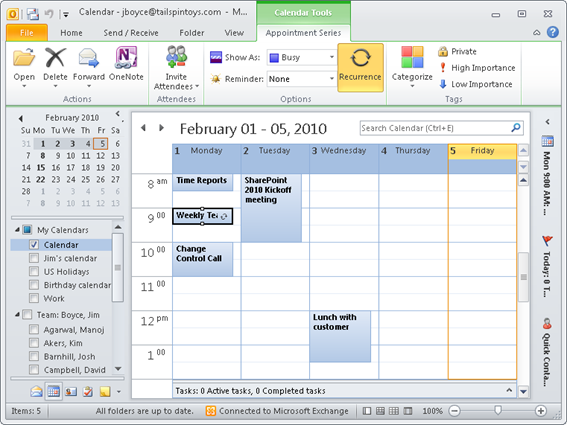
30-minute time increments by default. Figure 19-2 shows the Time Bar set to 30-minute
increments, with a selection of appointments on the calendar, the shortest of which is 30
minutes.Figure 19-2 By default, the Time Bar is set to display 30-minute increments.
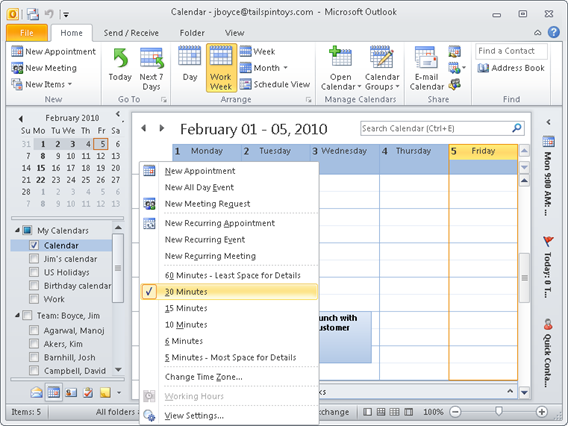
You can set the Time Bar to display different time increments. To do so, begin by right-clicking
the Time Bar to display the shortcut menu shown in Figure 19-3.Figure 19-3 Use the Time Bar shortcut menu to change the time increment.
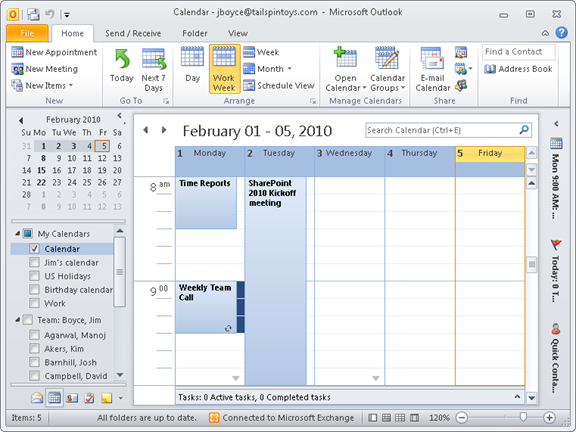
If you want to change the time scale to 10 minutes, select 10 Minutes; subsequently, the
30-minute appointment takes up three time intervals instead of one, as shown in Figure
19-4.Figure 19-4 The Time Bar has been changed to display 10-minute increments.
