New book: Microsoft Outlook 2010 Step by Step
We’re happy to announce that Microsoft Outlook 2010 Step by Step (ISBN 9780735626904; 576 pages) is now available for purchase! In this book, veteran authors Joan Lambert and Joyce Cox use the popular step-by-step approach to teach you how to manage e-mail messages; organize your inbox, contacts, and task lists; manage and share your calendar; and much more.
View this previous post for a chapter-level table of contents and excerpt from the Introduction.
In this post, we offer an excerpt from this book’s Chapter 7, “Organize Your Inbox.”
7 Organize Your Inbox
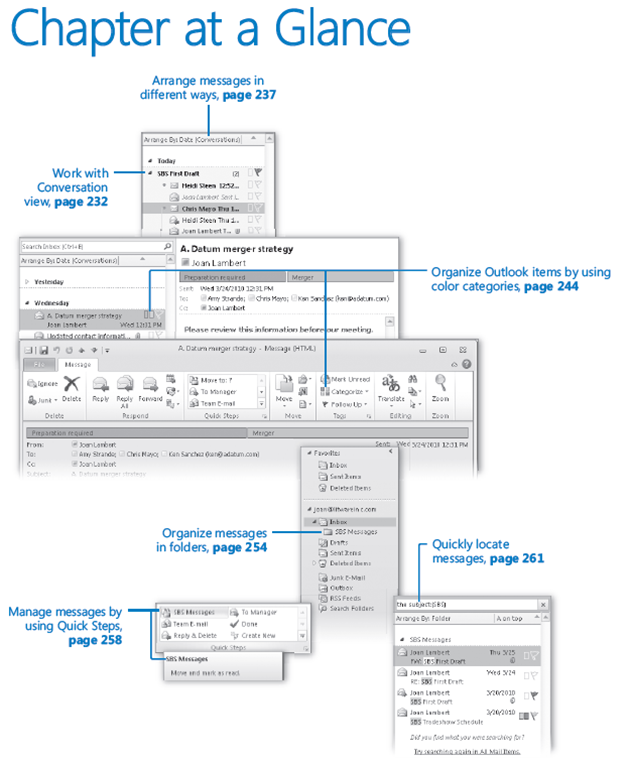
In this chapter, you will learn how to
✔ Work with Conversation view.
✔ Arrange messages in different ways.
✔ Organize Outlook items by using color categories.
✔ Organize messages in folders.
✔ Manage messages by using Quick Steps.
✔ Quickly locate messages.
✔ Print messages.
✔ Delete messages.
You can use Microsoft Outlook 2010 to manage multiple e-mail accounts, including multiple Microsoft Exchange Server accounts with their associated contacts, calendars, and so on. Even if you use Outlook only for sending and receiving e-mail messages, you can rapidly build up a mass of messages that make it difficult to locate information. Fortunately, Outlook is designed to act as a complete information-management system; it provides many simple yet useful features that enable you to organize messages and other Outlook items and to quickly find information that you need.
Outlook 2010 automatically handles certain types of organization for you. In your Inbox, Outlook makes it easy to follow related messages (message threads) from multiple people by displaying the messages in Conversation view. Outlook Search almost instantly locates items that contain specific content, and it allows you to save search results as Search Folders in which you can view up-to-date search results at any time.
You can organize items in Outlook by storing related items in folders and by assigning color categories to related items.
In this chapter, you’ll work with Conversation view to locate different levels of messages in a series. You’ll display the messages in your Inbox in a variety of arrangements and organize messages by assigning color categories and by moving them to folders within your Inbox. You’ll filter and find messages by using the Search feature, and use Search folders. You’ll work with the built-in Quick Steps. Finally, you’ll preview, print, and delete messages.
Practice Files The exercises in this chapter use Outlook items you created in exercises in previous chapters. If an exercise requires an item that you don’t have, you can complete the exercise in which you create the item before beginning the exercise, or you can substitute a similar item of your own. A complete list of practice files is provided in “Using the Practice Files” at the beginning of this book.
Working with Conversation View
Conversation view is an arrangement of messages grouped by subject. All the messages with the same subject appear together in your Inbox (or other message list) under one conversation header.
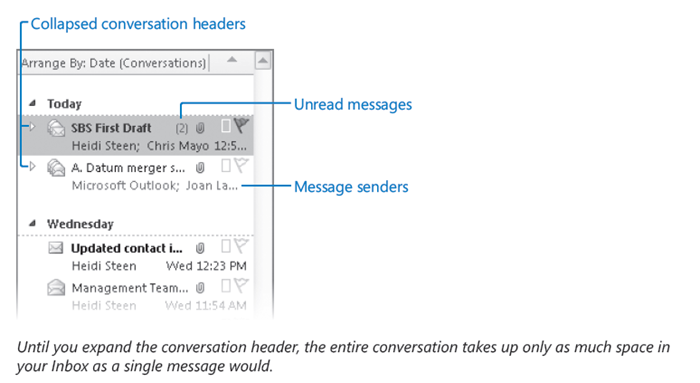
The conversation header provides information about the messages within the conversation, including the number of unread messages and whether one or more messages includes an attachment, is categorized, or is flagged for follow up.
When you receive a message that is part of a conversation, the entire conversation moves to the top of your Inbox and the new message appears when you click the conversation header. When a conversation includes unread messages, the conversation header is bold. When there are multiple unread messages, the number is indicated in parentheses following the subject. The senders of the unread messages are listed below the subject.
Split Conversations
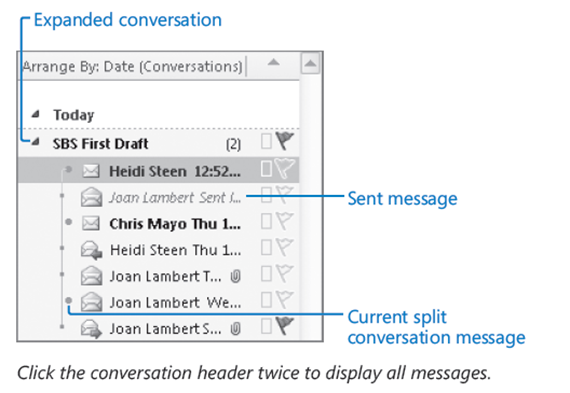
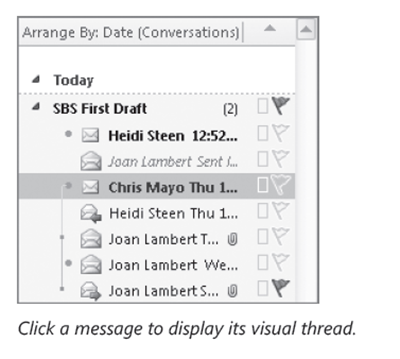
When an e-mail conversation involves more than two people, it frequently happens that more than one person responds to the same message, and other people respond to each of those messages. Multiple conversations emerge from the primary conversation in a process that you might think of as branches growing out from a tree—each can split into additional branches that are farther and farther from the trunk (the original message). A conversation that contains multiple branches is called a split conversation. Within a split conversation, individual conversation branches are marked by orange and gray dots. Larger orange dots indicate the most current message in each branch. Small orange dots indicate older messages. Small gray dots indicate messages that may be considered redundant. Messages within each conversation branch are connected by orange and gray lines (referred to as visual threads).
Tip Conversation view isn’t new in Outlook 2010—it was first introduced in Outlook 2007—but it’s greatly improved and is now the default view for your Inbox and other message folders.
Viewing Conversations
You can display differing levels of messages within a conversation, as follows:
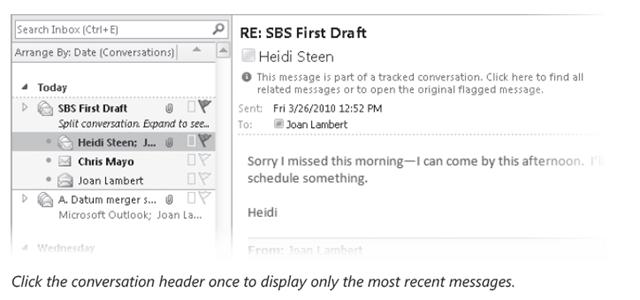
● Click the conversation header or the Expand Conversation button to the left of the conversation header once to display the most recent message in the Reading Pane and to display the most recent message in each branch of a split conversation in the message list. These messages are indicated by orange dots.
● Click the conversation header again to expand the conversation to display all messages in the conversation.
● Click the most recent message in a split conversation to display the visual thread of that message branch.
Conversation View Settings
By default, Conversation view displays messages stored in any folder, including sent messages that are stored in the Sent Items folder. (Within the expanded conversation, sent messages are indicated by italic font.) If you prefer to display only messages from the current folder, you can clear this setting on the Conversation Settings menu in the Conversation group on the View tab.
Other settings that you can turn on include:
● Show Senders Above the Subject This setting reverses the order of the information in the conversation header; you see the names of the conversation participants above the conversation subject. In some cases, such as when Outlook displays a message on the second line, the subject might not be visible at all.
● Always Expand Conversations This setting causes Outlook to display all messages in a conversation when you click the conversation header once, rather than twice.
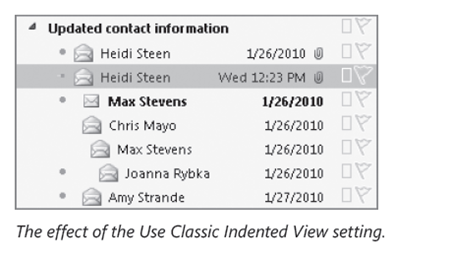
● Use Classic Indented View This setting causes Outlook to indent older messages within individual message threads to show the progression of the thread. This setting is not as effective as the default for displaying split conversations because a message might be at the root of multiple branches but can appear only once in the message list.
Managing Conversations
Although the most apparent function of Conversation view is the grouping of related messages, its greatest usefulness is as a message-management tool. It can be especially handy for Outlook users within large organizations that use distribution lists to disseminate information to a large group of people. When hundreds of message recipients use the Reply All function to respond to a message, your Inbox can quickly become cluttered.
Troubleshooting Conversation View
As with many “new and improved” features, Conversation view has its fans and its detractors. Many Outlook users appreciate the efficiency of the automatically grouped messages and not having to wade through as many messages in their Inboxes; others rue the fact that this new feature can cause messages to vanish, apparently, from their Inboxes before they’ve even seen them.
Conversation view can present a very efficient means of viewing messages within a multi-threaded conversation; however, it also has its drawbacks. Because conversation view displays only certain messages within a conversation, a specific message that you’re looking for might not be visible within a conversation. If this happens, you can turn off Conversation view (by clearing the Show In Conversations check box in the Conversation group on the View tab) and then use one of these methods to locate the message you want to find:
● Sort the messages by subject, and then type the first few letters of the conversation subject to scroll those messages to the top of the Message pane.
● Enter the subject into the Search box at the top of the Message pane and then specify any other criteria (such as the sender or date) of the message that you’re looking for to narrow the results.
After using either of these methods to display a set of messages, visually scan the messages to locate the one you’re looking for.
Conversation view enables you to manage all the messages within a conversation as a group. You can do this by clicking the conversation header to effectively select all the messages in the conversation (they won’t appear selected, but any action you apply to the conversation header applies to all the individual messages in the conversation) and then applying your action. Or you can use these new conversation-management tools:
● Ignore Conversation This command moves the selected conversation and any related messages you receive in the future directly to the Deleted Items folder.
Keyboard Shortcut Press Ctrl+Del to ignore the currently active conversation.
See Also For more information about keyboard shortcuts, see “Keyboard Shortcuts” at the end of this book.
Tip Be cautious when using the Ignore Conversation command. Outlook identifies “conversations” based on message subjects. If you receive unrelated messages in the future that have the same message subject as a conversation that you’ve chosen to ignore, you won’t receive those messages.
● Clean Up Conversation This command deletes redundant messages—messages whose text is wholly contained within later messages—from a conversation. By default, Outlook doesn’t clean up categorized, flagged, or digitally signed messages. You can modify conversation clean-up settings on the Mail page of the Outlook Options dialog box.
See Also For information about modifying mail settings, see “Personalizing Your Office and Outlook Settings” in Chapter 13, “Customize Outlook.”
