Home Automation Part 2 – Making Basic Measurements
In the previous installment I described my decision to build a temperature and humidity sensor network using modules from IButtonLink.com. The heart of the system is the Link45 which connects the PC’s serial port to the sensor network and provides an ASCII interface to the sensors.
In previous home automation projects using .NET 1.1 I had no built-in class to access the serial port and therefore had to rely on solutions like VB6’s MsComm32.ocx or Corrado Cavalli’s excellent CRs232 class. For this project I decided to use .NET Framework 2.0 so that I could try out the new System.IO.Ports.SerialPortclass.
I needed to familiarize myself with the Link45 and learn how to enumerate the sensors on the network and take a reading from an individual sensor. With this in mind, I started by implementing a Super-Simple Serial Console that would let me type commands to the Link45 and see its responses in the console window. Most of the code was straight forward (see Listing 1, below) but I did run into a few gotchas related to serial port settings, Link45 initialization, and multi-threading.
Listing 1. The Super-Simple Serial Console consists of about 100 lines of code.
1: using System;
2: using System.IO.Ports;
3: using System.Threading;
4:
5: namespace s3c
6: {
7: // Super-simple Serial Console
8: // Provides an interactive console session with an iButtonLink Link45.
9: class S3C
10: {
11: private int nCharsReceived;
12: private SerialPort port;
13:
14: public void Run()
15: {
16: Console.WriteLine("Super-Simple Serial Console");
17: try
18: {
19: Open();
20:
21: while (true)
22: {
23: // Show > prompt, read line from console and transmit to serial port.
24: Console.Write(">");
25: String line = System.Console.ReadLine();
26: if (line.Length == 0)
27: return;
28:
29: nCharsReceived = 0;
30: port.Write(line);
31:
32: // Wait until 200ms after the last data received from port before
33: // prompting for next line.
34: while (true)
35: {
36: int n = nCharsReceived;
37: Thread.Sleep(200);
38: if (n == nCharsReceived)
39: break;
40: }
41: }
42: }
43: finally
44: {
45: if (port != null && port.IsOpen)
46: port.Close();
47: }
48: }
49:
50: public void Open()
51: {
52: port = new SerialPort("COM1", 9600, Parity.None, 8, StopBits.One);
53:
54: // The iButton Link45 needs DTR and RTS enabled.
55: port.DtrEnable = true;
56: port.RtsEnable = true;
57:
58: // Hook up callback to display data received from Link45
59: port.DataReceived += new SerialDataReceivedEventHandler(port_DataReceived);
60:
61: // The serial port is now configured and ready to be opened.
62: port.Open();
63:
64: // Shock the Link45 to life by sending a break.
65: port.BreakState = true;
66: port.BreakState = false;
67: }
68:
69: public void Close()
70: {
71: port.Close();
72: }
73:
74: void port_DataReceived(object sender, SerialDataReceivedEventArgs e)
75: {
76: string s = port.ReadExisting();
77: if (s != null)
78: {
79: nCharsReceived += s.Length;
80: Console.Write(s);
81: }
82: }
83: }
84:
85: class Program
86: {
87:
88: static void Main(string[] args)
89: {
90: S3C s3c = new S3C();
91: s3c.Run();
92: }
93:
94: }
95: }
Let's walk through the code in execution-order. The program entry point is the Main() function at at line 88. Main() just news up an S3C object (S3C is short for Super-Simple Serial Console) and calls it's Run() method. The Run() method does four things:
- prints a welcome message at line 16.
- initializes the serial port by calling Open() at line 19.
- performs the main input and serial port write loop in lines 21-41.
- closes the serial port in lines 43-47.
Initializing the Serial Port. My first challenge was getting the serial port settings correct in the Open() method, lines 50-67. The Link45 had some of the port settings conveniently printed on the side of the device. These included 9600 baud, no parity and 8 bits of data. I figured out the stop bits by trial and error. All of these values were passed to the constructor of the System.IO.Ports.SerialPort in line 52. I also found that I needed to enable DTR and RTS which I do on lines 55 and 56. If you want to learn more about serial port esoterics in general, check out Wikipedia RS323.
After creating and configuring the serial port, I wire up a handler for the port's DataReceived event on line 59. This is where the multithreading comes in. Serial port communications are inherently asynchronous - once you transmit some data your main thread continues on to do other work and at some point in the future when a response arrives back at the port, the DataReceived event is fired on another thread, which results in a call to port_DataReceived() which is defined on line 74.
Once the event handler is wired up, it is time to actually open the serial port (line 62). I thought I was done configuring the port at this point, but I found in my experiments that some Link45 commands such as the help command would sometimes fail if issued before a sensor read command. I ended up fixing this problem by toggling the serial port's break state to true and then back to false (lines 65-66). This seems to have the effect of resetting the communication channel to the Link45 and ensures that all of the Link45 commands work consistently the first time.
The Main Loop. After initializing the serial port, we enter the main loop on line 21. The loop runs until an empty input line is detected (lines 26-27) or an exception is thrown (lines 43-47). At the top of the loop we print a prompt and get user input (lines 24-25) and then send the user's text to the serial port (line 30). After sending the text, we wait a brief period for a response to be displayed (lines 34-40) and then head back to the top of the loop to prompt the user for more input.
A Bit of Multithreading. Responses from the Link45 trigger the serial port's DataReceived event. For the Super-Simple Serial Console, the role of the DataReceived event handler is simple - it just reads any data that is available in the serial port's input buffer and then prints that data to the console. This all happens on lines 74-82. The only part that isn't completely straight forward is line 79:
79: nCharsReceived += s.Length;
This is where the DataReceived thread communicates with the main thread. The reason we need some sort of handshaking between the threads is that we'd like the serial port responses to be interleaved with the user input - basically a repeating prompt-input-response pattern. Without this handshaking, the prompt for the next command would be printed before the response from the current command.
One way to accomplish this interleaving is to blindly Sleep() for a fixed amount of time in the main loop after every command is transmitted to the serial port. This approach will work with a long enough sleep, but it leads to a sluggish user experience because every Sleep() needs to be long enough to wait for the slowest Link45 command. Experiments showed that the Link45 was always pretty responsive, but that some commands resulted in a verbose response that could take a second or more to receive.
My approach was to wait 200ms beyond the time the last character was received. If, after 200ms, no additional characters had been received, I would assume the response was complete and head back up to the top of the loop for more user input. I used the nCharsReceived variable to track the number of characters received while waiting. I clear nCharsReceived (line 29) immediately before writing to the serial port. The DataReceived event handler updates nCharsReceived on line 79. Lines 34-39 in the main loop alternately Sleep() for 200ms and check nCharsReceived for more data until a Sleep() occurs with no new data received. Technically speaking one should probably protect nCharsReceived with a lock in case we ever encounter an architecture where integer writes aren't atomic.
Putting It All Together. Once I had the Super-Simple Serial Console working, I proceeded to wire up a pair of sensors to the serial port in the back of my laptop. The connections were easy since the sensors have RJ-45 connectors. Figure 1 shows the setup.
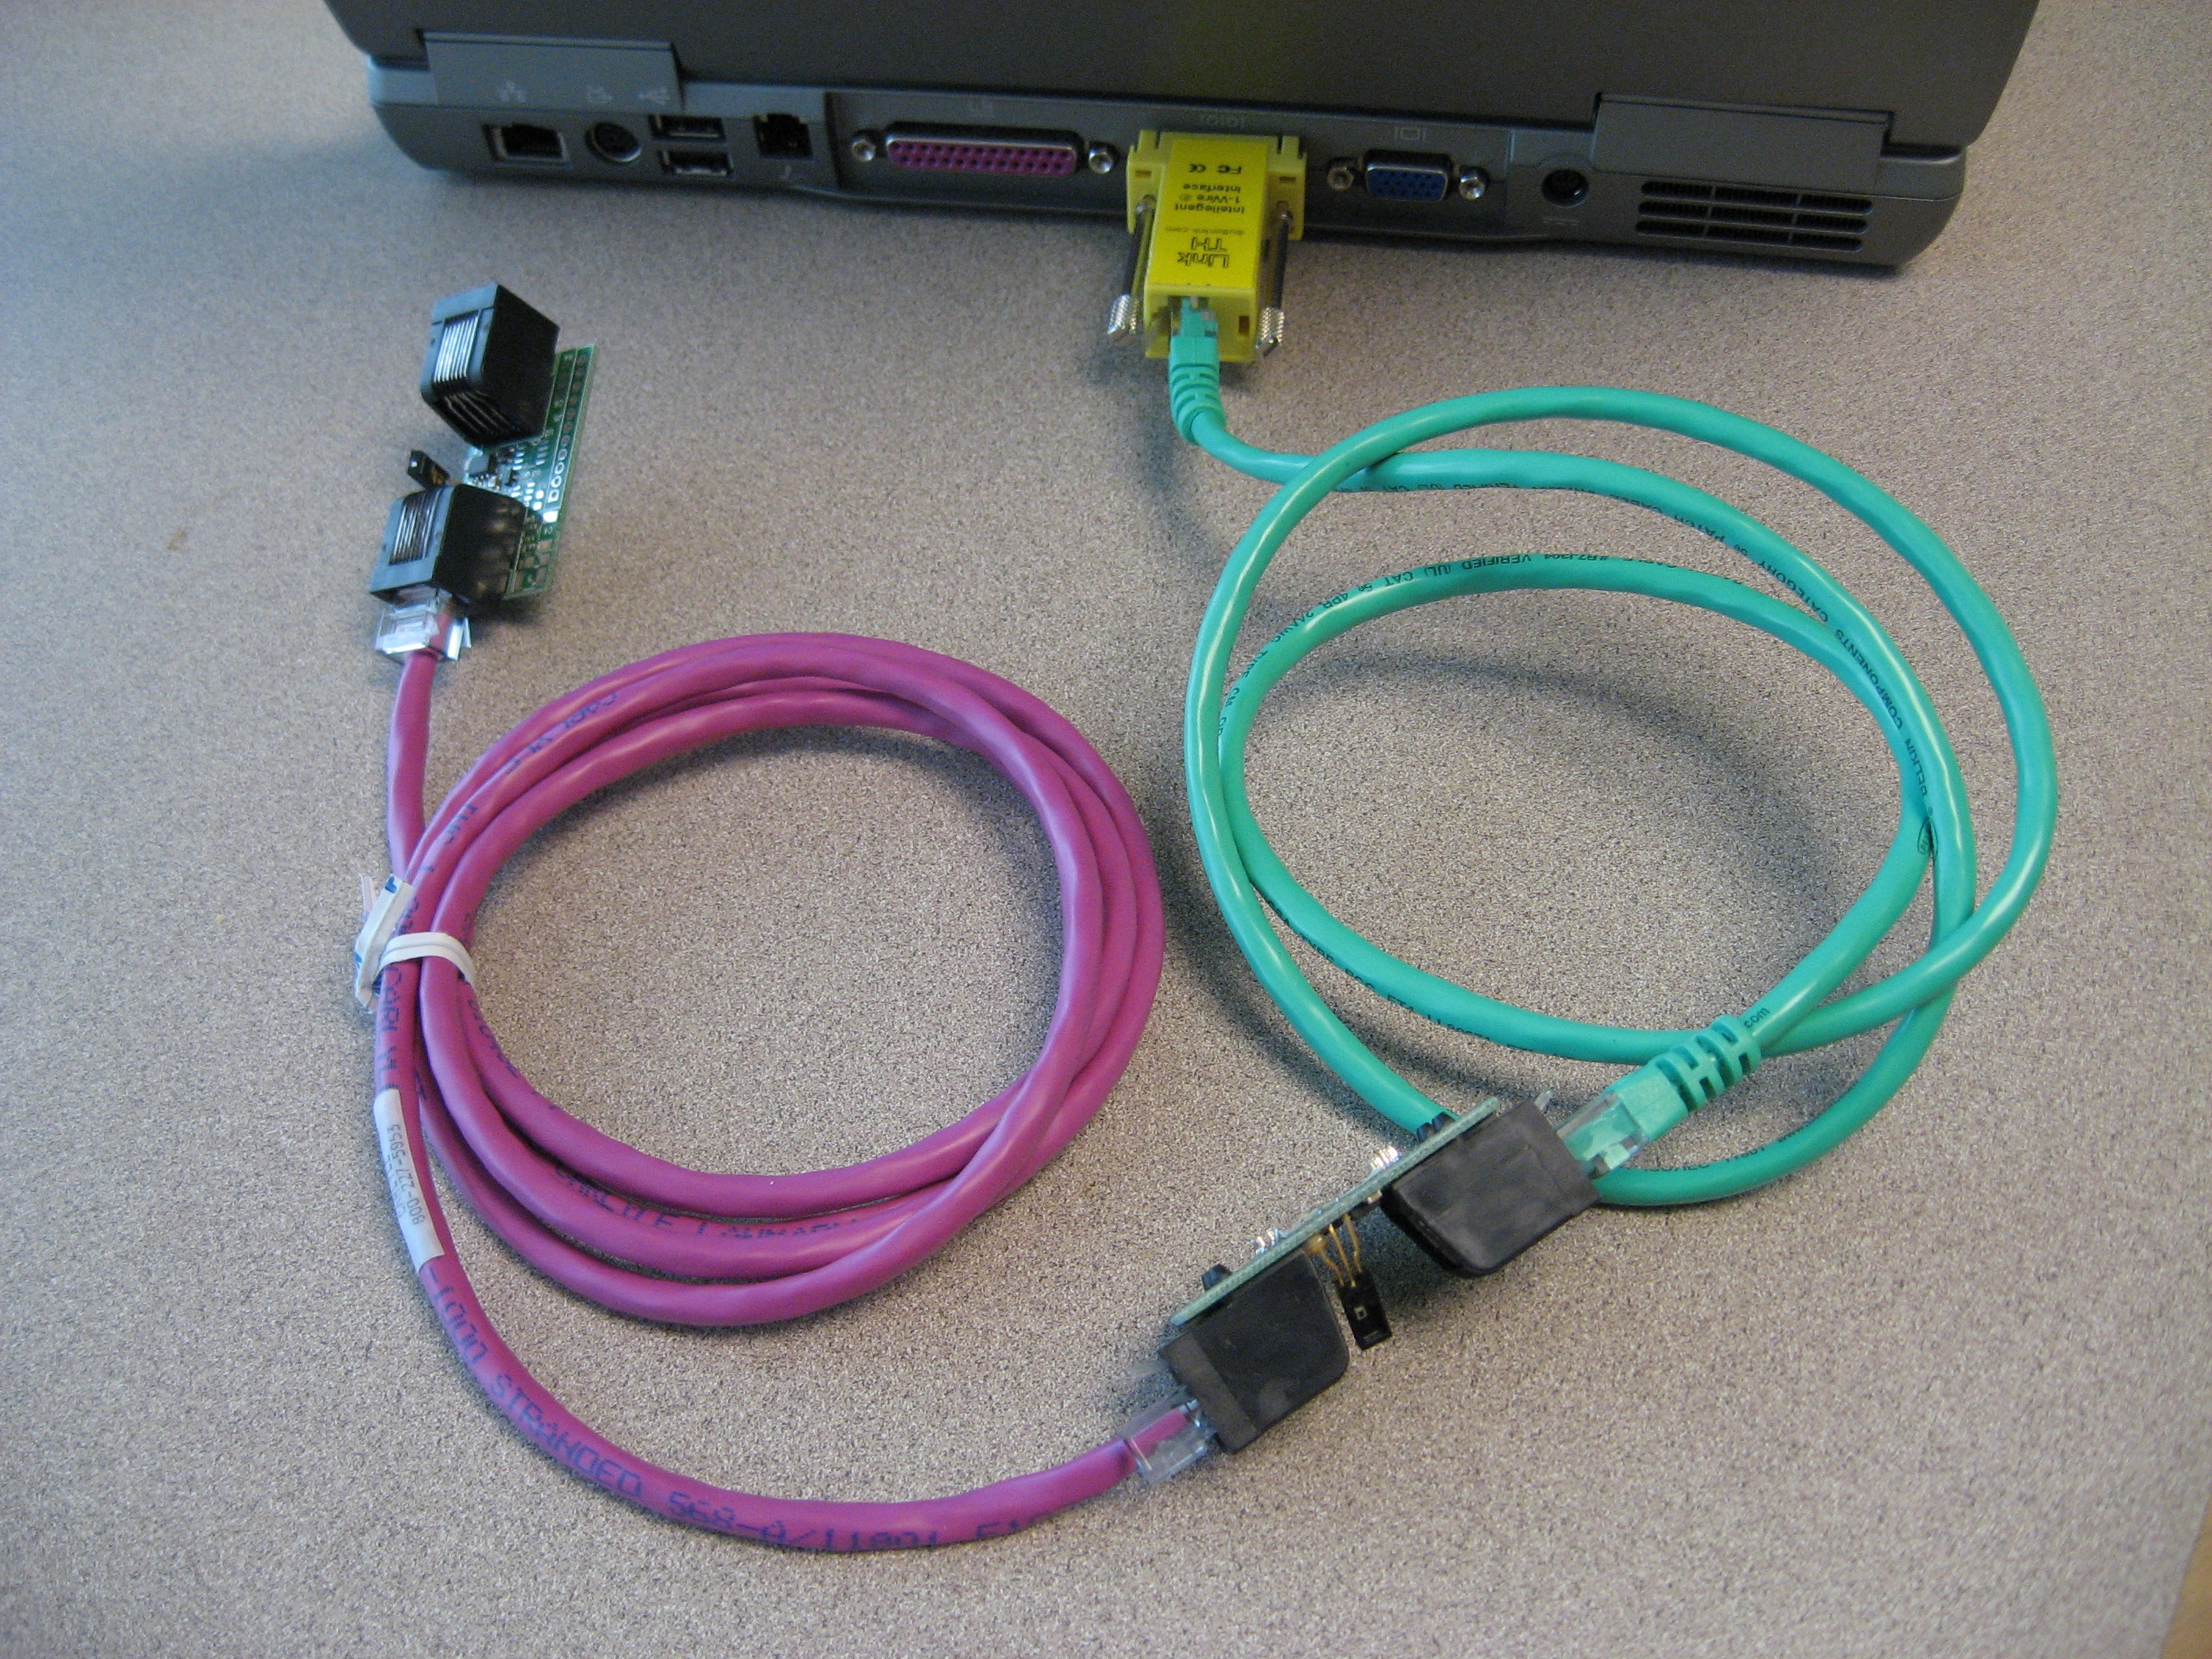
Figure 1. CAT-5 networking cable connects a pair of sensors to the serial port via the Link45.
After plugging in the sensors I fired up the Super-Simple Serial Console. I began by typing the character h to see the list of commands available. The transcript in Figure 2 shows the response from the Link45. You can read more about the available commands in the Link45 Users Manual.

Figure 2. First communications with the Link45.
To get the list of sensors on the network I typed the character I, requesting that the Link45 report the sensor inventory. The results are shown in Figure 3. Each sensor appears on a line consisting of a 16 hex digit sensor ID followed by a 2 digit sensor type. My network shows two temperature+humidity sensors. Here’s the cheat sheet for the sensor types:
- 00 – temperature
- 19 – temperature + humidity
- 1A – temperature + voltage
- 1B – temperature + light
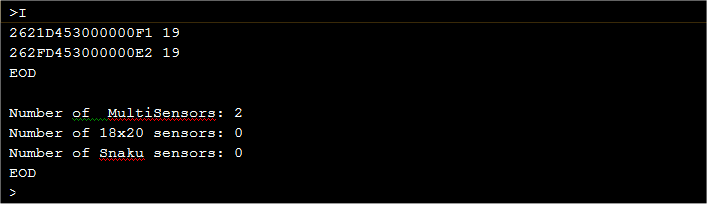
Figure 3. The I command reports the list of sensors on the network.
Finally, I used the D command to request temperature and humidity readings from all sensors on the network. Figure 4 shows the results. According to the Link45 documentation, the data returned for each sensor is of the form
xxxxxxxxxxxxxxxx ss,ccc.cc,fff.ff,hhh
where
- xxxxxxxxxxxxxxxxis a 16 digit hexadecimal sensor ID
- ssis the sensor type
- ccc.ccis the temperature in degrees Celsius
- fff.ffis the temperature in degrees Fahrenheit
- hhh is the humidity
My network shows that the temperatures near my computer are in the mid 60s and with humidity around 44%.

Figure 4. The D command takes temperature and humidity readings from all sensors.
The Link45 has a lot of functionality and accepts many more commands than the ones I've shown here. You can learn more from the Link45 Users Manual.
With the code from the Super-Simple Serial Console and the Link45 commands for sensor inventory and sensor reading, we have all the building blocks we need to write a program to monitor the temperature and humidity.
Next installment: Using Regular Expressions to Parse Sensor Data