Home Automation Part 1 - Burning $200 of propane
I like to use my knowledge of technology to solve problems outside of work. In this series I explain how I used C# and the Internet to remotely monitor a propane stove in my cabin. While reading about my adventures you will learn about C#, embedded technology, regular expressions, databases, web servers, web cams and much more.
A few years back my wife and I bought a cabin in the mountains and it is heated by a propane gas hearth (see figure 1). I’m guessing that the hearth was added as an afterthought because when I bought the place, there were no thermostat wires in the walls to control the hearth. The previous owner used a wireless remote control thermostat that looks like the thing you use to change the channel on the cable box. The thermostat sends signals by IR or radio or telepathy to a little box near the hearth and the little box turns the flame on and off. At least this is how it is supposed to work. The problem is that when the batteries in the controller or the little box get low, the system switches into a failsafe mode where the hearth never shuts off. I don’t know if this behavior is by design or just random and I suppose it has the advantage of keeping the pipes from freezing, but one fall I arrived at the cabin to find the hearth burning away in a balmy 100 degree room and shortly thereafter had to pay $200 to refill the propane tank. I have no idea how long the hearth had been burning.
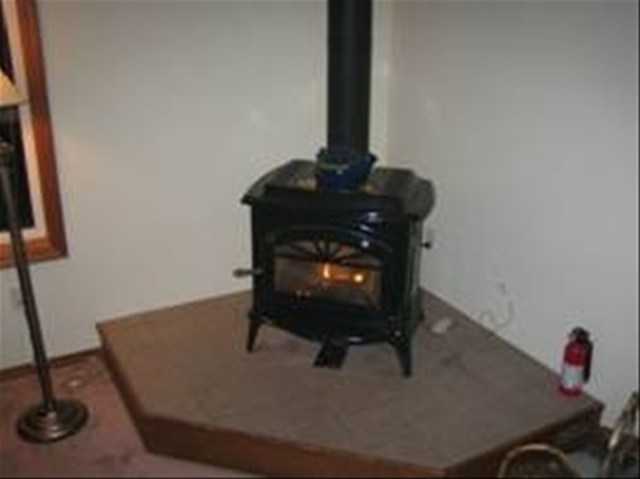
Figure 1: The hearth at my cabin in the Cascades
My first action was to replace the wireless thermostat with a hard wired unit. Fortunately, the hearth was next to an outside wall so I was able to stand on a ladder in a blizzard and run the thermostat wire under some trim on the outside of the wall while looking in at my wife and kids reading stories on the couch. The new thermostat increased the reliability of the system, but I was still concerned because the consequences of a failure were too costly. If the hearth failed to ignite I could end up with frozen pipes. If it failed to extinguish, I’d burn through all my propane and then have the pipes freeze. Also, the propane tank lies under ten feet of snow most of the winter, making a refill problematic.
I decided to build a monitoring system that could alert me to problems at the cabin and even let me inspect the premises over the web. My first order of business was to find a simple way to monitor the temperature. I wanted something that was unobtrusive, reliable, inexpensive, could easily interface with a PC, and did not require its own power supply. A brief search of the web turned up an amazing device called a 1-wire sensor. It’s manufactured by Dallas Semiconductor and is basically a CPU with a sensor and serial I/O on a die the size of a wheat kernel. The 1-wire sensor gets its power from the data wire used for communication with the outside world. Since each sensor has a unique 64 bit serial number, it is possible to connect multiple sensors to a single data line and then interrogate each in turn by sending its serial number and a command over the wire. Dallas Semiconductor sells 1-wire sensor chips and IButtons which enclose the chip in a round stainless steel can. Other vendors provide 1-wire devices in modules with all sorts of sensors including temperature, humidity, water, light, voltage and current. I ended up purchasing temperature+humidity modules from iButtonLink.com. These sensor modules consist of a very small printed circuit holding the 1-wire chip and a pair of RJ-45 jacks for the communication line. Building a network of sensors is as easy as plugging all the modules together with CAT-5 wire. Figure 2 shows an iButtonLink temperature+humidity module. Newer versions come in nice a plastic enclosure.
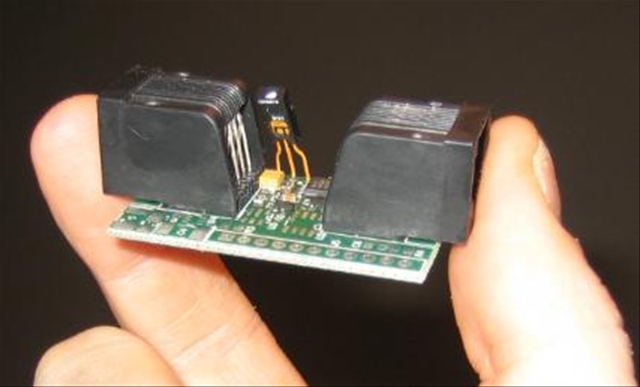
Figure 2: The temperature+humidity sensor module I purchased from iButtonLink.com.
I also purchased an iButtonLink Link45 which provides an ASCII interface to the sensor network via an RS-232 port (see figure 3). The Link45 is about an inch and a half long and includes a DE-9 connector at one end for the serial port and an RJ-45 on the other for the sensor network.
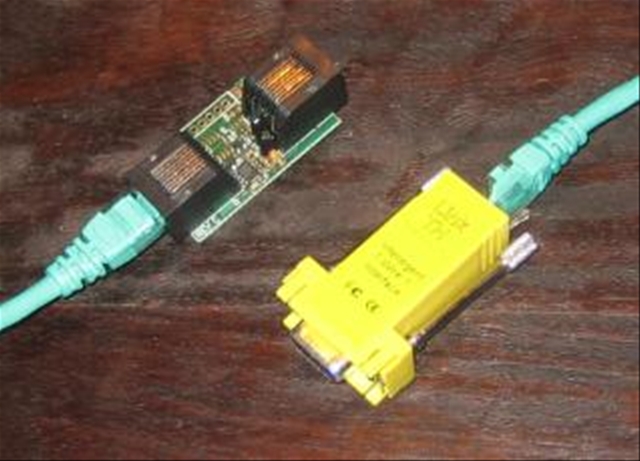
Figure 3: The Link45 provides an ASCII interface to the sensor network via an RS-232 port.
With a Link45, a handful of sensor modules, 100 feet of CAT-5, and an old PC, I was ready to start coding.
Next installment: Making Basic Measurements
(edited: updated link to next installment)