Unit Testing Delay Signed Assemblies on the Hosted TFS Build Service
Using the hosted build service available in the Team Foundation Service is great because you don't have to build and manage build servers. You can even get the hosted build server to run your unit tests automatically. To help maintain quality on a project I am doing with the ALM Rangers, we use a gated checkin that runs all our unit tests, so we can't check in code with any failing unit tests.
Of course, using a standardized build server can have its restrictions. One of these is that you can't configure strong name verification skipping. So if your code has to be delay signed then your unit tests will not run because they will be unable to load the assemblies due to a "strong name validation failed" error. I want to show you here one way to get around this problem. It is not necessarily suitable for everyone, so please consider whether it can work for you before committing to this solution.
The Idea
The idea is to have two strong name key files, one for development only that contains both public and private keys, and one for production use that contains only the public key and requires delay signing. You then create a new solution configuration for signed builds that uses the production file, while still using the development file in Debug and Release builds, through the use of conditionals in the project files.
Your normal gated checkin will build a Debug or Release configuration. The builds you use for testing may also use the Release configuration, unless you actually deploy fully signed assemblies to the test environments. You need to create a new build definition that uses the Signed configuration to generate the assemblies that use the production strong name key file, this build cannot run the tests though because the strong name verification skipping cannot be configured.
Step 1: Create a New Solution Configuration
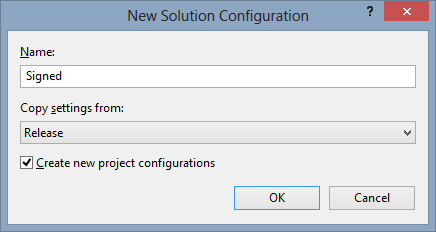
The new solution configuration will be used to build the assemblies using the production strong name key file with delay signing. To create the solution configuration open the Configuration Manager from the BUILD menu. In the Active solution configuration drop-down select <New…> , this will open the New Solution Configuration dialog where you can create the new solution configuration. I named the new configuration "Signed" and based it on the Release configuration, like this:
It is best to verify that your solution still builds using the new Signed configuration. Fix any build issues before proceeding.
Step 2: Add the Strong Name Key Files
If you haven't already done so, make sure you have the development and production strong name key files in the solution and in source control.
In my projects I put these in the solution directory and refer to them by relative path from the individual projects in the solution. Visual Studio likes to always copy the strong name key files into the project directory, you can correct this while doing the next step below.
Step 3: Make the Strong Name Key Files and Delay Signing Conditional
In this step we are going to make the choice of strong name key file and delay signing conditional on the solution configuration. This step requires you to manually edit the project file (i.e. .csproj or .vbproj). Open the file in a text editor. You can also open it in the Visual Studio XML Editor if you wish, but you will need to unload the project first. You will need to edit the project file for each assembly that needs to be delay signed.
Strong Name Key File
Locate the <AssemblyOriginatorKeyFile> element. This will appear in a property group like this:
<PropertyGroup>
<AssemblyOriginatorKeyFile>..\Development.snk</AssemblyOriginatorKeyFile>
</PropertyGroup>
Replace this with the following:
<PropertyGroup Condition=" '$(Configuration)' != 'Signed' ">
<AssemblyOriginatorKeyFile>..\Development.snk</AssemblyOriginatorKeyFile>
</PropertyGroup>
<PropertyGroup Condition=" '$(Configuration)' == 'Signed' ">
<AssemblyOriginatorKeyFile>..\Production.snk</AssemblyOriginatorKeyFile>
</PropertyGroup>
This means that when building the assembly the Development strong name key file will be used in any build configuration that is not the Signed one, the Signed one will use the Production strong name key file. Notice that I have used relative paths at this point too so I can keep the strong name key files in a single location.
Sometimes the <AssemblyOriginatorKeyFile> element appears together with other settings, as in this example:
<PropertyGroup>
<Configuration Condition=" '$(Configuration)' == '' ">Debug</Configuration>
<Platform Condition=" '$(Platform)' == '' ">AnyCPU</Platform>
<SchemaVersion>2.0</SchemaVersion>
<ProjectGuid>{792AC23B-5A04-4C5C-A7E5-70D22423CF4C}</ProjectGuid>
<ProjectTypeGuids>{82b43b9b-a64c-4715-b499-d71e9ca2bd60};{60dc8134-eba5-43b8-bcc9-bb4bc16c2548};{FAE04EC0-301F-11D3-BF4B-00C04F79EFBC}</ProjectTypeGuids>
<OutputType>Library</OutputType>
<AppDesignerFolder>Properties</AppDesignerFolder>
<RootNamespace>Microsoft.ALMRangers.GenerateUnitTest</RootNamespace>
<AssemblyName>GenerateUnitTest</AssemblyName>
<SignAssembly>True</SignAssembly>
<AssemblyOriginatorKeyFile>..\Development.snk</AssemblyOriginatorKeyFile>
<TargetFrameworkVersion>v4.5</TargetFrameworkVersion>
</PropertyGroup>
In this case remove the element from this section and then use the two conditional property groups above.
Delay Signing
We do a similar thing for the <DelaySign> element. If you were already delay signing then locate this element and replace the property group it is in with the property groups below, otherwise just add the property groups:
<PropertyGroup Condition=" '$(Configuration)' != 'Signed' ">
<DelaySign>false</DelaySign>
</PropertyGroup>
<PropertyGroup Condition=" '$(Configuration)' == 'Signed' ">
<DelaySign>true</DelaySign>
</PropertyGroup>
As before, if the <DelaySign> element is in a property group with other settings then remove the element from the property group and add the conditional property groups above.
Step 4: Create Build Definition
The final step is to create a new build definition on the build service. The simplest thing to do is to clone an existing build definition and then in the Process section, under Items To Build set the Configurations to build to be Signed. You will want to disable the unit tests in the Automated Tests node as these will not work any more.
Limitations
This solution allowed me to build and unit test Debug builds on the hosted build service and also to build delay signed assemblies on it too.
However, I have not lived with this solution for long so there may be limitations that I am not yet aware of. One possible issue that comes to mind is when putting assembly references into configuration files. You will need to find a way to have configuration files change according to which solution configuration was built.