Building an SCCM Self Service Portal for Deploying Applications – Part 3 (Example Code)
This article is the third in a series of three. The first article looked at the context of the business challenge being addressed and the second article investigated the high level design.
This article details code that will be needed in order to build a self-service portal for deploying applications into SCCM and is provided to help those trying to build similar applications – a functional windows form version of the code can be found here. Some of these have been documented by other people on the interweb but are compiled here for convenience and to provide a fuller picture of what is technically needed to achieve the functionality needed for the self-service portal. A lot of the code started life from example found on Adam Meltzers blog.
This code was developed just as SP1 was released which brings new API support using powershell cmdlets which is something that could be considered for future development. However, the code that follows uses c#.
Although this code will run in a Web Site the example provided uses a windows form application to make it quicker to get up and running with examples. The following notes will run through the steps needed to achieve the following:
Extract information from an MSI so it might be used for creating an application
Create an new application called 'Test Application'
Create an installer and deployment type (including retrieving a reference to the application created on the previous step)
Supersede an existing application called 'App For Dependency' with 'Test Application'
Add a dependency on 'App For dependency' from 'Test Application'
Add a requirement to 'Test Application' to a registry based global condition
Distribute 'Test Application' to a Distribution Point Group
Deploy the 'Test Application' to an existing collection
Delete the 'Test Application'
Reading an MSI
One of the first things that a developer needs to do when submitting a new application through the Web Site is provide a location of the MSI which will install the application. Note that this information has to be supplied by text box for the following reasons:
- The application is interested in not only the MSI but the folder contents of where the MSI is located. This might be because the MSI needs to use other files to install correctly.
- The application cannot use the HTML file upload control as this will only supply the binary of the MSI and not the location of the file as browsers tend to block this for security reasons
- Related to the point above, the submission will need to be a network share the Web Site can see. Submitting c:\testpackage\myMSI.msi refers to a location on the server not on the machine of the developer submitting the application. For this reason the developer needs to submit things in the following format \\cm2012machine\TestPackages\TestPackage\myMSI.msi
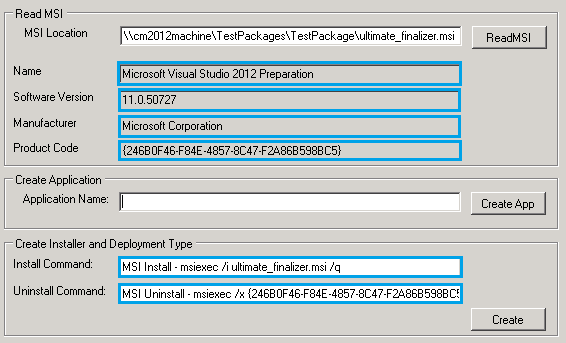
Once the correct path has been supplied the application can read data from the MSI. This is useful to automatically supply information later on like the manufacturer or the product code (which can be used in the uninstall command line).
The MSI Reference can be found at the following location, it only worked when browsed to in references within visual studio : C:\Windows\System32\msi.dll and the namespace is WindowsInstaller:
Type installerType = Type.GetTypeFromProgID("WindowsInstaller.Installer"); WindowsInstaller.Installer installer = Activator.CreateInstance(installerType) as WindowsInstaller.Installer;
////read out the contents of the msi based on the msi location (txtMSILocation.Text) WindowsInstaller.Database db = installer.OpenDatabase(txtMSILocation.Text, 0);
////select properties from the MSI and set text boxes with those values string query = "SELECT Value FROM Property WHERE Property='ProductName'"; WindowsInstaller.View view = db.OpenView(query); view.Execute(null); this.txtAppName.Text = view.Fetch().StringData[1]; query = "SELECT Value FROM Property WHERE Property='ProductVersion'"; view = db.OpenView(query); view.Execute(null); this.txtSoftwareVersion.Text = view.Fetch().StringData[1]; query = "SELECT Value FROM Property WHERE Property='Manufacturer'"; view = db.OpenView(query); view.Execute(null); this.txtManufacturer.Text = view.Fetch().StringData[1]; query = "SELECT Value FROM Property WHERE Property='ProductCode'"; view = db.OpenView(query); view.Execute(null); this.txtProductCode.Text = view.Fetch().StringData[1]; installer = null;
////dynamically build the install command based on the MSI properties FileInfo file = new FileInfo(txtMSILocation.Text); this.txtInstallCommandLine.Text = string.Format("MSI Install - msiexec /i /{0} /q", file.Name); this.txtUninstallCommandLine.Text = "MSI Uninstall - msiexec /x " + this.txtProductCode.Text + " /q"; |
For example when clicking on ReadMSI using an MSI that comes with Visual Studio the following information highlighted in blue is retrieved and populated in the tool:
Creating an Application
There are quite a few examples of programmatically creating an application and this example is provided for convenience, but probably differs only slightly from what has already been published. Unlike a lot of programming patterns in SCCM which are based on the WMI objects, because applications are new in SCCM 2012 it uses an approach more familiar syntactically(to me anyway) for application creation. Objects can be created using the 'new' keyword.
The example code snippets that follow require the following namespaces and references:
Namespace |
Microsoft.ConfigurationManagement.ApplicationManagement (C:\Program Files (x86)\Microsoft Configuration Manager\AdminConsole\bin\Microsoft.ConfigurationManagement.ApplicationManagement.dll) |
Microsoft.ConfigurationManagement.ManagementProvider.WqlQueryEngine (C:\Program Files (x86)\Microsoft Configuration Manager\AdminConsole\bin\AdminUI.WqlQueryEngine.dll) |
Microsoft.ConfigurationManagement.AdminConsole.AppManFoundation (C:\Program Files (x86)\Microsoft Configuration Manager\AdminConsole\bin\AdminUI.AppManFoundation.dll) |
Before interacting with the Application objects the scope for the naming object needs to be set. The code below uses the site id:
////need to set the scope for the application request WqlResultObject smsIdentification = this.sccmConnection.GetClassObject("sms_identification") as WqlResultObject; string id = smsIdentification.ExecuteMethod("GetSiteID", null)["SiteID"].StringValue.Replace("{", string.Empty).Replace("}", string.Empty); NamedObject.DefaultScope = "ScopeId_" + id; |
Now the application can be created and properties set on that object. Note on the example below uses an alias to the SCCM namespace as follows using sccm = Microsoft.ConfigurationManagement.ApplicationManagement;, to avoid interactions with the namespaces used in a windows forms app:
sccm.Application applicationRequest = new sccm.Application(); applicationRequest.Publisher = this.txtManufacturer.Text; applicationRequest.SoftwareVersion = this.txtSoftwareVersion.Text; applicationRequest.Title = this.txtSCCMApplicationName.Text; applicationRequest.Version = 1; applicationRequest.DisplayInfo.DefaultLanguage = CultureInfo.CurrentCulture.Name; applicationRequest.AutoInstall = true; applicationRequest.Description = string.Format("Created using code for app {0}", this.txtSCCMApplicationName.Text); applicationRequest.ReleaseDate = DateTime.Now.ToString();
sccm.AppDisplayInfo displayInformation = new sccm.AppDisplayInfo(); displayInformation.Title = this.txtAppName.Text; displayInformation.Language = CultureInfo.CurrentCulture.Name; displayInformation.Publisher = this.txtManufacturer.Text; applicationRequest.DisplayInfo.Add(displayInformation); |
Finally it is necessary to persist the application settings. This is possible using some wrapper objects:
//// Initialize application wrapper and factory for creating the SMS Provider application object. ApplicationFactory applicationFactory = new ApplicationFactory(); AppManWrapper applicationWrapper = AppManWrapper.Create(this.sccmConnection, applicationFactory) as AppManWrapper; //// Set the application into the provider object. applicationWrapper.InnerAppManObject = applicationRequest; applicationFactory.PrepareResultObject(applicationWrapper); applicationWrapper.InnerResultObject.Put(); |
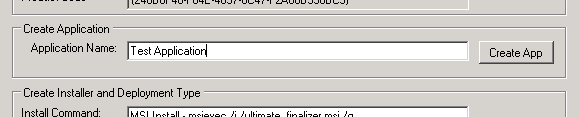
In the example application clicking on the 'Create App' button with the name 'Test Application' as shown below will create the application in SCCM:
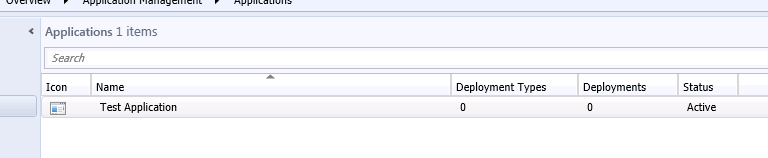
As you can see in the screen shot below the application has been created, but does not include any deployment types or deployments at this point:
Another thing to keep in mind is that every time an application is changed and saved a new version of that application is created. This behaviour will affect how the code for deleting applications and retrieving applications has to be written.
Adding an installer and Deployment Type
As mentioned in part 2 of this series a deployment type allows the specification of different deployment rules for the same application. At least one needs to be created in order to deploy the application successfully. Deployment types need to have an installer specified and as the name implies this contains the installation information. There are a few different types of installer available, for instance AppVInstaller or ScriptInstaller, this example will use the msiinstaller. The code examples that follow use the following namespaces and references (in addition to any mentioned previously):
Namespace |
Microsoft.ConfigurationManagement.ApplicationManagement (C:\Program Files (x86)\Microsoft Configuration Manager\AdminConsole\bin\Microsoft.ConfigurationManagement.ApplicationManagement.MsiInstaller.dll) |
In order to add a deployment type to an application it is necessary to retrieve it from SCCM. This is done using a query into SCCM using WMI syntax, which then loads the retrieved object into an application object. The application is retrieved based on name and in order to exclude old versions the query sets IsLatest=1 so only the current version is returned.
private WqlResultObject GetApplicationWQLFromName(string applicationName) { ////get the application based on the display name string wmiQuery = string.Format("SELECT * FROM SMS_Application WHERE SMS_APPLICATION.IsLatest = 1 AND LocalizedDisplayName='{0}'", applicationName.Trim()); WqlQueryResultsObject applicationResults = this.sccmConnection.QueryProcessor.ExecuteQuery(wmiQuery) as WqlQueryResultsObject; ////return the first instance of the application found based on the query - note this assumes the name is unique! foreach (WqlResultObject appReference in applicationResults) { return appReference; }
////didn't find anything with the name return null; } |
The next function reloads the application object from the WQLResultObject returned from the query above using the same objects that were used to save the application originally:
private sccm.Application GetApplicationFromName(string applicationName) { WqlResultObject appReference = GetApplicationWQLFromName(applicationName); if (appReference != null) { ////load all the properties for the application object so it can be loaded into an AppManWrapper to retrive application appReference.Get(); ApplicationFactory applicationFactory = new ApplicationFactory(); AppManWrapper applicationWrapper = AppManWrapper.WrapExisting(appReference, applicationFactory) as AppManWrapper; return applicationWrapper.InnerAppManObject as sccm.Application; }
return null; } |
Now that the application has a reference to the current version of the application a new installer and deployment type can be added to it. Saving the application will create a new version and persist the changes:
////Setup the installer and it's contents Content content = new Content(); MsiInstaller msiInstaller = new MsiInstaller();
FileInfo file = new FileInfo(txtMSILocation.Text); content.Location = file.Directory.FullName; ////use the msi folders location as the content source for the application package content = ContentImporter.CreateContentFromFolder(file.Directory.FullName); ////set the command that will run to install on a clients desktop msiInstaller.InstallCommandLine = txtInstallCommandLine.Text; msiInstaller.UninstallCommandLine = txtUninstallCommandLine.Text; ContentRef contentReferenece = new ContentRef(content); content.OnFastNetwork = ContentHandlingMode.Download; content.OnSlowNetwork = ContentHandlingMode.DoNothing; content.FallbackToUnprotectedDP = false; ////configure other properties - for instance the produce code which by default is used to detect whether the application is already installed msiInstaller.Contents.Add(content); msiInstaller.InstallContent = contentReferenece; msiInstaller.DetectionMethod = DetectionMethod.ProductCode; msiInstaller.ProductCode = txtProductCode.Text; msiInstaller.SourceUpdateProductCode = txtProductCode.Text; msiInstaller.ExecutionContext = sccm.ExecutionContext.System; msiInstaller.Contents[0].PinOnClient = false; msiInstaller.Contents[0].PeerCache = false; msiInstaller.UserInteractionMode = UserInteractionMode.Normal; msiInstaller.MaxExecuteTime = 120; msiInstaller.ExecuteTime = 0;
////Add a deployment type to the application using the installer details created above
sccm.DeploymentType dt = new sccm.DeploymentType(msiInstaller, "MSI", NativeHostingTechnology.TechnologyId); dt.Title = txtSCCMApplicationName.Text; dt.Version = 1; ////retrieve tha application here to then add the deployment type to ot sccm.Application application = GetApplicationFromName(txtSCCMApplicationName.Text); application.DeploymentTypes.Add(dt); ////resave the application SaveApplication(application); |
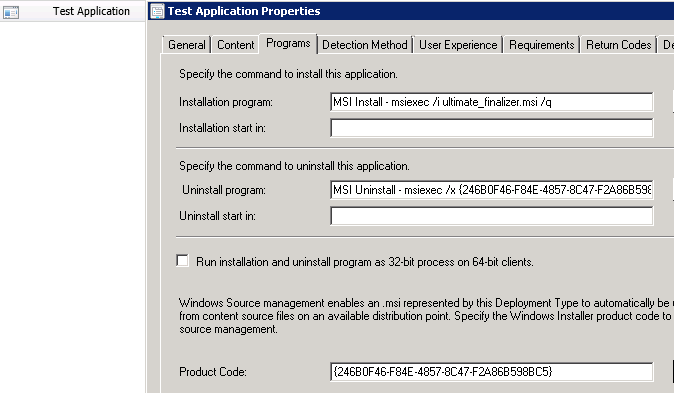
The settings located in the sample are highlighted in blue:

These now appear in SCCM on a newly created deployment type associated with the application:
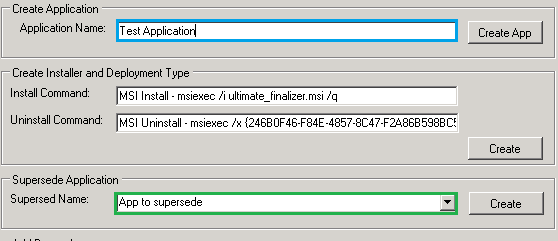
Superseding an application
In this scenario the example causes the submitted application 'Test Application' to supersede an existing application called 'App to supersede'. In the sample this can be selected as shown below. The application highlighted in green is the one that will be superseded and the application highlighted in blue is the application created previously and the one that will do the superseding:
The code to create a supersedence is fairly straightforward. A reference to the application being superseded is needed and the application that is doing the superseding. Then a relationship is created using a DeploymentTypeRule:
////retrieve app that was created sccm.Application application = GetApplicationFromName(txtSCCMApplicationName.Text); ////retrieve application that will be superseded sccm.Application appToSupersede = GetApplicationFromName(cmbSuperseded.Items[cmbSuperseded.SelectedIndex] as string);
sccm.DeploymentType dt = application.DeploymentTypes[0]; sccm.DeploymentType ssdt = appToSupersede.DeploymentTypes[0]; //// Define an intent expression to describe the realtionship between the applications DeploymentTypeIntentExpression intentExpression = new DeploymentTypeIntentExpression(appToSupersede.Scope, appToSupersede.Name, (int)appToSupersede.Version, ssdt.Scope, ssdt.Name, (int)ssdt.Version, DeploymentTypeDesiredState.Prohibited, true); //// Define a deployment type rule to contain the expression DeploymentTypeRule deploymentRule = new DeploymentTypeRule(NoncomplianceSeverity.None, null, intentExpression); //// Add to Supersedes collection. dt.Supersedes.Add(deploymentRule);
SaveApplication(application); |
In order to get this code to work it will be necessary to add the following namespaces and references:
Namespace |
Microsoft.SystemsManagementServer.DesiredConfigurationManagement.Expressions (C:\Program Files (x86)\Microsoft Configuration Manager\AdminConsole\bin\DcmObjectModel.dll) |
After running the example a check on the application using the Configuration Manager console shows that the supersedence has been set up:

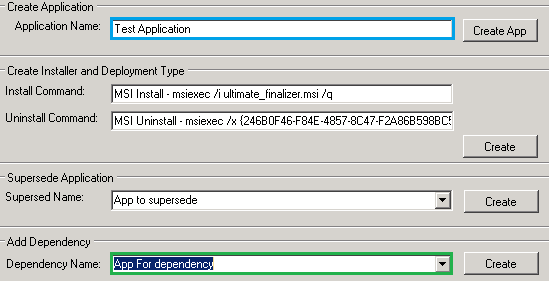
Adding a dependency to an application
In this example the code will show how to add a dependency to an application called 'App For Dependency' within 'Test Application'. In the sample the settings would look like the following, with the application highlighted in green being the one that will become the dependency:
The code is very similar in structure to the code used to create supersedence. However, it is possible to group dependencies together with and/or operators to indicate groups of dependencies or more complex combinations and the dependencies appear on the deployment type. The code below adds a single dependency:
////retrieve the application that requires a dependency sccm.Application application = GetApplicationFromName(txtSCCMApplicationName.Text); ////retrieve the application that will form a dependency sccm.Application dependencyApplication = GetApplicationFromName(cmbDependency.Items[cmbDependency.SelectedIndex] as string); sccm.DeploymentType dependencydeploymentType = dependencyApplication.DeploymentTypes[0]; // define operands in an intent expression and add the information to the dependency CustomCollection<DeploymentTypeIntentExpression> operand = new CustomCollection<DeploymentTypeIntentExpression>(); operand.Add(new DeploymentTypeIntentExpression(dependencyApplication.Scope, dependencyApplication.Name, dependencyApplication.Version.Value, dependencydeploymentType.Scope, dependencydeploymentType.Name, dependencydeploymentType.Version.Value, DeploymentTypeDesiredState.Required, true)); ////create an expression (and/or) for multiple dependencies and then use in a rule which is added to the dependencies collection of the application's deployment type DeploymentTypeExpression expression = new DeploymentTypeExpression(ExpressionOperator.And, operand); DeploymentTypeRule dependencyRule = new DeploymentTypeRule("Dependency_" + Guid.NewGuid().ToString("B"), NoncomplianceSeverity.Critical, null, expression); application.DeploymentTypes[0].Dependencies.Add(dependencyRule);
SaveApplication(application); |
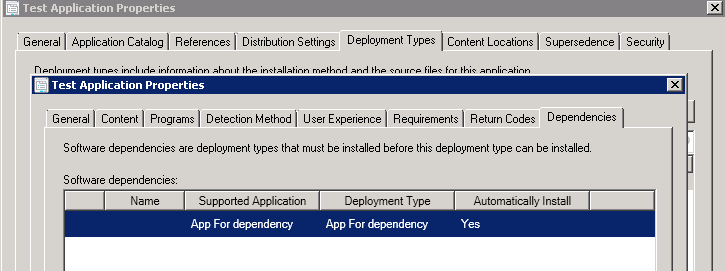
When checking the deployment type for 'Test Application' in SCCM the following can be seen:
Add a requirement based on a Global Condition to an application
One of the features the Website had to provide was the ability to allow submitting developers the ability to add requirements for their application. In the original scenario these were to be registry based which meant 'custom' requirements which are setup as global conditions. The other advantage of setting up the requirements as global conditions is that it provides a data source for displaying available requirements in the Web Site, rather than driving the possible requirements from a configuration file or a SQL database. The code below shows a query for retrieving global conditions for display, this code filters to just string based registry conditions to keep the example code simple:
////get the global conditions and add them to the global conditions drop down string condtionQuery = string.Format("SELECT * FROM SMS_GlobalCondition"); WqlQueryResultsObject queryResults = this.sccmConnection.QueryProcessor.ExecuteQuery(condtionQuery) as WqlQueryResultsObject; foreach (IResultObject condition in queryResults) { ////retrieve the lazy properties from the global condition condition.Get(); ////load into wrapper objects so we can read out the properties in more detail DcmObjectWrapper wraper = DcmObjectWrapper.WrapExistingConfigurationItem(condition) as DcmObjectWrapper; ComplexSetting conditionSettings = wraper.InnerConfigurationItem.Settings; if (conditionSettings.ChildSimpleSettings.Any()) { ////if the condition contains simplechild settings assume this is a registry setting RegistrySetting registrySetting = conditionSettings.ChildSimpleSettings[0] as RegistrySetting; if (registrySetting != null) { ScalarDataType type = registrySetting.SettingDataType as ScalarDataType; ////only add string based registry conditions if (type == ScalarDataType.String) { this.cmbConditions.Items.Add(registrySetting.Name); } } } } |
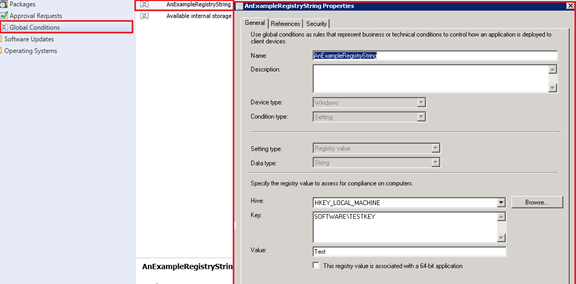
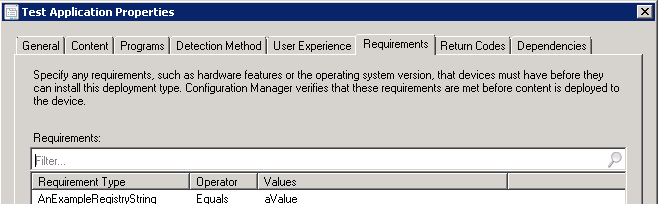
The screen shot below shows how to configure a global condition using the SCCM console so that will appear in the example code. It is possible to programmatically set up these global conditions as well if needed, the one below is called 'AnExampleRegistryString':
Select this in the example application as shown below, add a value and press the create button:

A check of the deployment type for 'Test Application' shows the following:
The code that sets up the requirement on the application by referencing the global condition requires the following namespaces and references in addition to the ones mentioned previously:
Namespace |
Microsoft.SystemsManagementServer.DesiredConfigurationManagement.Rules (C:\Program Files (x86)\Microsoft Configuration Manager\AdminConsole\bin\AdminUI.DcmObjectWrapper.dll) |
Microsoft.ConfigurationManagement.DesiredConfigurationManagement (C:\Program Files (x86)\Microsoft Configuration Manager\AdminConsole\bin\AdminUI.DcmObjectWrapper.dll) |
The key thing the example code that follows has to do is retrieve the global condition. Extract information from the global condition in order to set up a global condition reference on the application 'Test Application'. Then set the value that is to be used as a comparison to the registry setting and set the operator for the comparison with the registry setting. Then finally it adds all this information into a rule and adds it into the requirements collection of the application before saving it:
////retrieve the global condition to be associated by name WqlQueryResultsObject results = this.sccmConnection.QueryProcessor.ExecuteQuery(string.Format("SELECT * FROM SMS_GlobalCondition Where LocalizedDisplayName = '{0}'", cmbConditions.Items[cmbConditions.SelectedIndex])) as WqlQueryResultsObject; IResultObject result = null; foreach (IResultObject item in results) { result = item; break; }
////retrieve the application to add the global condition onto be name sccm.Application application = GetApplicationFromName(txtSCCMApplicationName.Text); if (result != null && application != null && application.DeploymentTypes.Any()) { ////need to get all the information for the result otherwise the call to the dcmobjectwrapper wont work result.Get(); ////Get the full id from the property of the result object string ciuniqueid = result.PropertyList["CI_UniqueID"]; ////It will contain the scope and ID which, both of which are needed seperately so split them on their seperator string[] ids = ciuniqueid.Split("/".ToCharArray()); string scope = ids[0]; string id = ids[1];
////wrap up the wmi object in a wrapper object so it is possible to read out particular seetings DcmObjectWrapper dcmwrapper = DcmObjectWrapper.WrapExistingConfigurationItem(result) as DcmObjectWrapper; ComplexSetting complexsettings = dcmwrapper.InnerConfigurationItem.Settings; string name = complexsettings.ChildSimpleSettings[0].LogicalName;
////create the operands object which will set up ther comparison information CustomCollection<ExpressionBase> operands = new CustomCollection<ExpressionBase>(); ////Add the reference information to the global setting - note the assumption it is a string (this could also be read out of the object above) GlobalSettingReference setting = new GlobalSettingReference(scope, id, ScalarDataType.String, name, ConfigurationItemSettingSourceType.CIM); setting.SettingSourceType = ConfigurationItemSettingSourceType.Registry; setting.MethodType = ConfigurationItemSettingMethodType.Value; ////add the value into the value for the registry entry, note this example just focuses on string registry settings ConstantValue value = new ConstantValue(txtRequirementValue.Text, ScalarDataType.String); operands.Add(setting); operands.Add(value); ////for this example this requirement will check to see if something is of a particular value Expression exp = new Expression(ExpressionOperator.IsEquals, operands); ////Create a rule to add to the deplyment types requirement list Microsoft.SystemsManagementServer.DesiredConfigurationManagement.Rules.Rule rule = new Microsoft.SystemsManagementServer.DesiredConfigurationManagement.Rules.Rule("Rule_" + Guid.NewGuid().ToString("B").Replace("{", string.Empty).Replace("}", string.Empty), Microsoft.SystemsManagementServer.DesiredConfigurationManagement.Rules.NoncomplianceSeverity.None, null, exp); application.DeploymentTypes[0].Requirements.Add(rule); ////save the changes back to SCCM SaveApplication(application); } |
Sending an application to a Distribution Point Group (dpg)
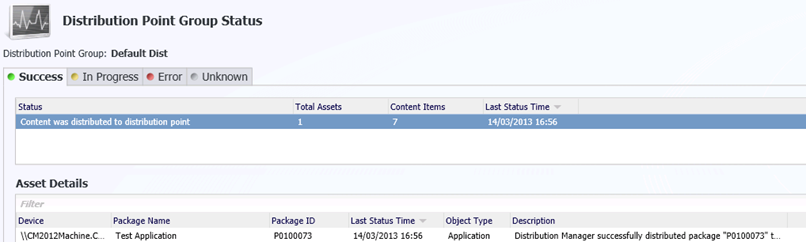
This example will show how to send the 'Test Application' created above to a dpg. It is possible to send an application to individual distribution points, which is slightly more straightforward. Originally this worked by retrieving the individual distribution points in a dpg, looping through them and sending the application to each individual distribution point. However, it was pointed out that the dpg has the advantage that their distribution points can change and sending to the individual distribution points within the group rather than the group itself might cause issues if the dpg's membership changed later. In the example 'Test Application is used again - sending to a dpg called 'Default Dist':

In the example code below first the packageids are retrieved from the application. Then a reference to the dpg. Finally a method called 'AddPackages' is executed with the previously retrieved package ids:
WqlResultObject application = GetApplicationWQLFromName(txtSCCMApplicationName.Text); if (application != null) { ////get the package ids associated with the application string packageQuery = "SELECT PackageID FROM SMS_ObjectContentInfo WHERE ObjectID='" + application.PropertyList["ModelName"] + "'"; IResultObject packages = this.sccmConnection.QueryProcessor.ExecuteQuery(packageQuery); List<string> idList = new List<string>(); if (packages != null) { foreach (IResultObject package in packages) { idList.Add(package.PropertyList["PackageID"]); } }
////return the selected distribution point group string dpgQuery = string.Format(CultureInfo.InvariantCulture, "Select * From SMS_DistributionPointGroup Where Name = '{0}'", cmbDPGNames.Items[cmbDPGNames.SelectedIndex]); WqlQueryResultsObject dpgresults = this.sccmConnection.QueryProcessor.ExecuteQuery(dpgQuery) as WqlQueryResultsObject; WqlResultObject result = null; foreach (WqlResultObject dpgresult in dpgresults) { result = dpgresult; }
if (result != null) { ////send them to the distribution point group Dictionary<string, object> methodParams = new Dictionary<string, object>(); methodParams["PackageIDs"] = idList.ToArray(); result.ExecuteMethod("AddPackages", methodParams); } } |
To confirm this has been sent as expected click on the monitoring tab. Expand the 'Distribution Status'->'Distribution Point Group Status' and click the dpg called 'Default Dist' (or whatever the dpg is called). It should then show what applications have been sent to the dpg as shown in the screen shot below:
Deploying Content
Deploying applications is something that has been documented previously, the example below is provided to complete the scenario. In the example below 'Test Application' is going to be sent to a collection called 'All Systems':

The code that follows needs to retrieve both the application and the collection. Then using these 2 items create a new application assignment to deploy the application:
////retrieve the application WqlResultObject application = GetApplicationWQLFromName(txtSCCMApplicationName.Text);
if (application != null) { ////get the collection we want to apply to the deployment string collectionQuery = string.Format(CultureInfo.InvariantCulture, "SELECT * FROM SMS_Collection Where Name = '{0}'", cmbCollection.Items[cmbCollection.SelectedIndex]); WqlQueryResultsObject collections = this.sccmConnection.QueryProcessor.ExecuteQuery(collectionQuery) as WqlQueryResultsObject; WqlResultObject result = null; foreach (WqlResultObject collection in collections) { result = collection; }
////create an assignment (deployment) using the application and collection details if (result != null) { IResultObject applicationAssignment = this.sccmConnection.CreateInstance("SMS_ApplicationAssignment"); DateTime time = DateTime.Now; //// assign the application information to the assignment applicationAssignment["ApplicationName"].StringValue = application.PropertyList["LocalizedDisplayName"]; applicationAssignment["AssignedCI_UniqueID"].StringValue = application.PropertyList["CI_UniqueID"]; applicationAssignment["AssignedCIs"].IntegerArrayValue = new int[] { int.Parse(application.PropertyList["CI_ID"]) }; applicationAssignment["AssignmentName"].StringValue = this.txtSCCMApplicationName.Text + "_Deployment"; ////use the collection name applicationAssignment["CollectionName"].StringValue = result.PropertyList["Name"]; applicationAssignment["DisableMomAlerts"].BooleanValue = true; applicationAssignment["AssignmentDescription"].StringValue = "Created by a web form application"; applicationAssignment["EnforcementDeadline"].DateTimeValue = time; applicationAssignment["NotifyUser"].BooleanValue = false; applicationAssignment["OfferFlags"].LongValue = 1; applicationAssignment["DesiredConfigType"].LongValue = 1; applicationAssignment["OverrideServiceWindows"].BooleanValue = false; applicationAssignment["RebootOutsideOfServiceWindows"].BooleanValue = false; applicationAssignment["RequireApproval"].BooleanValue = false; applicationAssignment["StartTime"].DateTimeValue = time; applicationAssignment["SuppressReboot"].LongValue = 0; ////use the collection id applicationAssignment["TargetCollectionID"].StringValue = result.PropertyList["CollectionID"]; applicationAssignment["UseGMTTimes"].BooleanValue = false; applicationAssignment["UserUIExperience"].BooleanValue = false; applicationAssignment["WoLEnabled"].BooleanValue = false; applicationAssignment["LocaleID"].LongValue = 1033; applicationAssignment.Put(); } } |
Select the application in SCCM using the console application and select the deployments tab at the bottom to verify it was successfully deployed to the selected collection:

Deleting the application
Before SCCM will allow an application to be deleted 2 things need to happen:
- All previous versions of the application need to be deleted.
- The application needs to be retired.
Following the example code to create the application will have saved after every modification. For example it will make a save after creating the application and then make a separate save after adding a requirement, there will be multiple versions of the application in SCCM.
The code below retrieves all the applications using a certain name, but does not restrict the items returned using the IsLatest property. This means all versions of 'Test Application' will be retrieved as well. As it is not possible to order the WMI query it is necessary to order the returned collection using Linq. Finally it is necessary to loop through the items in the ordered list a check if it is the latest version. If it is the latest version retire it before deleting, otherwise just delete:
////before deleting the application we need to delete any deployments we created string deploysql = string.Format(CultureInfo.InvariantCulture, "SELECT * FROM SMS_ApplicationAssignment WHERE AssignmentName='{0}'", this.txtSCCMApplicationName.Text + "_Deployment"); WqlQueryResultsObject deployments = this.sccmConnection.QueryProcessor.ExecuteQuery(deploysql) as WqlQueryResultsObject; foreach (WqlResultObject deployment in deployments) { deployment.Delete(); }
////as the app maybe have been saved a few times it is necessary to retrive all versions string query = string.Format("SELECT * FROM SMS_Application WHERE LocalizedDisplayName='{0}'", txtSCCMApplicationName.Text); WqlQueryResultsObject applications = this.sccmConnection.QueryProcessor.ExecuteQuery(query) as WqlQueryResultsObject; List<WqlResultObject> applicationList = new List<WqlResultObject>(); ////sort the list so that the older versions of the application are deleted first, trying to delete the latest version without deleteing the older ones results in an error foreach (WqlResultObject application in applications) { applicationList.Add(application); }
applicationList = applicationList.OrderBy(item => item["CIVersion"].LongValue).ToList(); foreach (WqlResultObject application in applicationList) { ////if it is the latest version then it must be retired before deletion if (application["IsLatest"].BooleanValue == true) { Dictionary<string, object> parameters = new Dictionary<string, object>(); parameters["Expired"] = true; application.ExecuteMethod("SetIsExpired", parameters); application.Get(); }
////delete the application application.Delete(); } |