Building an SCCM Self Service Portal for Deploying Applications – Part 2 (Design)
In the previous article (The Background) we looked at why a Self Service portal for developers wishing to submit their applications for deployment might be useful to a large multi-national organisation. The article also looked at why it was felt desirable to develop the submission process using a Web Site.
This article will look at how the requirements were addressed in the design and ultimately how the solution was built using SCCM application objects.
The submission process
In the UI a developer submitting an application would have to follow specific steps in order to set up their application using the Web site. This would allow the standardisation that the client wanted in all application submissions, no matter which team in the world submitted the application.
The diagram below shows the planned flow through the site. Note the decision point on whether an application submission is intended to supersede (supersedence in SCCM is the process of upgrading/replacing existing applications) an existing application or not. This workflow helps with standardisation, new applications will have a naming convention applied to them through the web UI while superseded application would load the previous information and allow the submitting developer to change the version information. The numbers against each box are explained in more detail in a numbered list following the diagram:
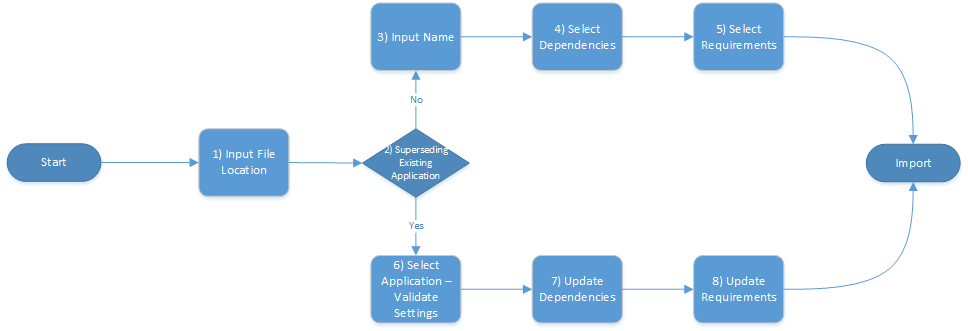
- Input File Location - The very first thing the tool needs to do is select the location of the MSI file, which is the typed into a text box as a network path: \\cm2012machine\TestPackages\ultimate_finalizer.msi. The solution uses this path to retrieve the Product Name, Software Version, Product Code and Manufacturer, which is used later in the request.
- Superseding Existing Application - At this point a developer decides whether this request is to replace an existing application or to deploy a new one. If replacing an existing application this screen needs to allow the user to search for the application they wish to supersede. If not superseding an application the developer would follow steps 3,4,5 and if the developer was superseding an application they would follow steps 6,7,8.
- Input Name - The developer inputs their name in a controlled format. For example the name of the Product + a version number
- Select Dependencies - The developer can specify any dependencies they wish to include as part of the application by using a search page and selecting them.
- Select Requirements - The developer can select any requirements that need to be checked for before allowing the application to install. For instance the presence of a registry condition.
- Select Application and Validate Settings - Unlike the scenario where a new application is selected this is the start of selecting an existing application to supersede. In the Web Site after searching and selecting the application to supersede they would just need to adjust the name to show it is a new version.
- Update dependencies - This step will allow the developer to adjust the dependencies of the application. As this is part of the logic where the developer has decided to supersede an existing application, by default showing a list of dependencies for the superseded application makes sense
- Update Requirements - As this is part of the supersedence logic by default the requirements for the superseded application would be displayed, with the developer allowed to adjust them.
The Web Site as designed above would help meet the original requirements of creating a quick, convenient way of allowing developers a way of submitting their applications into SCCM in a controlled/standardised manner.
Importing (into SCCM)
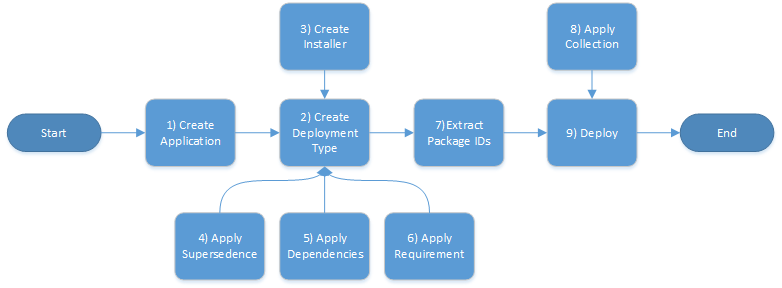
After the developer has configured the details for a new application they can then submit the request in order for the Web Site to create the application inside SCCM. In order to fully meet the original requirements not only should the Web Site create the application but it should also deploy to test machines. The sequence in which objects inside SCCM get created is as follows:
Note: All the components referenced for creating SCCM objects are found with the Admin console, which can be installed on a separate machine to SCCM and would be needed on the machine running the Web Site. These components can be found on: C:\Program Files (x86)\Microsoft Configuration Manager\AdminConsole\bin
- Create Application - Represents an application in SCCM
Type Name |
Namespace |
Application |
Microsoft.ConfigurationManagement.ApplicationManagement.Application (Microsoft.ConfigurationManagement.ApplicationManagement.dll) |
- Create Deployment Type - A deployment type allows you to specify different actions for different criteria on the same application For instance a single application might install a 32bit version of an app using one deployment type and a 64bit for another via different detection methods. More information on them can be found here. The import process will need to set up at least one deployment type so the application can be installed on a machine:
Type Name |
Namespace |
DeploymentType |
Microsoft.ConfigurationManagement.ApplicationManagement (Microsoft.ConfigurationManagement.ApplicationManagement.dll) |
- Create Installer - As the name implies this contains the installation information, which is used by the deployment type. For example this object allows the specification of the detection method (how an app detects whether it is already installed on a machine), the installation command lines, and the location of the content which will be installed on a client machine.
Type Name |
Namespace |
Installer |
Microsoft.ConfigurationManagement.ApplicationManagement (Microsoft.ConfigurationManagement.ApplicationManagement.dll) |
- Apply Supersedence - Supersedences allows the import to specify whether the application replaces older applications already in SCCM. More information on settings this up out of the box can be found here. The deployment type has a collection where you can add supersedence, this can be done using something called a DeploymentTypeRule which itself contains information on the old application:
Type Name |
Namespace |
DeploymentTypeRule |
Microsoft.SystemsManagementServer.DesiredConfigurationManagement.Rules (DcmObjectModel.dll) |
Apply Dependencies - This specifies which applications the application that is being imported has to have installed in order to work correctly, information on setting up dependencies can be found here. Like supersedence dependencies are specified on the deployment type, by using a DeploymentType rule - this time on a Dependencies collection.
Apply Requirements - Also applied to the deployment type which has a collection called Requirements these specify conditions that have to be met on client machine that have to be met before the application installs. Requirements are specified by creating a rule which contains the information on the requirement directly or via a global condition.
Type Name |
Namespace |
Rule |
Microsoft.SystemsManagementServer.DesiredConfigurationManagement.Rules (DcmObjectModel.dll) |
- Extract Package IDs - All applications are made up of packages, these need to be extracted in order for them to be distributed and deployed to user machines.
- Apply Collection - The collection needs to be retrieved to setup the deployment.
- Deploy - The final step in the process is a deployment is created for the application which leads to the application being installed on test machines.
Note on security:
A Web Site using the SCCM console API would be subject to the double hop issue. In this project the Web Site was setup to use a service account when calling the console API, rather than using impersonation. Although, if time and the environment had allowed it other options could have been considered. By using a service account objects were created in SCCM in the same security scope as that account. This meant the security scopes for application creation were tied to the one account.
The next article will provide code examples for creating the SCCM objects listed above.