Adding Image Management to your Commerce Site Part (V)
Welcome to the last post of our Image Management System, this certainly has been a long post. I hope that by now you see some value in taking some time and designing your system instead of coding first and now some code:). If you have not created any of the wire frame projects now would be a good time to look at Adding Image Management to your Commerce Site Part (IV).
I am going to include the code as part of this post see attachment at the bottom. Also we are going to walk through one of the operations instead of having the complete end to end development. I want to minimize the length of this post :). So by walking through one operation you should have a good understanding of how to fill the rest of the operations.
Operations
We need to define the operations for Image Management this is defined for us based on the Catalog UI forms and Controls we created to display images.
- Get Catalog Languages
- You don't need a method for this you can get this from the CatalogContext. You use this to populate the languages field when the user is uploading an image. Remember that when we started this post we would support only one language if you have requirements for multiple languages for images then you have a bit work a head of you.
- Get File Types
- We need to get the supported file types when the user is uploading images.
- Get Images
- This method is the main method for getting a list of all images to be displayed under the Image tab in ProductCatalogEdit.cs form.
- Search Images
- This method is invoke by the Search tab in our AssociateImages.cs form.
- Add Images
- This method is invoked when the user has uploaded images and select OK under the upload tab from AssociateImages.cs form.
- Remove Image
- Remove just one image and disassociate with the product.
- Sort Images
- You may need this method to sort the images under the Image tab in ProductCatalogEdit.cs form.
Image Management System code
We are going to add some code to get the Image management System up and running. for this sample we are only going to work with the Get Images operation. The following references needs to be added to our ImageManagementSystem project:
Microsoft.CommerceServer.Runtime
ImageModule
Microsoft.Practices.EnterpriseLibrary.Data
Microsoft.Practices.EnterpriseLibrary.Common
The following Web References needs to be added to our project:
localhost
Now lets add some methods, properties and members.
- From the solution explorer navigate to ImageManagementSystem project.
- Right click on the project and add a new folder called UML. We will use this folder to generate our Bridge Pattern.
- Right click on the UML folder you just created and add a new item Class Diagram and name it ImageManagement.cd.
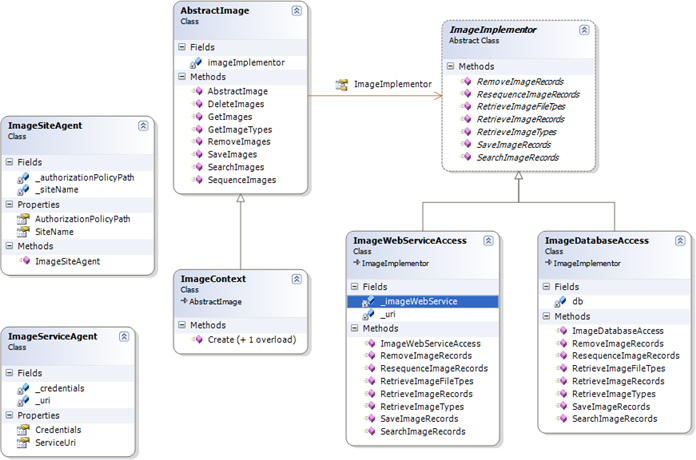
- Add the following classes under the ImageManagement.cd diagram.
- ImageSiteAgent
- Sets the Imagecontext to connect to the Product Catalog database for image tables.
- ImageServiceAgent
- Sets the Imagecontext to connect to the Catalog Image Service for image objects to be accessed through HTTP Soap.
- ImageContext
- Context for access to the Image APIs.
- AbstractImage
- Defines the abstraction's interface.
- Maintains a reference to an object of type Implementor.
- ImageImplementor
- Defines the interface for Image implementation classes.
- ImageWebServiceAccess
- Implements the ImageImplementor interface and defines its concrete implementation to access our Image Web Service.
- ImageDatabaseAccess
- Implements the ImageImplementor interface and defines its concrete implementation to access the Product Catalog Database for image objects.
- ImageSiteAgent
- Make sure that ImageImplementor is an internal abstract class.
- ImageDatabaseAccess and ImageWebServiceAccess must be internal.
- ImageSiteAgent, ImageServiceAgent, ImageContext and AbstractImage are public.
- Now we will implement the interfaces for our ImageImplementor. Remember for this sample we will only create one operation.
- From the ImageManagement.cd diagram right click on ImageImplementor class and select Add then Method. Name the new method RetrieveImageRecords.
- Right click on the RetrieveImageRecords method and select Class Details.
- From the Class Details select RetrieveImageRecords and add DataSet as the return data type.
- From the Class Details select RetrieveImageRecords and expand it. Next add a new parameter ProductID as type string.
- Now from the Toolbox select the inheritance object and create two relationship between ImageDatabaseAccess and ImageWebServiceAccess inheriting from ImageImplementor.
- Create a constructor for ImageDatabaseAccess and ImageWebServiceAccess. The ImageWebServiceAccess constructor will take ImageServiceAgent as a parameter and ImageDatabaseAccess will have ImageSiteAgent.
- Right click on ImageDatabaseAccess and select IntelliSense then select Override Members. Form the Override Members dialog select the methods you want to override in our case RetrieveImageRecords. Override the methods for ImageWebServiceAccess as well. Under the ImageDatabaseAccess class create a member db as type Database. Under ImageWebServiceAccess create two members _uri as type Uri and _imageWebServiceas type ImageWebService.
- Next from the Toolbox select Association object and create an association between AbstractImage and ImageImplementor and name the association ImageImplementor. Modify the code for ImageImplementor method so that it has only a set accessor.
- Right click AbstractImage class and add a private member imageImplementor and a method GetImages.
- GetImages method accepts a string type ProductID as parameter and returns a DataSet.
- In ImageContext class create two methods called Create. One method will accept ImageServiceAgent and the other ImageSiteAgent.
Your completed diagram should look like the image Bellow:
Your Image Management System project code should look like the following:

Now lets talk code for a while.
ImageServiceAgent and ImageSiteAgent works similar to CatalogSiteAgent and CatalogServiceAgent I have only created a few methods to show you how you can create your own Agents based on your requirements you can add\remove what you need.
In our AbstractImage class we code our method so that it calls our Implementor's method to retrieving images.
ImageWebServiceAccess
In the ImageWebServiceAccess's constructor we need to set the Image Web Proxy's URL and the credentials for accessing the Web Service.
The RetrieveImageRecords method we call our Web Service Method to get our Images (we will code the Web Service later on).
ImageDatabaseAccess
In the ImgeDatabaseAccess's constructor we need to get the Product Catalog connection string and use it to create Database object using the EnterpriseLib Data Block. Now that we have a database object we can query our Image SQL objects.
So in our RetrieveImageRecords method we call img_GetImageProduct Stored Procedure and return the results back to our caller.
Note: You may want to sign EnterpriseLibrary projects if you are going to add your assemblies into the GAC.
Image Module Code
Add the following references to your Image Module Project:
Microsoft.CommerceServer.Runtime
ImageManagementSystem
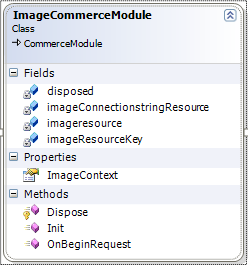
Now lets add some methods, properties and members. Create a UML folder under the Image Module Project. Under the UML folder add a class diagram object. In the Diagram designer windows add a new class and name it WebImageModule.cs.
Add the following private Fields
- disposed
- Bool type has this instance been disposed
- imageConnectionstringResource
- "product Catalog" key will be used to get the connection string
- imageresource
- Reference to a single instance (singleton) of the Image Context class
- imageResourceKey
- The key name used to store the resource in the HttpContext Items collection
Add the following methods
- Dispose
- returns void accepting bool value (true if this was called from the Dispose method, false if called from the finalizer)
- Init
- A public method returning void and accepting HttpApplication as a parameter. The current Application instance (ASP.Net maintains a pool of these for every ASP.Net application.
- OnBeginRequest
- BeginRequest event handler.
Add the following properties
- ImageContext
- A public static method. Used to set and retrieve the ImageContext.
Your class Diagram should look like the following:
Your Image Module project code should look like the following:
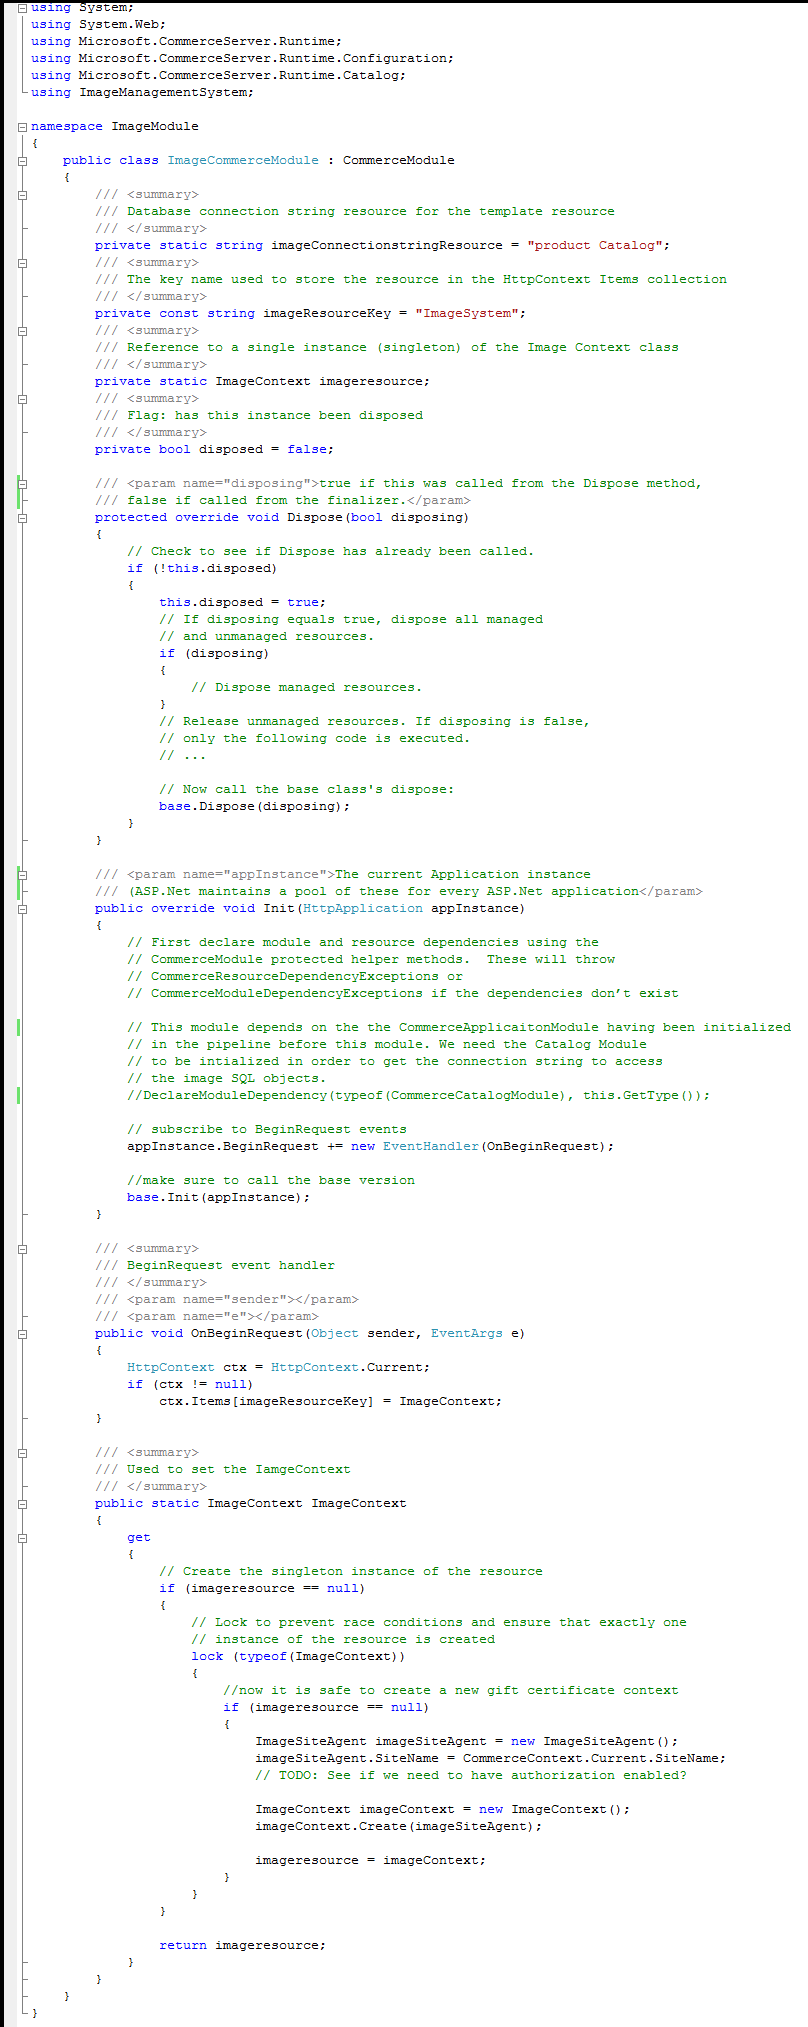
The ImageContext property code explained:
We use the Singleton pattern to get an ImageContext using site Agent. The site name is retrieved from the CommerceContext. We should have a dependency on CommerceApplicationModule, the reason for this is that we depend on this object to get our sitename.
Catalog Web Service Code
Modify the web.config so we have the CommerceApplicationModule loaded and add a configuration section to hold our site name. I have outlined the section for you to modify.
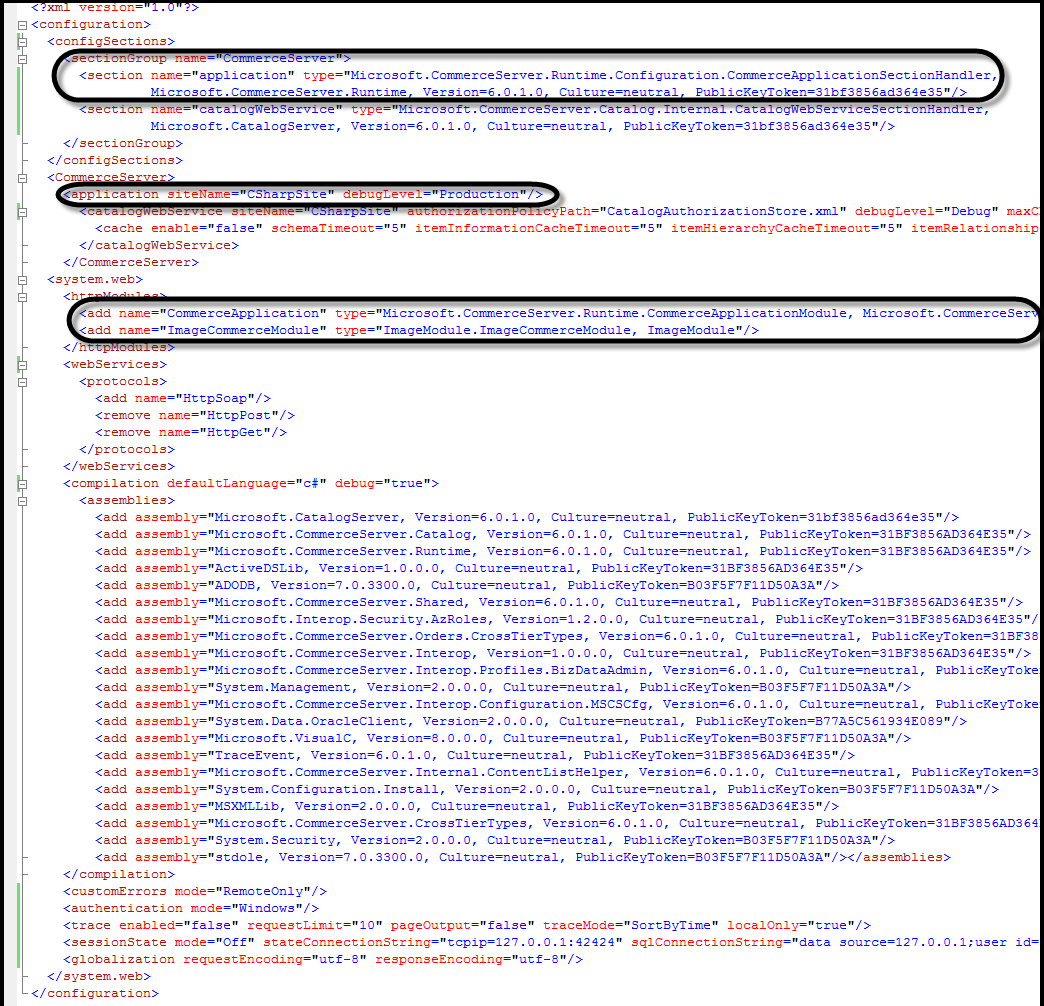
web.config walk through, You need to add a section handler under the sectiongroup tag so our CommerceAppication can read the site name. Next we add application tag for Commerce Server's siteName and finally we add two modules the CommerceApplicationModule and our ImageModule.
Add a new new amsx file and call it ImageWebService.
Add a new web method RetrieveImageRecords.
You class should look like the following:
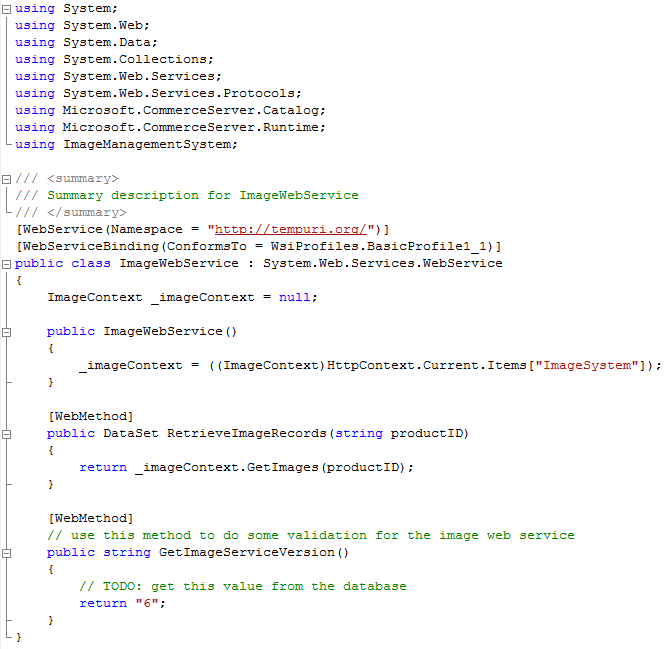
Code walk through, in the WebService constructor set the field to current ImageContext. So in each method all you have to do is call the ImageContext's methods.
Catalog Manager Code
Now lets tie it all together but first compile your solution to make sure that we have no errors.
In Catalog Manager add ImageManagementSystem reference
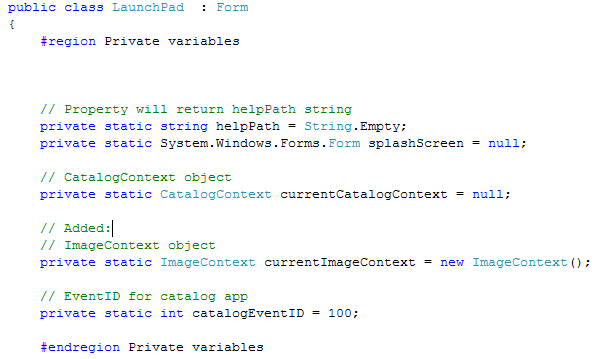
In LaunchPad.cs we need to create an ImageContext
add using ImageManagementSystem; statement
add private static ImageContext imageContext = new ImageContext();
LoadDefaultSiteUrlConnectionImageServiceAgent imageServiceAgent = new ImageServiceAgent();
imageServiceAgent.Credentials = LaunchPad.currentCatalogContext.ServiceAgent.Credentials;Uri imageUri = new Uri(LaunchPad.currentCatalogContext.ServiceAgent.ServiceUri.AbsoluteUri.Replace("CatalogWebService.asmx", "ImageWebService.asmx"));
imageServiceAgent.ServiceUri = imageUri;LaunchPad.currentImageContext.Create(imageServiceAgent);CurrentImageContextLoadDefaultSiteUrlConnection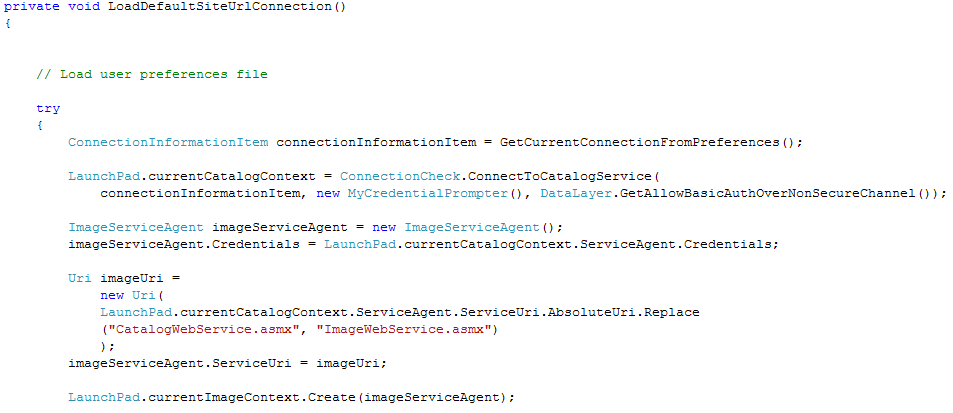
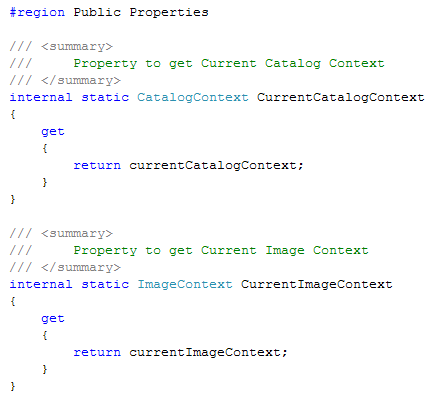
add internal property
/// <summary>
/// Property to get Current Image Context
/// </summary>
internal static ImageContext CurrentImageContext
{
get
{
return imageContext;
}
}
next add the following code under the
method right after creating the Catalog Context
So here is why we did what we did. We need the private variable currentImageContext to encapsulate the internal property
. We initialize the ImageContext under the
method using our private variable currentImageContext.
Modify the CatalogManagerObjectFactory.cs under the controller folder.
Add enum to CatalogManagerItem ViewProductImages
then add code to CatalogManagerObjectFactory class's Create methodcase CatalogManagerItem.ViewProductImages:
objectToCreate = new ProductCatalogImages();
break;We added the enum so that we our factory can create the image tab based on the code we added in the switch statement of itemToCreate.
add code to CatalogItemEdit_Load method of CatalogItemEdit under the Dialog folder.
pages.Add(CatalogManagerItem.ProductCatalogImages, "Images");Once our factory knows how to create an image tab we need to add it to our form.
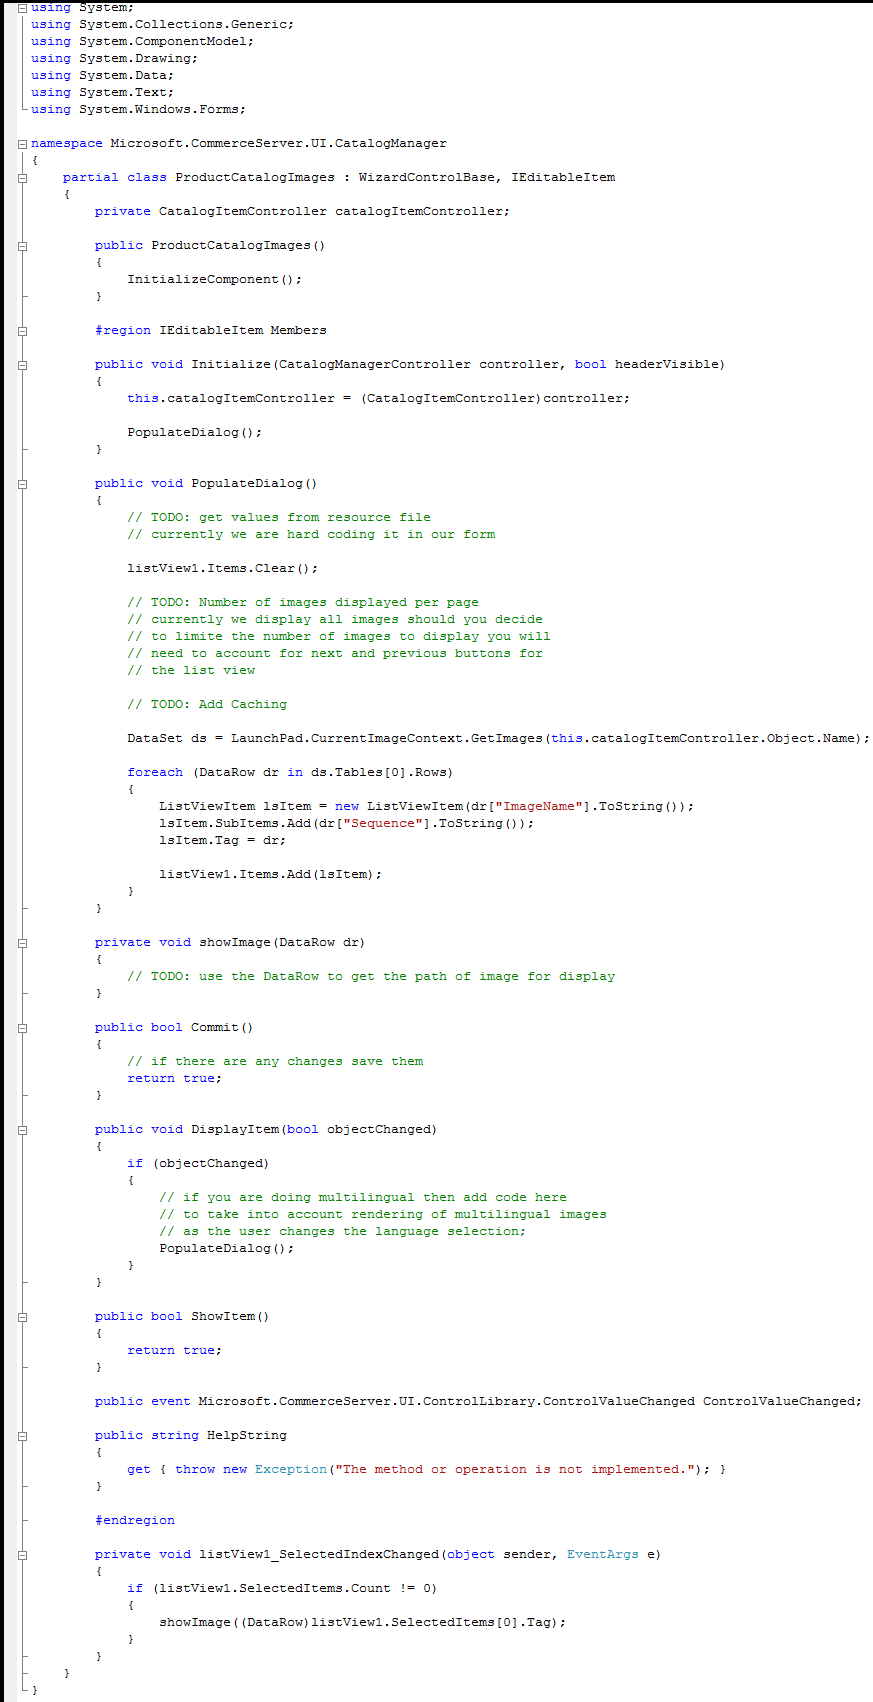
Now add code to ProductCatalogImages.cs form to display the images under the Wizards folder. Your code should look like below:
What About All The Other Methods
By now we have walked through one operation and you should be familiar enough with the projects to create the rest on your own, good luck.
How to upload Images
There are many ways to upload images to a file server you can use FtpWebRequest Class ,HttpWebRequest(using the PUT verb) and Web Service. Web Service code sample:
You would need a method to read the image from the file system
FileStream fs = new FileStream(textBox1.Text, FileMode.Open);
Byte[] image = new Byte[fs.Length];
fs.Read(image, 0, (int)fs.Length);
fs.Close();
localhost.ImageUpload ws = new localhost.ImageUpload();
ws.Credentials = System.Net.CredentialCache.DefaultCredentials;
ws.UplaodImage(image);
From the Web Service you would accept a byte array of our image and save it to the file system
[WebMethod]
public void UplaodImage(byte[] image)
{
FileStream fs = new FileStream("C:\\Inetpub\\wwwroot\\CatalogWebService\\test.jpg", FileMode.CreateNew, FileAccess.Write);
fs.Write(image, 0, image.GetLength(0));
fs.Close();
}
In order for the Web Service to write the image you will need to give the AppPool write permissions.
Caching
Catalog Manager has a caching class you can use this to cache your image DataSets.
Exception Management
Use the Enterprise Library for exception management and logging for both the Server side and client side.
Authorization Manager
Extend the Authorization Manager to have Image Management roles as described in our requirement.
- Image Reader
- Image writer
- Image Administrator
You will need to use the two methods under all the Web Service to get the authorization policy and perform your own access checks. This means that you have to create your own Authorization Context. The AzMan has an interop layer that you can use.
The Authorization Methods exposed to all Web Services (for more details see my post Extending Commerce Server 2007 Web Services):
- protected bool AuthorizationEnabled { get; }
Returns true if you have Authorization Enabled in the web.config - protected string AuthorizationPolicyPath { get; }
Returns the path to the Authorization Policy
For more information on Authorization Manager see this MSDN article Use Role-Based Security in Your Middle Tier .NET Apps with Authorization Manager.
Security
Not everyone does this but you should start thinking about it. This should be done during the design of your application to identify risks to your application. You can find out more about Threat Modeling on MSDN.
Summary
So now you have all the tools and knowledge to complete the image projects and add multiple images to a product. When you upload your image to your Web Service you can use the Commerce Staging Service to move your files to your production site.