How to move your Windows server VM running on Hyper-V to Microsoft Azure
Note: This blog post comes from Manoj Sehgal, Sr. Support Escalation Engineer from Microsoft Azure team.
The following blog post will guide you through the procedure to move your on premises Windows server VM which is running in Hyper-V or VMWare environment to Microsoft Azure, by uploading its VHD.
Steps:
1. 1. Before you upload a VM's VHD to Microsoft Azure, make sure you have the RDP enabled inside the VM.
2. 2. Login to Windows server VM and then enable Remote Desktop Feature.
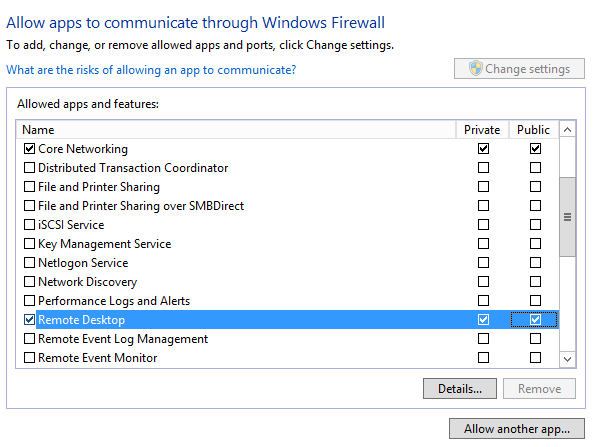
3. 3. Verify the Remote Desktop feature is enabled in Windows Firewall for both Private and Public Profile.
Note - If machine is part of domain, then make sure RDP is enabled for Domain Profile.
1. 4. Copy the VHD to Microsoft Azure using the below Azure PowerShell command.
$sourceVHD = “d:\source\osdisk.vhd”
$destinationVHD = https://test.blob.core.windows.net/vhds/baseosdisk.vhd
Add-AzureVhd -LocalFilePath $sourceVHD -Destination $destinationVHD -NumberOfUploaderThreads 5
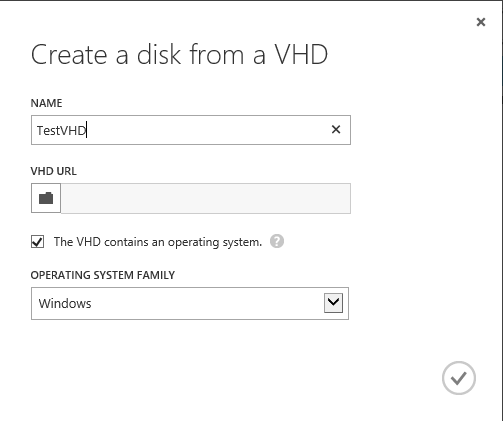
5.Once the VHD is copied to Azure Storage, create a new disk by clicking on Virtual Machine>Disks>Create
1. 6. Once the disk is created, you can now create a new VM using this disk.
2. 7. Click on New>Compute >Virtual Machine> From Gallery select My Disks and you should see the disk named “TestVHD” (which we uploaded in the previous step), continue to create a VM using this disk.
8. Once the VM is provisioned you will be able to manage this VM through RDP.
Related Article:
This article covers how to create and upload a VHD that contains the Windows Server OS Image.