Windows Azure Virtual Machines - Common Issues
This blog post is an attempt to summarize most common issues we’ve seen Windows Azure Virtual Machine users are running into.
1) Virtual machine disappeared or was deleted
When you hit the usage limit on your account, for example with a 90-day trial or the monthly access from an MSDN subscription, your storage accounts are set read-only, the VHD files for your VMs remain in the storage account as-is, but any deployed VMs are removed. This is done because deployed VMs reserve capacity even when stopped. Trial account users can enable pay-as-you-go, and for accounts with monthly limits like with an MSDN subscription, you will be able to deploy VMs from the existing VHDs when the next month’s billing cycle begins and the next month of usage is available. I’ve detailed this issue and mitigations in this blog post
Important Note: 90 day trial is associated with various quotas documented here. After a specific quota(s) are reached you will not be able to use the related services unless you enable charges on your subscription. So depending on the usage of the trial subscription, you may run out of quotas way before 90 days. For example, 90 day trial comes with 750 small compute hours. That means you can run one single small VM for 750 hours. So, if you were to create 4 extra large VMs, these VMs will run for 23+ hrs before they are deleted.
2) Underlying VHDs are not deleted by default when you delete virtual machines
VHD files for Azure VMs are blobs in your Azure storage account that are registered as disk objects and attached to a VM when a VM is created (in the case of the OS disk) or when you manually add one (in the case of data disks). Removing a VM only makes it so the disk objects are no longer attached to the a VM, but the disk objects still remain as do the physical VHD files in your storage account (which will continue to incur storage fees).
To delete virtual machines along with related resources, you need to: Delete virtual machines, Delete Disks, Delete VHDs
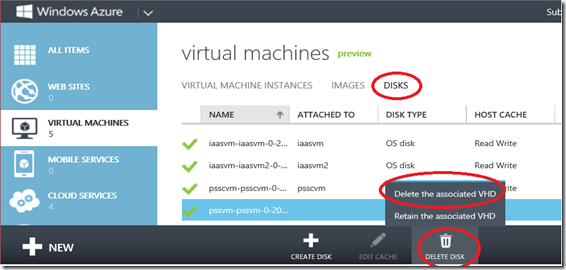
To remove disk objects and if desired, the physical VHD also, select Virtual Machines, then Disks, highlight the relevant disk and click Delete Disk which will then show you two options – Delete the associated VHD and Retain the associated VHD.
- To remove both the disk object and the physical VHD in your storage account, select Delete the associated VHD.
- If you want to keep the physical VHD file but just remove the disk object, select Retain the associated VHD.
Screenshot showing the Delete the associated VHD and Retain the associated VHD options that are displayed when clicking Delete Disk in the Disks section within Virtual Machines.
Note: Deleting VHDs may result in errors and may require you to break the lease to recover from the issue. Refer to point # 7 for more details.
3) Beware of “Temporary Disk” usage
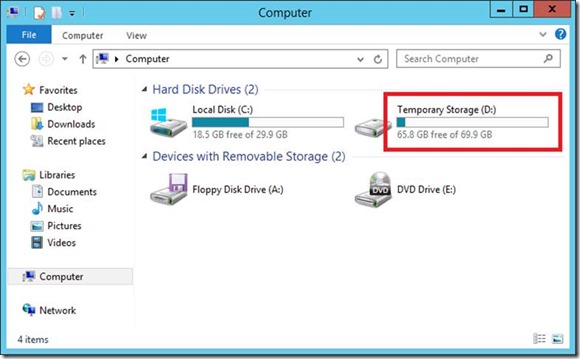
We have seen a few customers that have used the D: drive to store important data, not realizing it is temporary storage.
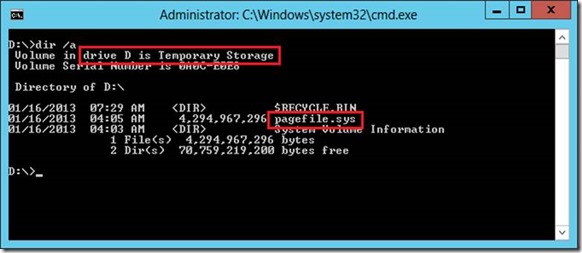
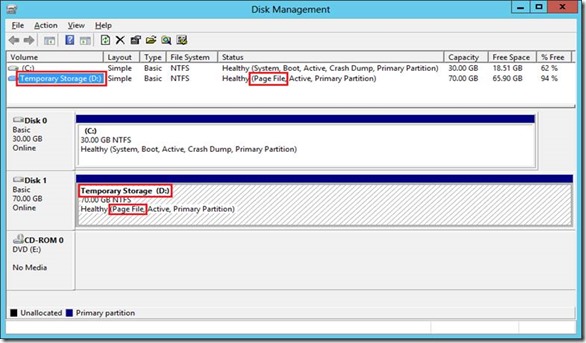
The Temporary Storage (D:) drive is not persisted to Windows Azure storage as OS disks and data disks are. Data on the D: drive will be lost when the VM is moved to a different host server, when the host is updated or if it experiences a hardware failure. The D: drive is only intended for storing temporary data (as indicated by the Temporary Storage volume label on the drive) such as temporary logs or databases. You must not use this temporary disk to store any data that you are not willing to lose. One key benefit that may motivate developers to use temporary disk is performance. I/O performance for temporary disks is higher than the IO permanence to OS disks, Data Disks. The reason is data is not persisted to Windows Azure Storage.
When using the D: drive for SQL TEMPDB, you will need to recreate the target folder when the VM is migrated to a different host, otherwise SQL may fail to start. For more information see the following article on the TechNet wiki: Change TEMPDB to Temporary Drive on Azure SQL IaaS
Screenshots showing the temporary drive Temporary Storage (D:)
4) Uploading existing VHDs
Customers can use various methods to upload VHDs to Windows Azure Storage. We recommend uploading VHDs with the Add-AzureVHD cmdlet from Azure PowerShell 0.6.9 or later, or with Csupload.exe (1.7 or later) from the Azure SDK.
Please make sure of the following when uploading a VHD for use with Azure VMs:
- A VM must be generalized to use as an image from which you will create other VMs. For Windows, you generalize with the sysprep tool. For Linux you generalize with the Windows Azure Linux Agent (waagent). Provisioning will fail if you upload a VHD as an image that has not been generalized.
- A VM must not be generalized to use as a disk to only use as a single VM (and not base other VMs from it). Provisioning will fail if you upload a VHD as a disk that has generalized.
- When using third-party storage tools for the upload make sure to upload the VHD a page blob (provisioning will fail if the VHD was uploaded as a block blob). Add-AzureVHD and Csupload will handle this for you. It is only with third-party tools that you could inadvertantly upload as a block blob instead of a page blob.
- Upload only fixed VHDs (not dynamic, and not VHDX). Windows Azure Virtual Machines do not support dynamic disks or the VHDX format.
Note: Using CSUPLOAD or Add-AzureVHD to upload VHDs automatically converts the dynamic VHDs to fixed VHDs.
- Maximum size of VHD can be up to 127 GB. While data disks can be up to 1 TB, OS disks must be 127 GB or less.
- The VM must be configured for DHCP and not assigned a static IP address. Windows Azure Virtual Machines do not support static IP addresses.
This forum post contains the common issues(&workarounds) which may occur while uploading the VHDs. Also, you can find few details on several storage tools here
5) Unable to re-use the previous DNS name of VM even though VM is deleted
Deleting a VM does not remove the associated cloud service automatically and hence you are unable to re-use the same DNS name as previous VM. To reuse the DNS name, explicitly delete the cloud service in the Cloud Services section of the management portal, using Remove-AzureService from Azure PowerShell, Azure Service Delete from the Azure CLI tool, or the Delete Hosted Service API (the terms Cloud Service and Hosted Service are synonymous in this scenario).
Confused about cloud service? Let me explain.
When you create an Azure VM, a cloud service is created automatically with the DNS name you’ve provided for the VM. Currently, new HTML5 management portal does not list this cloud service under "Cloud Services” section if it contains a single VM. You will see the cloud service there if it contains no VMs (is empty) or multiple VMs. You can check the cloud service by using the Azure PowerShell Get-AzureService cmdlet. You can group or connect up to 50 virtual machines under a single cloud service.
6) RDP connectivity issues
RDP connectivity issue is very common issue customer encounter and this could be due to several different factors ranging from simple client firewall issue to a platform issue. You should start eliminating all client side issues first.
- Investigate client-side firewall issues by pinging the TCP port for the RDP endpoint using tools such as PsPing, PortQry, Telnet, or Nmap. See if your machine allows outbound communication to the RDP endpoint (TCP port 3389 for the first VM deployed to a cloud service, a random ephemeral port between 49152-65535 for additional VMs in the same cloud service). Verify the port on the Endpoints section for the VM in the portal. Since corporate firewalls often block 3389 and/or the ephemeral range (49152-65535), try connecting to the VM from a different network – from home, a wifi hotspot, or a mobile broadband connection.
- Drew McDaniel has a forum sticky post with common issue like cache credentials, endpoint related issues.
- If you none of the above resolved connectivity issue, you can quickly try restarting/resizing the VMs to see if the problem goes away. If the problem persists you can reach out to the support forum.
7) VM activations
While activating the OS on windows azure virtual machines, you may run into an error message stating the “A problem occurred when Windows tried to activate” Error Code 0xC004F074 with below details
Code:
0xC004F074
Description:
"The software licensing service reported that the computer could not be activated. No key management service could be contacted"
We are aware of this issue and working towards resolving this issue. Please note that activation status does not impact the services running on the server. Not activating will generate persistent notifications reminding you to activate the server. Services and remote administration are not affected.
Refer to forum post for more details.


