(Part 2) - Hands on with Biztalk RFID and the Alien 9650
Building on the previous post, the next thing we'll do is use Biztalk RFID to connect to the Alien 9650. This post assumes that you've gone through the steps in part 1.
Connectivity and configuration with Biztalk RFID
Now the part we've all been waiting for - firing up Biztalk RFID, and using it in conjunction with the Alien reader to do cool stuff. This process (at least the first time) involves obtaining and installing the provider, configuring the appropriate firewall access on the host machine, and then adding the reader itself.
Obtaining and Installing the Provider
The provider is available from the partner site (another reason I recommend getting a partner login as soon as possible :). In the partner site, under Technical Information -> Software, look for the Microsoft BizTalk RFID Provider for ALR-9900, 9800, 8800, 9650 link. This leads to a zip package containing an installer. Download the package and execute the installer. This will install the provider DLL under Program Files at \Alien RFID\Alien RFID Provider.
Note: the installer does not register the provider, so we'll need to take care of that in the next step.
To register the provider (remember that multiple versions of the same provider can be simultaneously registered - great feature :):
- Start the RFID Manager, and click on the Device Providers node. We'll go ahead and add the Alien which I downloaded from the partner site in the last step.
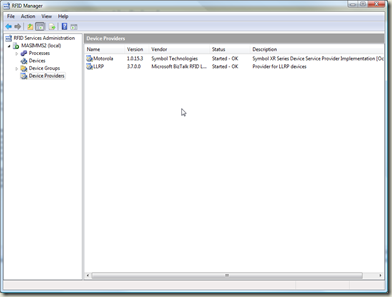
- Right click on Device Providers, and click on New Provider.
- From the Add Provider dialog window type in Alien as the name.
- Click on Browse, and navigate to the Alien RFID Provider directory (under \Program Files\Alien RFID) and select the AlienRfidProvider.dll file.
- Click Register to load the provider into Biztalk RFID.
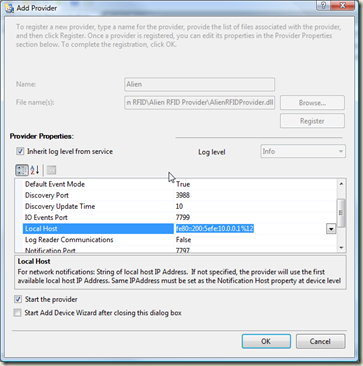
As of the time I wrote this article, the Alien provider has a minor bug when running on Windows Vista with IPv6 enabled related to the Local Host property. This property is used by the provider to auto-configure the device's notification host. The notification host is the destination to which the reader sends asynchronous events, such as "I saw tags", or "my input port changed". If the provider does not have the correct value for this asynchronous events will never be received - i.e. RFID Processes in Biztalk RFID will never receive tags.
To fix the problem get rid of the IPv6 "fluff" around the local address. In the example the default host string is fe80::200:5efe:10.0.0.1%12. Change that to 10.0.0.1 (the IPv4 address buried in the middle). A quick review of the other configuration properties (which don't need to be changed for default scenarios, but good to be familiar with none the less) is listed in the next section.
- Ensure the Start the provider box is checked, then click OK to start the provider.
Snapshot of Vendor Properties
| Property Name | Vendor Description | Default Value | Comment |
| Discovery Port | Decimal network port number used for discovery. Same port must be set as the HeartbeatPort vendor property at device evel | 3988 | This port needs to be open on the local machine firewall for discovery to work. |
| Local Host | For network notifications: String of local host IP Address. If not specified, the provider will use the first available local host IP Address. Same IPAddress must be set as the Notification Host property at device level. | Varies | As noted above, may need to remove the IPv6 formatting from the local host address. |
| Notification Port | Decimal network port number used for notifications. Should be different from the IO Events Port. Same port must be set as the Notification Port property at device level | 7797 | This port needs to be open on the local machine firewall for asynchronous notifications to be received. |
| IO Events Port | Decimal network port number used for IO events. Should be different from the Notification Port. Same port must be set as the IO Stream Port property at device level. | 7799 | This port needs to be open on the local machine firewall for I/O events to be received. |
| Tag Stream Port | Decimal network port number used for Tag Streaming. Should be different from the Notification and IO Events Ports. Same port must be set as the TagStreamPort property at device level. | 7798 | This port needs to be open on the local machine for tag streaming mode to work. |
| Discovery Update Time | Time interval in seconds used for updating readers discovered over network. | 10 | No need to modify this value for most scenarios. |
| Log Reader Communications | If TRUE provider will log excessive reader communications to the 'Program Files\Alien RFID\AlienAPI*.log\' files for diagnostic purposes when investigating and fixing issues. They should be deleted manually to free disk space. | False | Only set this value to true when performing diagnostics. |
| Use Tag Streaming | If TRUE provider will set the Alien Custom property TagStreamMode = ON on all connected readers for UNCONDITIONALLY reporting every single tag found. As a result the provider will send not only 'TagListEvents' caused by Event Mode but also separate 'TagReadEvents' for every single tag read (sometimes far too many.) Set this property to FALSE if you're going to use 'TagListEvents' only and/or reader's notifications with specifically configured Alien CUSTOM properties. | True | Depends on the type and shape of data that your application or scenario requires. Understand how the Alien reader's internal tag list and configuration properties work before changing this to FALSE. |
| Default Event Mode | If TRUE, provider will automatically set the Event Mode = true whenever establishing connection to device; otherwise client application will be responsible for configuring the Event Mode as a separate operation after device connection has been already established. | True | Unless you're writing a manual / synchronous application that sets this property manually, leave this value as TRUE. |
| Auto-Save individual properties | If TRUE provider will automatically save to reader's flash memory all individual properties. Otherwise, call to the Save command is required to make ALL properties persistent after setting them with the SetProperty command. | False | If using the Biztalk RFID interface to perform "permanent" configuration changes, set this value to TRUE. Otherwise changes will be discarded when the reader restarts. |
Configuring Firewall Ports
As noted in the previous section certain inbound ports need to be opened in the firewall to enable asynchronous notification and discovery functionality. The default ports 3988, 7797, 7798, and 7799 may be opened by executing the commands below.
For Windows XP / Server 2003:
netsh firewall add portopening TCP 3988 “Alien Discovery”
netsh firewall add portopening TCP 7797 “Alien Notification”
netsh firewall add portopening TCP 7798 “Alien IO”
netsh firewall add portopening TCP 7799 “Alien Streaming”
For Windows Vista / Server 2008:
netsh advfirewall firewall add rule name=”AlienDiscovery” dir=in action=allow protocol=TCP localport=3988
netsh advfirewall firewall add rule name=”AlienNotification” dir=in action=allow protocol=TCP localport=7797
netsh advfirewall firewall add rule name=”AlienIO” dir=in action=allow protocol=TCP localport=7798
netsh advfirewall firewall add rule name=”AlienStreaming” dir=in action=allow protocol=TCP localport=7799
Adding the Reader
Seems like a lot of work just to connect to a reader and a get a few tags, doesn't it? I went into a lot more detail for the prerequisites than was perhaps strictly necessary - however, knowing why certain things are done is crucial when you have to perform troubleshooting. Not to mention the number of times that diagnostics have ended with staring at the end of an unplugged cable has taught me to start with the basics (power, connectivity, firmware, tags) before building up. To add the reader:
- From the RFID Manager, right click the Devices node, and click on New Device.
- From the Add Device Wizard (Introduction) dialog, ensure that the Add single device radio button is selected, and click Next.
- From the Add Device Wizard (Provider) dialog, click on Alien in the list of available providers and click Next.
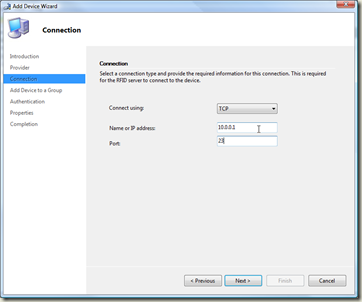
- From the Add Device Wizard (Connection) dialog, type the IP address of the device into the Name or IP address textbox, and type in 23 as the value for the Port. Note that the Alien provider uses port 23 for connecting, not the web interface on port 80. Click Next.
- From the Add Device Wizard (Add Device to a Group) dialog, select any device group (or the root device group) and click Next.
- From the Add Device Wizard (Authentication) dialog, type in alien for the username, and password for the password (the default factory values). Click Next to start connecting to the device. This will take several seconds, so don't get too impatient.
If you cannot connect to the device, and upon clicking View Error you receive the Error 24 Invalid Format error your notification host value is set incorrectly at a provider level. Go back to the provider properties and fix that value.
- From the Add Device Wizard (Properties) dialog, click Next to advance the final step without modifying any of the base device description properties, unless of course you really want to.
- From the Add Device Wizard (Completion) dialog, click Finish to finish the process of adding the device.
Checking for Tag Reads
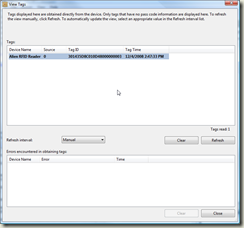
- Place a tag in the read field of the antenna (in this case, somewhere close to the built-in antenna).
- From the RFID Manager, click the Devices node.
- Right click on the new device you have just added, and click View Tags.
Almost there! Now that we are successfully communicating with the Alien reader and receiving tag notifications, we need to bind the device into an RFID process to persist tag events into a database, and then build a report.
Building a BizTalk RFID process and capturing tag reads
Now for the fun part - capturing the stream of information from the Alien reader, and making it consumable by a user. In this section, I'll create a basic RFID process using the SqlSink event handler, extend the table schema to associate tags with assets and generate a basic ASP.NET report from that database table.
Creating a Biztalk RFID Process
The first step in capturing the information from the RFID reader will be to define an RFID process, bind in that reader, and use an event handler to route information to a SQL database.
- From the RFID Manager, right click the Processes node, and click on New Process.
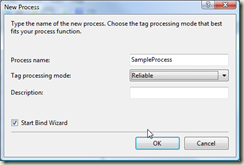
- From the New Process Dialog
- Type in SampleProcess as the Process name.
- Select Reliable as the Tag processing mode.
- Leave the description blank.
- Ensure the Start Bind Wizard box is checked.
- Click OK.
- From the Bind Wizard (Welcome to the Bind Wizard) dialog, click Next.
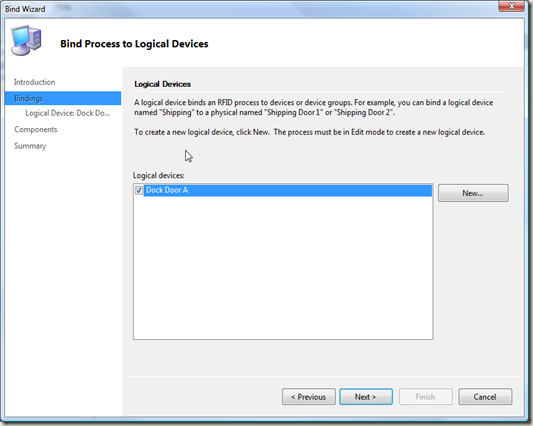
- From the Bind Wizard (Bind Process to Logical Devices) dialog, we'll create a logical device. Logical devices are used to create associations between event sources (like devices and antenna) and logical or physical constructs (like portals or doorways). In this case, our system will pretend that the ALR-9650 is located at a loading dock, door A.
- Click New.
- From the Logical Device Name dialog, type in Dock Door A and click OK.
- Back in the Bind Wizard (Bind Process to Logical Devices) dialog, click on the checkbox for Dock Door A. If you don't click on the checkbox, the option to bind physical devices to the logical device will not be available.
-
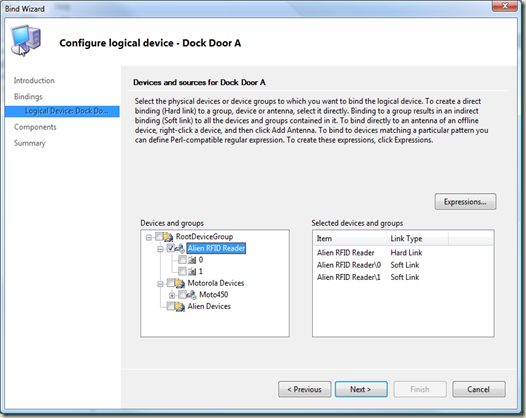
- In the Bind Wizard (Configure logical device - Dock Door A) dialog, expand the Alien RFID Reader entry to expose the list of sources (2, for the two antenna supported by the ALR-9650). Click on the checkbox next to the Alien RFID Reader to bind all events from the device to this logical device. Note that this also creates "soft links" to both antenna of the reader.
- Click Next.
- From the Bind Wizard (Configure Components) dialog, click New Component.
- Click on the SqlServerSink component, then click Add.
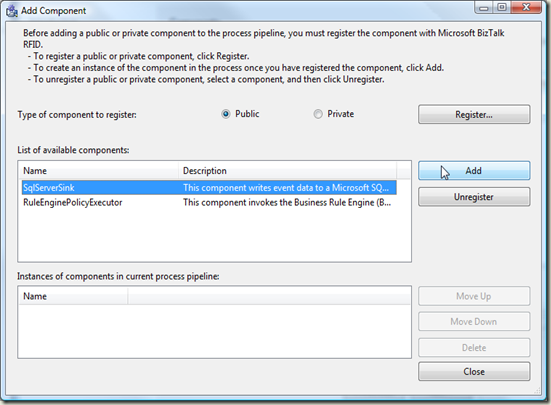
- Type in SqlSink as the Instance name and click OK.
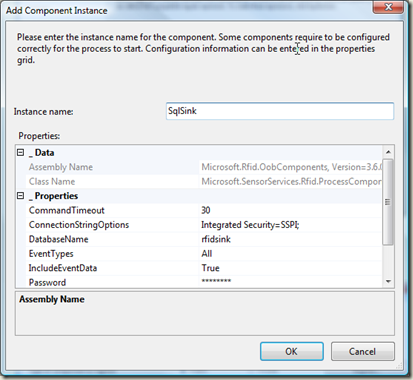
- Click Close to finish adding components.
- Click Next.
- Ensure that the Start the process when I click Finish box is checked, then click Finish.
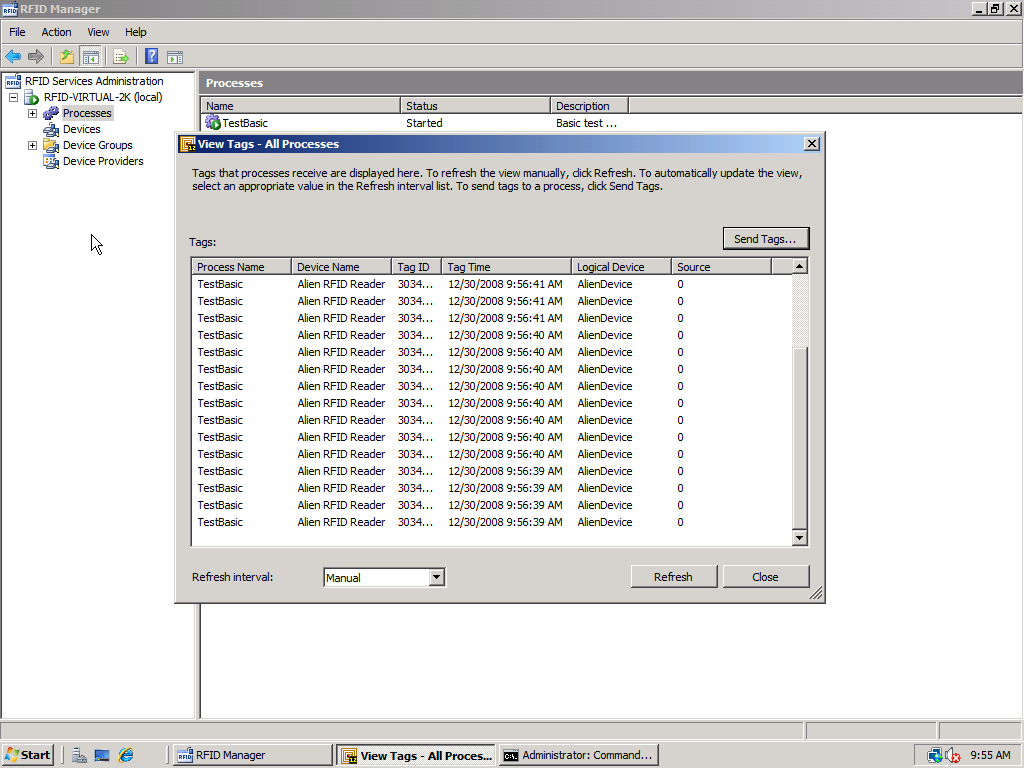
- From the RFID Manager, you should be able to see the process running.
- Right click on the process name and click View Tags. By default the page is on a Manual refresh, so click the Refresh button. If you don't see any tags in the window, it's time to troubleshoot! Happily, troubleshooting is covered in the next installment of this series.
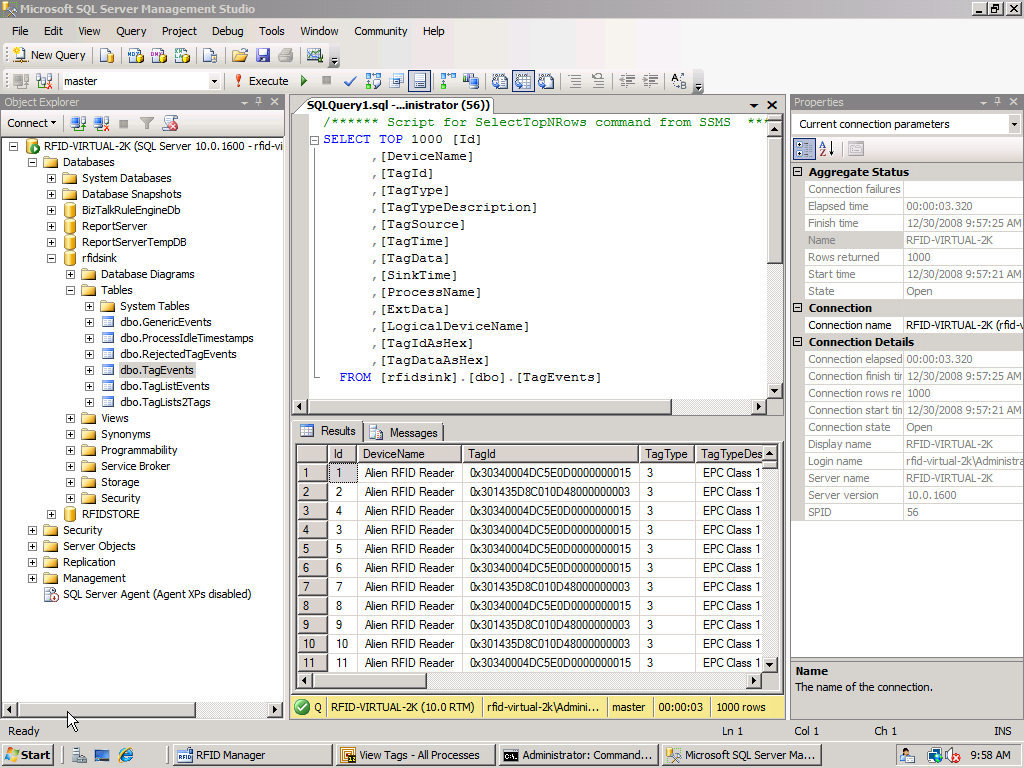
- Now that we've confirmed tags can be read in the process, the last step before building out a reporting interface will to confirm that the event handler (the SqlSink) is processing the tags correctly. Start up the SQL Server Management Studio, and connect to the RFIDSINK database.
- From the list of tables in the RFIDSINK database, dump the contents of the dbo.TagEvents table. The tag reads should now be visible in the database.
Summary
In this posting, we walked through using BizTalk RFID to communicate with the ALR-9650 and flow tag information into a database. In the next posting we'll cover troubleshooting the most common problems and build out a basic reporting interface using ASP.NET.