Inventorying SQL Servers with the Microsoft Assessment and Planning Toolkit (MAP)
How many SQL Servers do you have in your environment? Do you know?
Do you really know? I recently had a customer ask me if there is
a way to programmatically find SQL Servers in their environment - even the ones
they don’t know about.
This customer had a catastrophic failure of a SQL server
installed by a department that IT didn’t know existed. There were no backups; no one was doing
maintenance. The database was corrupt
and the data was gone. The department
was very upset and there was nothing IT could do to help.
IT wanted to know if it was possible to find any other SQL
servers they didn’t know about. The
Microsoft Assessment and Planning Toolkit (MAP tool) provided them with the
information they sought.
The MAP tool will provide a wealth of information about each
and every instance of SQL you have running in your environment even if you are
not aware that they exist. The MAP tool
provides things you would expect such a tool to provide as Server Name,
Instance Name, SQL Version, SQL Edition, any SQL Service Packs installed. The MAP tool will also provide things you may
not expect such as Host OS version, edition and service pack, as well as
hardware architecture running the OS including CPU make and model, number of
CPUs, the number of cores. The MAP tool will also tell you if the machine is
virtual or physical.
How does it work
The MAP tool will systematically look for SQL Servers on
your network and report back what it finds.
It works by using Windows Management Interface (WMI) and remote registry
reads to capture information about SQL in your environment. WMI and the ability to remotely read the
registry is part of the Windows OS so nothing needs to be installed on the
target machine to determine if SQL is present and if it is, information about
SQL.
The MAP tool is very light weight in terms of resources
consumed on the target and host machine.
I have ran the MAP tool at a customer site with over 80,000 machines on
their network. We instructed the tool to
look for SQL on every single one of those machines and there was no negative
impact to any machines or the network.
The tool can be run from a desktop or a small virtual
machine and the tool will throttle itself up or down based on resources
available on the machine running the tool.
I have had many customers install the tool on a DBA or System
Administrators desktop to perform an inventory while that person continued their
usual work on the same machine running the MAP tool.
Once the MAP tool finds a SQL Server and queries WMI and the
registry of that machine for details about the SQL server, it will store that
information in a SQL database on the machine you are using to run the MAP
tool. The current version of the MAP
tool, version 7.0, uses a very light weight version of SQL 2012 called
LocalDB. Previous versions of the MAP
tool used SQL Express which consumed more local resources than LocalDB.
MAP 7.0 also introduces a light weight SQL inventory that
will provide all the information I mentioned above. Previous versions of the tool will also
report back information about individual databases. That is still available but if all you want
to do is inventory SQL in your environment, the light weight inventory will run
about 90% faster than the SQL with Database Details inventory.
Warning: Prior to running the MAP tool, inform your
Network and Security teams about what you are planning to do. Since the tool will systematically query
every machine it finds, it can appear to be malicious to these teams.
I’ve been involved in running this tool in dozens of
customers and this is a key step. The
customers who did let the Network and Security teams know met with little or no
resistance and the customers that did not were usually shut down by those teams
in the process of running the tool and in one case were not allowed to run it
again.
Getting Started
To begin, you will need to download the tool which can be
found here: https://technet.microsoft.com/en-us/library/bb977556.aspx. The tool will install SQL 2012 localDB first
and then itself. Once the tool is
installed you can perform an initial inventory.
The first time you run the tool, you will be asked to
provide a database name. It is important
to note that any additional inventories done with that database will skip all
machines the tool has previously found.
If you want a fresh inventory, simply create another database from
within the MAP tool. The tool will let
you switch between multiple databases.
Once you have the tool installed and the database selected,
you should see the following screen:
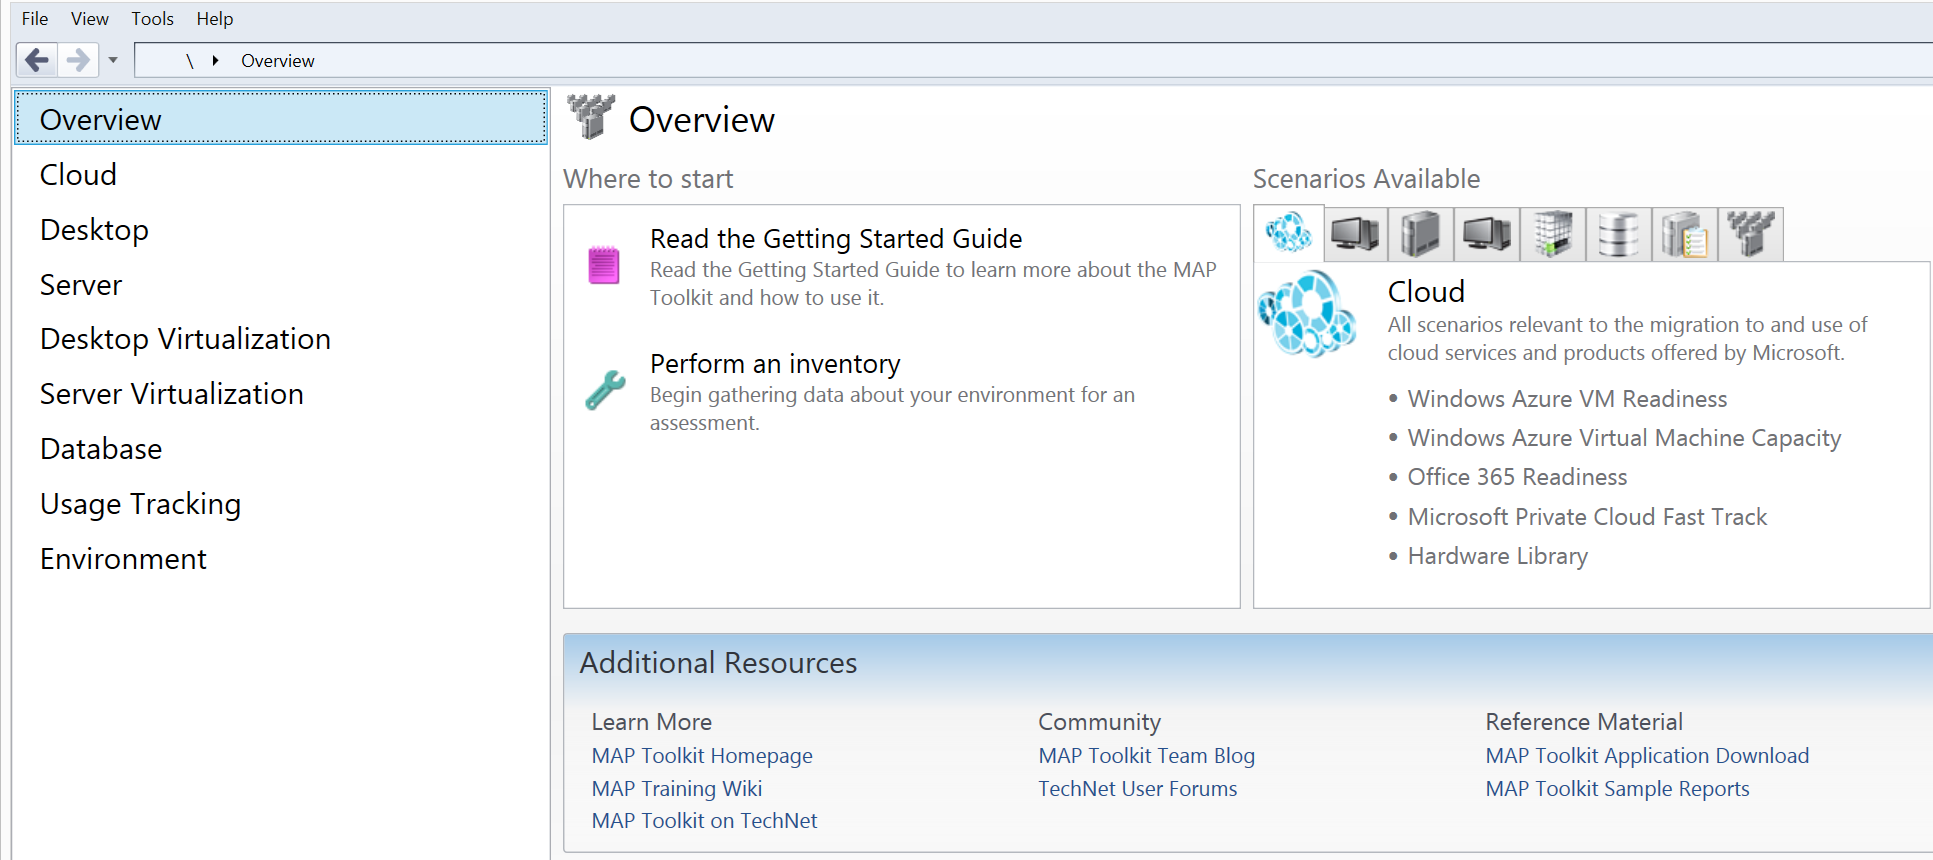
You have probably noticed that there are a lot more than
just database options in this tool. The
Solutions Accelerator team at Microsoft has provided us with a very
comprehensive tool that will do significantly more than just SQL discovery. Take a look at some of the other things this
tool can do - some of them may be useful to you or others in your organization
The screen is laid out into two main sections. To the left is a list of items the tool can do
and it provides you a way to move from one area of the tool to another. The right section is unique to the selection
made on the left side of the screen.
To start, we want to select Perform and inventory. This option has a wrench icon and is located
in the Where to start section of the Overview section.
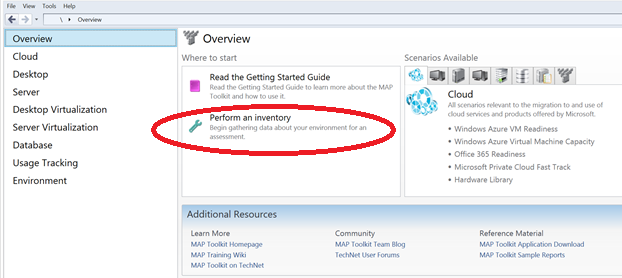
Performing an Inventory
After clicking on Perform an inventory. You will see the following screen:

This screen will allow you to select what you want to
inventory, how you will discover the machines and what credentials the tool
will use for inventory. Notice on the
left side of the screen the following items are listed:
- Inventory Services
Discovery Methods
- Active Directory Credentials
- Active Directory Options
- All Computers Credentials
- Credential Order
- Summary
Each of these has its own screen that requires input. I will walk you through those screens now and
describe your options.
Inventory Services
If you scroll the slider down, you will see all of the
possible things you can inventory. There
are two boxes for SQL Server. SQL Server
without database details has been recently added and is a much faster, more
efficient inventory if you don’t want details about your databases. If you do
want details about your databases, then select the SQL Server Database Details
option. Database details will require
SQL credentials as well as AD credentials.
Discovery Methods
You should now see the screen shown in figure 3. Using Active Directory Domain Services is
pre-selected. The AD option is the most
comprehensive selection you can make.
This is the option I recommend so this article will cover that option in
detail. The following are brief
descriptions of the other options.
Use Windows
networking protocols – Uses Windows protocols to find computers not
connected to a domain. The protocols
rely on multi-cast technologies so you will be limited to your VLAN or subnet
if you select this option.
Use System Center
Configuration Manager – Will query System Center Configuration Manager for
a list of servers and will inventory just those servers.
Scan an IP address
range – Allows you to enter in multiple IP address ranges and will try
every IP address in each range to discover SQL.
Manually enter
computer names and credentials – This is exactly what it says it is. You manually enter computer names along with
credentials.
Import computer names
from a file – This option allows you to enter a list of computer names into
a flat file delimited by a <CR><LF>. (One name per line.)
Ensure that the Use Active Directory Domain Servers is
selected and click next. You will see a
screen similar to the screen in figure 4.
This screen is asking for credentials.
Active Directory Credentials
Ensure that the Use Active Directory Domain Servers is
selected and click next. You will see a
screen similar to the screen in figure 4.
This screen is asking for credentials.
A quick note about credentials: This tool will use credentials to enumerate
objects in AD and to query WMI - the latter typically requires local admin on
the machine being queried. The easiest
way to get local admin on all the machines is to use credentials that have
domain administrator rights. As I
mentioned previously, I have assisted many customers with running this tool and
if the person running the tool does not have the necessary rights, they are
obtained in one of two ways:
1.
The person running the tool requests and is
granted the rights. As you can imagine,
this rarely happens.
2.
The person running the tool asks someone with
those rights to enter their credentials in the tool. This person is typically a system
administrator. The tool does not store
credentials and if an inventory is stopped for any reason, those credentials
must be entered again to do another inventory.
Entering credentials to enumerate AD objects usually does
not require administrator rights. Enter
your credentials in the screen shown in figure 4 and press enter.
Next, you will see the screen shown in figure 5. In my case, I have a single domain and that
domain is shown. If you have multiple
domains in a forest, you will see all domains in the forest. In either case by default, the option to find
all computers in all domains, containers and organization units is
selected. You can selectively choose
which parts of AD are used to find computers by selecting the second option as
shown in figure 5.
All Computers Credentials
The next screen that you will see is shown in figure 6. This is where you will enter your
administrator credentials. At the bottom
of the screen, you will notice the tool is providing you with a save and a save
and new option. You can enter multiple
credentials. This is useful if you are
inventorying multiple domains with different credentials. You will also have the ability to specify the
order in which the credentials will be used.
If you select the SQL Server Database Details, you will be
prompted for SQL credentials as well.
Credential Order
If you entered more than one set of credentials, this
section allows you to specify the order that those credentials are tried. The credentials are tried in the order you
specify here so if you are inventorying two domains, one large and one small,
put the credentials for the large domain first.
Once a connection is made to the machine being inventoried, additional
credentials are not used for that machine.
Summery
This is a summary page telling you everything the tool is
about to do. To begin your inventory, click
Finish and you will see a status screen. When the inventory is complete, the status
will change from running to complete and the status icon will change from
orange with three dots to green with a checkmark.
The question that is probably on your mind at this point is
“How long will this take?” The answer is it depends on a lot of things - most
certainly the number of machines the tool is going to inventory. Depending on the type of inventory you are
doing, a Database Details take longer than just a SQL inventory and how you are
inventorying. A scan using AD will
enumerate all the machine accounts in the OU’s you selected and will try to
connect to them all. If you entered
multiple IP address ranges, the tool will try to connect to each IP address in
that range even if there isn’t a machine using that IP address. Slow links in your network can also affect
the amount of time it will take to complete.
Viewing the Inventory Results
Expand the Database section under Inventory and Assessment
on the left hand side of the screen.

Click on the Microsoft SQL Server Discovery option (first
one in the list) and you will see a summary of your inventory which will look
similar to the screen shot above. This
summery is very interesting but there isn’t much you can do with it.
Generating Reports
When you clicked on Microsoft SQL Server Discovery your
screen changed to the Summary Results page in the center of your screen and
there is now an Actions section on the right hand side of the screen.
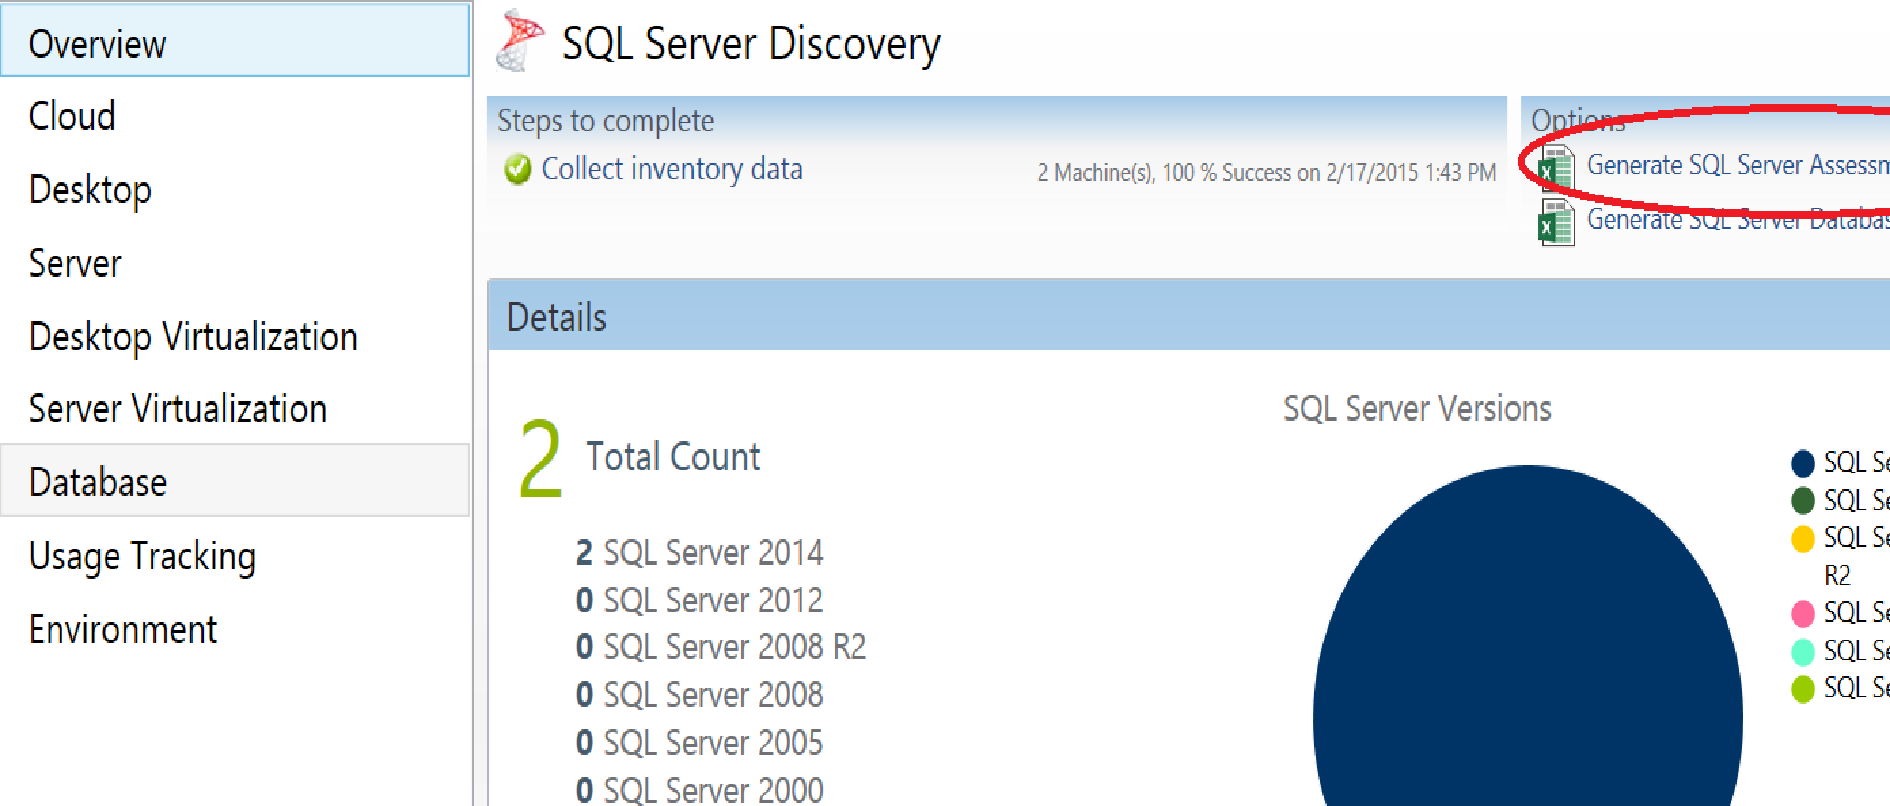
At the top of that section is a link that says Generate SQL
Server Assessment. Click that link and
the tool will generate an Excel spreadsheets.
The tool will generate a report called SQL Server Assessment. The report will be located in your My Documents Folder in a Folder in a Folder called MAP
The reports will reside in a sub-folder that is the same name as your database.
SQL Server Assessment
The SQL Server Assessment report provides the most useful
information for SQL Inventory.
The Database instance tab will have the following columns:
Computer Name, SQLServer Instance Name, SQL Server Product Name, SQL Server
Version, SQL Server Service Pack, SQL Server Edition, Clustered? SQL Server
Cluster Network Name, SQL Service State, SQL Service Start Mode, Language, SQL
Server Sub-Directory, Current Operating System, Operating System Service Pack
Level, Operating System Architecture Type, Number of Processors, Number of
Total Cores, Number of Logical Processors, CPU, System Memory, Logical Disk
Drive Name, Logical Disk Size (GB), Logical Disk Free Space (GB),
Recommendation, Machine Type, Number of Host Processors, WMI Status.
The report also contains a Summery Tab. The Summary Tab list a count of instance by
Component name: Database Services, Integration Services, Analysis Services and
Reporting Services.